If you're going soon gala event, and the gift wrapping service is far away, try a beautiful box for DIY gifts made of cardboard and paper, with or without a lid. It's not that difficult, you just need to find ideas, master classes on creating such crafts, and stock up necessary materials, tools and strictly follow the step-by-step instructions. Gifts and premium packaging collected with your own hands are always unique and priceless; the recipient will certainly appreciate them.
How to make a gift box with your own hands
A homemade do-it-yourself gift box will help you make a present truly original and unforgettable. It’s not difficult to make it, you just need to find a master class on creating suitable packaging or print a ready-made template. Next, all that remains is to transfer the drawing onto colored cardboard or craft paper, cut it out, fold it, and glue it together. If desired, a gift box already assembled with your own hands can be decorated with ribbons, rhinestones, bows, buttons or braid.
Materials for production
In order to make a gift box with your own hands, you will need good quality materials that will not tear or fall apart along the way and during gifting. Ordinary cardboard is unlikely to work here, it is not so dense, and its color is not festive. It is better to use a special one, and you can decorate gift wrapping using beautiful paper intended for handicrafts. There are stores that sell a variety of craft materials. There you can purchase a whole set of necessary accessories or buy something specific.
Box diagrams
How to make a gift box from a ready-made one
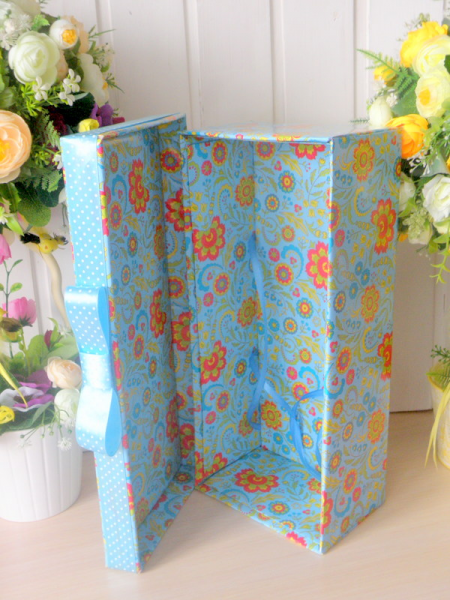
Even with an ordinary gift box made by yourself, you can surprise the recipient of the gift and everyone around you. If your imagination allows you, then it’s quite possible to create an original masterpiece that you won’t find in stores. One of the most simple ways– make gift boxes for gifts with your own hands from ready-made ones. For this purpose, the usual containers in which you, for example, bought shoes are suitable; find the appropriate size. Next, you need to decide on the theme of the holiday in order to choose desired color, design drawing and decor.
The prepared box must be covered with thick paper (fabric) using glue and tape. It is best to do this inside too, use the material different colors, so the packaging will look more beautiful and impressive. We decorate the lid of the box in the same way, they should complement each other. Decorate the finished packaging as you wish, in accordance with the holiday. To do this, use bows, hearts, fruits, funny figures, fabrics of various textures, paint, stencils, etc. Creative people can make figures themselves, for example, from polymer clay.
How to cover a box with gift paper
To do this, you will need a box, paper (colored, gift, self-adhesive, wallpaper, napkins) and tools (glue, scissors, ruler, brush, pencil). Next, proceed in the following sequence:
- Unfold the selected material and place the box in the center.
- Measure out the required amount of paper; there should be enough for the bottom of the base, the sides and a little for the bend. You can do this using a ruler.
- Cut off the excess part and cut four strips from it for the corner sections.
- Glue these strips, then coat the outer parts of the box with glue and cover with paper. Do the same on the inside.
- Cover the lid in the same way. Let dry and decorate further as you wish.
DIY gift box - master class
Making ordinary gift boxes with your own hands is not difficult, you just need a little patience, time, tools, and materials. If you have already stocked up on all this, follow these instructions:
- Draw a square in the middle of cardboard or thick paper - this is the bottom of the future product.
- Draw two lines perpendicularly from it in four directions. These will be the side parts of the box; determine the length of the lines based on the desired depth of gift packaging.
- On each side of the side parts, add 1.5-2 cm protrusions and cut off their edges at an angle of 45 degrees.
- Carefully cut out the resulting drawing, bend along the drawn lines, and glue with glue or double-sided tape.
- All that remains is to decorate the box and place the gift inside.

DIY surprise box
To give money for a birthday or jewelry, it is not necessary to put them in a paper envelope or a ready-made box. Show a little imagination, and the present will not look banal. It is much more impressive, for example, to present a small box glued together with your own hands. When the recipient finds a gift inside such a work of art, there will be a lot of impressions.
You will need: thick paper, scrap paper, scissors, glue, ruler, pencil, decorative materials. You can make such a package like this:
- From a plain piece of paper, cut out a base with sides 30 cm long.
- Draw the workpiece into 9 identical squares, cut off the corners.
- Using a ruler and a sharp object (toothpick, crochet hook), scratch the lines drawn in pencil. This way the folds will be even.
- Bend the side parts, glue the previously cut squares from the inside with a glue stick, retreating 2 mm from the base. File the edges with a nail file.
- Cut out 8 8.6 mm squares from scrap paper and glue them on both sides of the base.
- Next, it remains to decorate the box at your discretion: with flowers, ribbons and rhinestones, inscriptions with wishes, etc. The photo of the hero of the occasion at the top of the box will look very original and unusual.
- Place the surprise inside - money, a congratulations card, a small souvenir.
Candy box
It’s easy to make original candy packaging with your own hands using a ready-made template. You need to print it out or draw it on thick paper, assemble it along the dotted fold lines, glue it and place the sweets there. If you do not have this opportunity, then:
- Take a colored disposable cardboard cup big size, remove the border.
- Make 7-8 cuts 3 cm long on top, fold them inward, place them in the candy box, connect the edges together, and glue them together.
- Decorate the top with multi-colored pom-poms, beads or glue an interesting inscription: this will be an exquisite gift for women on March 8th.
DIY Christmas boxes
For New Year's themes, there are also ready-made templates in the form of Christmas trees, balls, which help you create boxes for gifts with your own hands, etc. Draw one of them, cut it out, glue it together. If your gift is large and will not fit into such packaging, choose any suitable container and simply decorate it with a New Year’s theme. For this:
- Cover it on all sides or simply wrap it with bright red paper of any texture.
- Glue a wide black stripe across the entire box in the middle.
- Next, make a square out of gold paper, cut out the middle in it, and attach it to the front of the gift on top of the black stripe. Look what happened, why not a Santa Claus costume?

Ring box
Ordinary velvet boxes for rings are already a thing of the past, but if you give your loved one a ring in a homemade package, it will be a gift-impression. It is made similarly to a simple box with a surprise, only inside you need to additionally build a backing for jewelry. To do this, follow this scheme:
- Cut a rectangle or square from foam rubber that fits the width and height of the box itself. Make a slot in the center, then a ring will be inserted into it.
- Take two satin or openwork pieces of fabric, first insert one piece into the cut, then the second.
- Gather the free edges into beautiful folds and secure with glue on the back side. Insert the backing into the box and the ring into it.
- Glue hearts, flowers, rhinestones onto the lid, and decorate the design with ribbons.
How to wrap a gift beautifully - diagrams and box templates
For those who don’t know how to do anything with their own hands, there are many different ready-made patterns and templates for gift boxes. You need to choose a photo of suitable packaging, print (draw), cut, bend along the dotted lines, glue, decorate. Choose the size and shape of the box based on the parameters of the gift - round, rectangular, in the shape of a heart, a cake, a Christmas tree, a baby shoe, etc. Believe me, such simple but cute boxes will make your congratulations original and unforgettable.
Rectangular box with double-sided cardboard lid
Making rectangular gift wrapping is the easiest way. To do this, stock up on cardboard, scissors, glue and follow the instructions:
- It is better to use double-sided cardboard, so the product will be one color inside and outside, with the same pattern. Draw a rectangle in the center; its size will depend on the size of the gift.
- Draw more rectangles on the top, bottom, right and left of the figure - these are the side parts, their height should be equal to the desired depth of the future box.
- Draw 2 cm allowances on all sides of the side parts, cut off their upper edges at an angle of 45 degrees.
- Bend the workpiece along the lines, glue using allowances.
- The lid is made in the same way, only its width and length should be 2-3 mm larger. So it will open and close freely.
- If you need big box, and the double-sided cardboard came in a small format - cut out each part separately, glue it together using allowances.
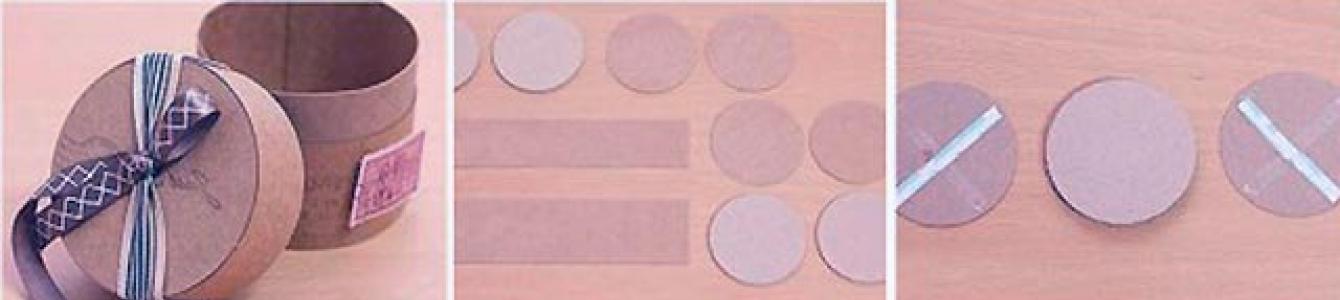
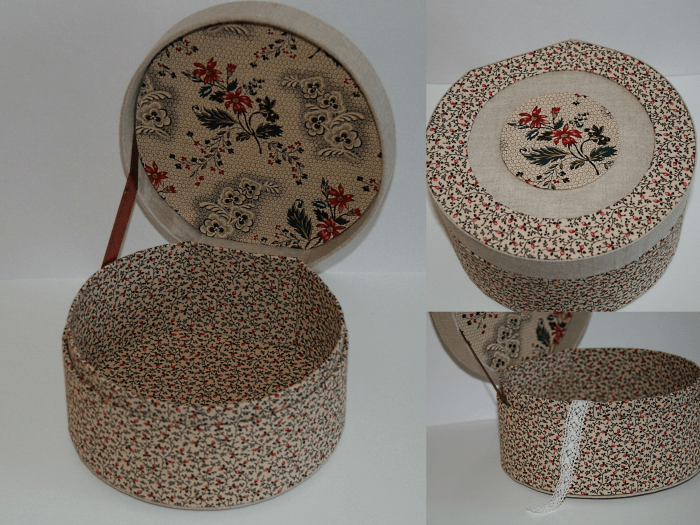
Round
Making a round gift box will not take much time, but patience and perseverance will come in handy. So, follow these steps:
- Cut out four circles from porous cardboard, two of them should be slightly smaller in diameter.
- From beer cardboard, cut two strips the size of the mugs, one wide, the other narrow. Leave some overlap on them and cut them with cloves. This way the strips will stick more evenly.
- Next, glue together 2 large and separately 2 small circles - these are the bases for the box and the lid.
- Glue strips to them: wide to narrow circle, narrow to wide.
- Decorate the lid of the package with a ribbon bow, an original inscription, or a postcard.

Felt and paper cake
This packaging is often used not for gifts, but for wishes and consists of 12 “sweet” pieces. To create it you need:
- Print the presented template in the form of a piece of cake, cut out 12 identical blanks from paper (can be multi-colored), and glue each one.
- Cover the blanks with felt, brown or colored, creating the illusion of chocolate cakes or delicious cream.
- Put a wish or a small souvenir in each braid, decorate the cake in connection with the theme of the holiday.
Using origami technique
To create gift boxes using this technique, you will need: paper of any texture, scissors, glue, pencil and ruler. Next you need to do the following manipulations:
- Cut two squares, one 2-3 mm larger than the other.
- We take one of them, draw 2 lines diagonally from one corner to the other.
- We bend the lower corner to the center of the intersection of the lines, and then bend the same part again to the middle. Let's expand. We do the same with all corners.
- Using scissors to the left and right of the upper corner, make 2 cuts, up to the length of the first fold line from the center of the workpiece. We do the same with the bottom corner.
- We bend the left and right corners to the center, bend them again along the cut lines, lifting them. You should now have two side pieces.
- Bend them, glue them with allowances in the form of triangles.
- Place the top and bottom on top and glue. The box itself is ready.
- Assemble the lid in the same way.
Heart-shaped box
This packaging is made similarly to the round one, only the base is cut out in the shape of a heart. Use a ready-made template or draw the box shape yourself. Choose thick cardboard as the material. Make a box according to this scheme:
- Cut out 2 hearts (one is 2 mm smaller) and 2 strips, equal in length to our figures. The height of one strip is the depth of the package, the second should be smaller.
- On each strip, leave an allowance of 2 cm for gluing, bend them, cut them with teeth. Glue the strips to the bases.
- Next, select the material for decoration, paste it over the outer, inner, side parts of the box and the lid. Decorate it in the form of a bow.

Gift packaging “Diamond”
It is very difficult to draw a template for such an unusual box with your own hands, so it is better to find and print a ready-made one. Next you need to take cardboard of the desired color, scissors, glue and proceed according to the scheme:
- Cut out the template, attach it to the cardboard, trace it.
- Next, you need to cut out the blank with a stationery knife, and press down the folds with a sharp object (knitting needle, crochet hook) (using a ruler).
- Bend the workpiece along the lines, glue the product (it is better to use Moment glue). Before gluing the last part, place a gift inside.
Bonbonniere
These small unusual boxes are usually given to guests at a wedding; they often contain candy, nuts, coffee, lollipops, cookies, and also words of gratitude or wishes. The newlyweds decide for themselves when to give out such gifts, created with their own hands, but everyone, both women and men, will like the gift. If you want to make a bonbonniere from paper or cardboard, then:
- You need to print (draw) and cut out the finished template of the product of the desired shape.
- Make folds along the dotted lines.
- Glue it together, not forgetting to put sweets and notes with warm words inside.
Such packaging can be made not only from paper, but also from fabric. For example, tulle, chiffon, and silk are perfect for this. Make a pattern, purchase the material of the desired color, thin ribbons to match the color and proceed according to the scheme:
- Cut circles with a diameter of 23 cm from the material. For one bonbonniere you need 3 circles.
- Place them on top of each other, place a card with wishes and sweets in the center.
- Gather the fabric into a bag and tie it with a ribbon. Straighten the ends of the fabric. Original gift ready with your own hands!
Video
After analyzing several MK packages, I found an option that suits me quite well for now. This way you can make a box of any size and color for a box, plate, etc. There is nothing new in the box design itself. The main thing that I “invented” for myself was making my own “designer” paper. It's hard to find nice paper in a small town, so here's what I suggest you do.
1. Materials:
- Whatman paper or cardboard,
- napkin or corrugated paper
- sheet of tracing paper
- PVA glue
- scissors
- ruler
- pencil
2. Determine the size of the box so that you can then draw a diagram.
The size of the bottom of the lower part: add 1 cm to the size of the product itself.
The size of the side parts is equal to the height of the product or slightly higher.
The size of the folds for the bottom part: 1 cm less than the size of the side part.
Cover size: 0.5 or 1 cm larger than the bottom.
I make the size of the side parts of the lid 3 cm.
The size of the folds for the lid is 2.5 cm (for a simple box you can do without them)
For example: the size of the box is 5X5X4. Box dimensions: bottom 6x6 cm; sidewalls 5cm; bend 4 cm. Lid 7x7 cm, sides 3 cm, bend 2.5 cm.
Now we determine the dimensions of the square, which will be the basis of our diagram. Fold 4+5+6+5+4=24cm. This is the length of the square, which we will draw on whatman paper.
In fact, making all the calculations is not as difficult as it seems))) If you do it once and understand the principle, you will easily perform them in your head without any papers or notes.
3. Draw a square on whatman paper, in our case with long sides = 24 cm. Cut it out.
4. Now we mark the square on each side according to the pattern: 4cm - 5cm - 6cm - 5cm - 4cm. We connect all the points and get the following diagram.
Here are the shaded parts that we then cut off.
5. Now, in fact, let's start making paper. To do this, you can use a regular napkin of a suitable pattern and size. Or corrugated paper, then the box will be plain. The square we cut out of whatman paper. grease with PVA. Here it is important to coat the entire surface well, especially the edges, but there should not be too much glue so that the napkin does not get wet.
While the glue dries slightly, iron the napkin with a hot iron so that there are no wrinkles. Corrugated paper You don't have to iron it. Then we place the napkin on whatman paper, cover it with a sheet of tracing paper and carefully iron it with an iron. I didn’t get it right the first time, it requires some skill))) This is what happens.
6. Now we cut off the excess parts of our square. We get such a figure.
7. Make cuts along the red lines.
8. Carefully bend everything using a ruler
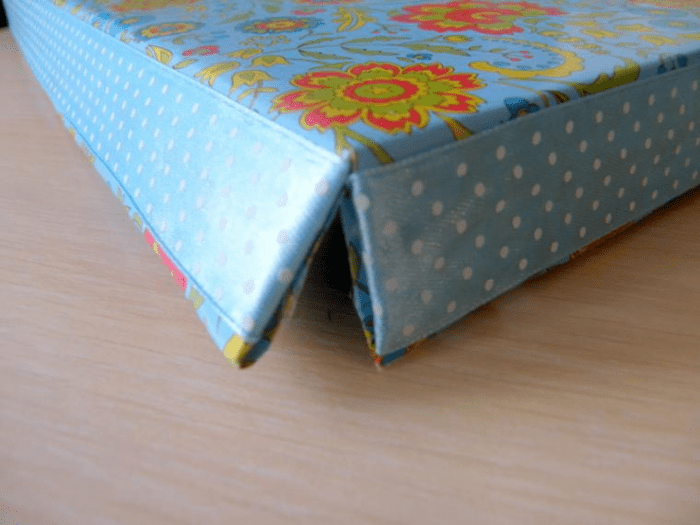
9. We wrap the valves and bends inward and get nice box. More precisely, its lower part.
10. For the lid of the box, we repeat all the operations, only the dimensions of the square will be different. In our example, 2.5 cm + 3 cm + 7 cm + 3 cm + 2.5 cm = 13 cm
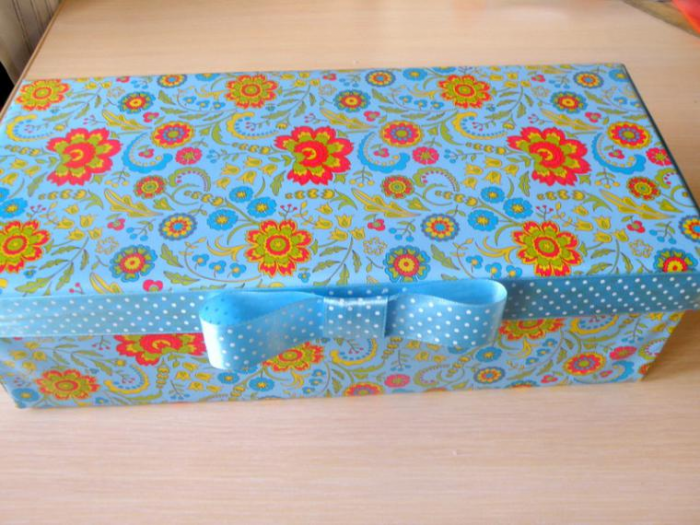
As a result of all the described manipulations, such a box appears
Everything is done quite quickly, in about an hour I did 6 of these things
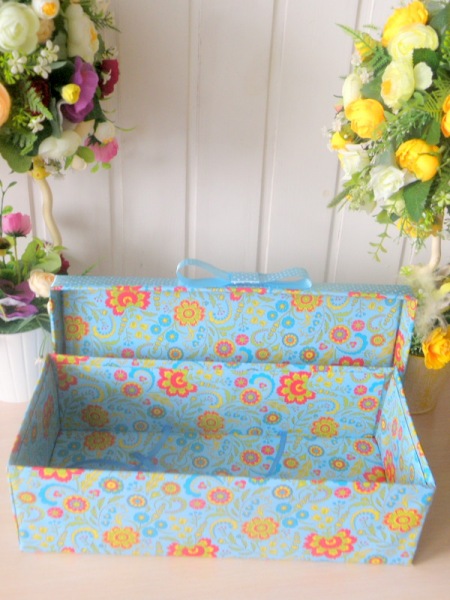
And this is what the finished product might look like in beautiful packaging.
Content
“If you want something done well, do it yourself” is a well-known phrase that different situations confirms its truth. So, if you want to decorate a gift beautifully and interestingly, then it is not necessary to contact specially trained people and spend money on their services. Let's create better gift box with our own hands from cardboard, we will do it well and efficiently.
From cardboard you can make a box with a flap lid, a removable lid, a gift bag, a small chest for a souvenir and other products.
Scheme
In order to make high-quality and beautiful box you will need special templates to use to cut the workpiece. We offer several design options so you can choose the one you like. Note that among these schemes you will also find products that do not require glue when working with them. The design itself is designed in such a way that the box is assembled and secured by itself.
This DIY cardboard gift box design is suitable for a product made of thin cardboard. The template needs to be enlarged to the size you need, transferred to cardboard and cut out.
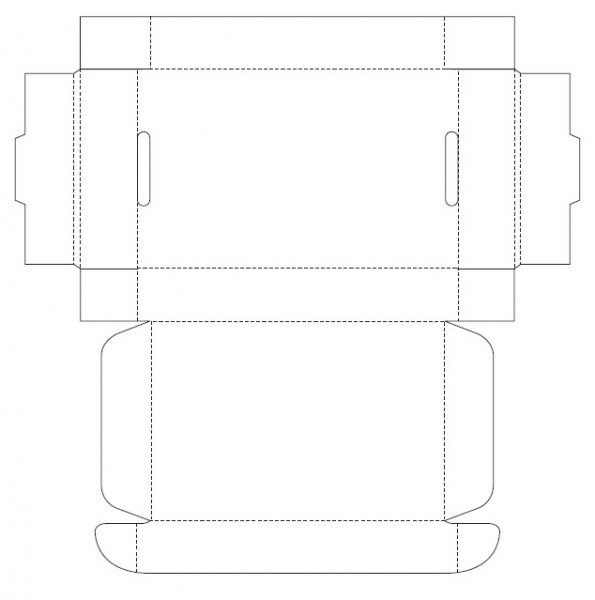
The dotted lines show you where to fold the cardboard. Use an old pen or nail file to pre-mark thin grooves so the cardboard will bend better and more beautifully. Cardboard is quite easy to work with once you already know how it will behave in a given situation.


To hold the parts together, you can use PVA glue, hot glue, double-sided tape, or any other material that will support thick cardboard.
Manufacturing process
First, let's look at the materials and tools:
- cardboard (thick corrugated and thin colored);
- PVA glue or glue gun;
- double sided tape;
- scissors;
- stationery knife;
- ruler;
- a pen that no longer writes or a nail file;
- all kinds of decor - beads, ribbons, lace fabric, twine, quilling paper, napkins for decoupage and so on.
What's next? Choose a template suitable for your gift, transfer it to cardboard, carefully cut it out using scissors or a sharp stationery knife, and connect the parts. Now all that remains is to design the box. Use the birthday boy’s favorite colors, remember his hobbies, passions, and use this knowledge in the design of the box. We offer you to look at several interesting options:
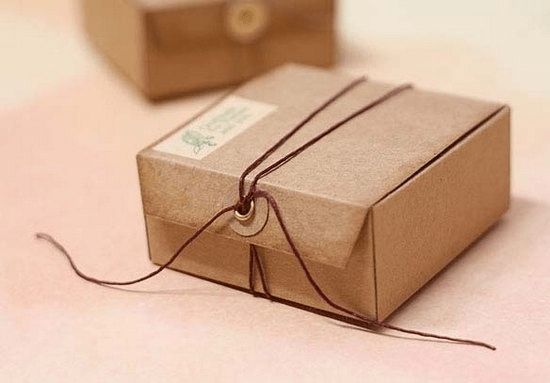
Laconic design is often the most stylish and original. Try not to overload the gift box big amount decor. Or at least choose decor in the same style or in the same color scheme.

The main material for the box can be cardboard, but the top can be decorated with burlap, wallpaper, gift paper and other materials. To make the box truly perfect, don’t forget to decorate the inside as well.

At the bottom of the box you can put a sheet of foil, a soft pillow, satin fabric, decorative hay or any other material.
Large gift box
To create a large gift box, you can already use ready box from under a small TV, food processor or any other medium-sized appliance. What else will you need:
- beautiful wrapping paper;
- satin ribbons to match the paper;
- glue gun;
- scotch;
- stationery knife;
- thin plain cardboard;
- decorative elements (if you want).
Making a gift box from cardboard with your own hands, especially a larger one, will not be difficult for you, but you will spend almost 4 times less money on it than if you buy ready-made packaging.
First you need to lay out the finished box so that you get Blank sheet cardboard Next, you need to draw a diagram taking into account the dimensions of your gift.
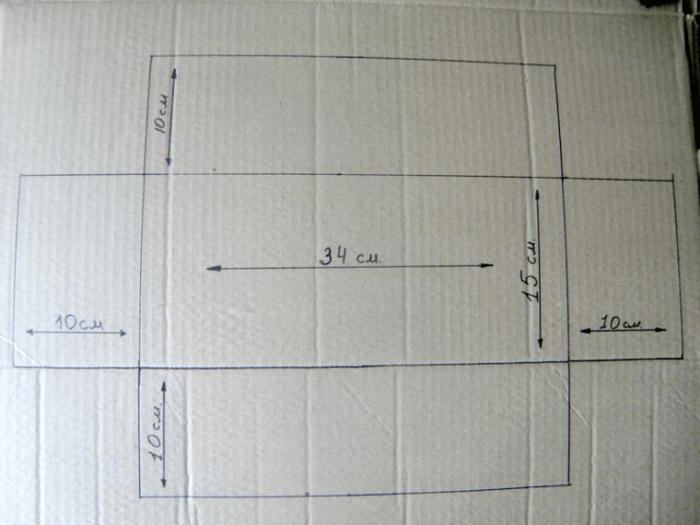
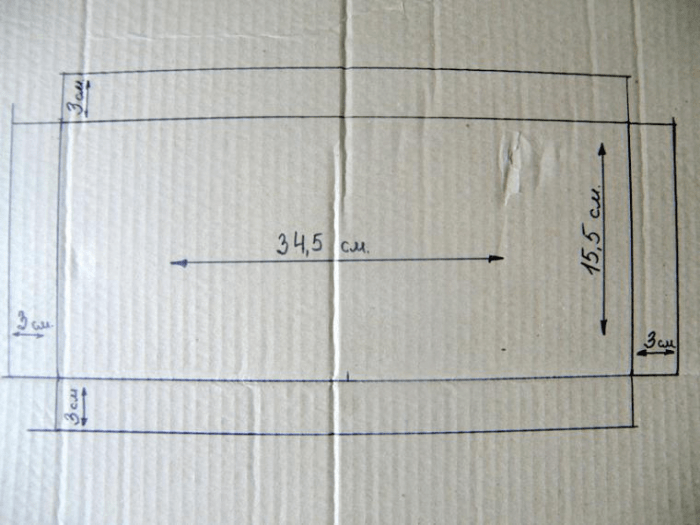
Next, using a stationery knife, you need to cut out all the parts. You will also need a bottom for the box, which will also need to be cut out. For the sides of the bottom, use thin cardboard, which will not reduce the internal space of the box.
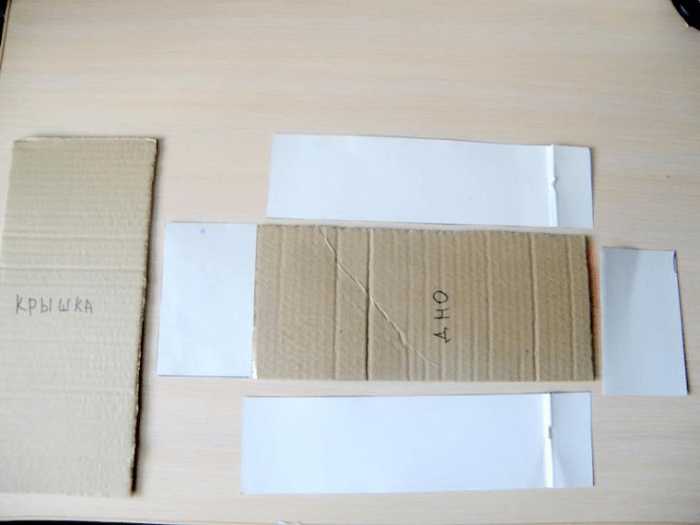
Now all the details need to be laid out on a sheet of your wrapping paper. Leave a few centimeters everywhere so that you can carefully arrange the box and completely cover the cardboard.
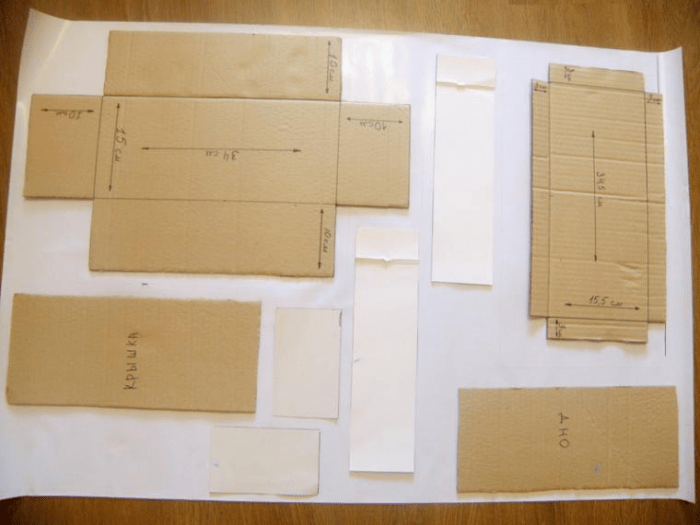
Trace all the parts, and then carefully use glue to connect the cardboard to the wrapping paper. Be careful not to use too much glue so that it stays on the piece.

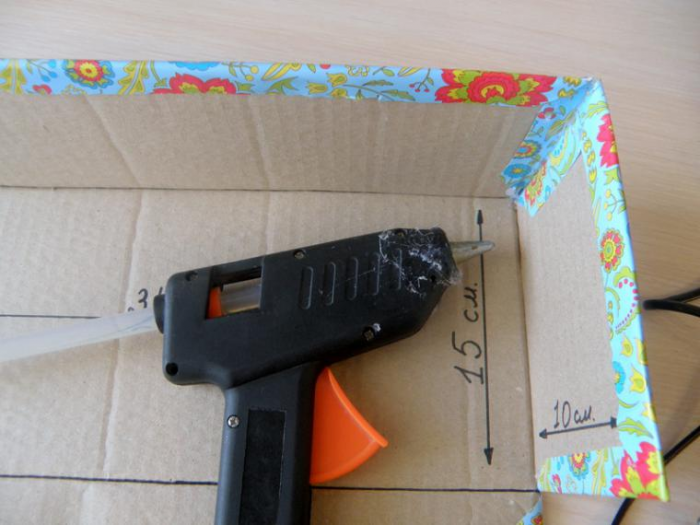
Now, using a glue gun, you need to connect the sides of the bottom and all other parts of the box.
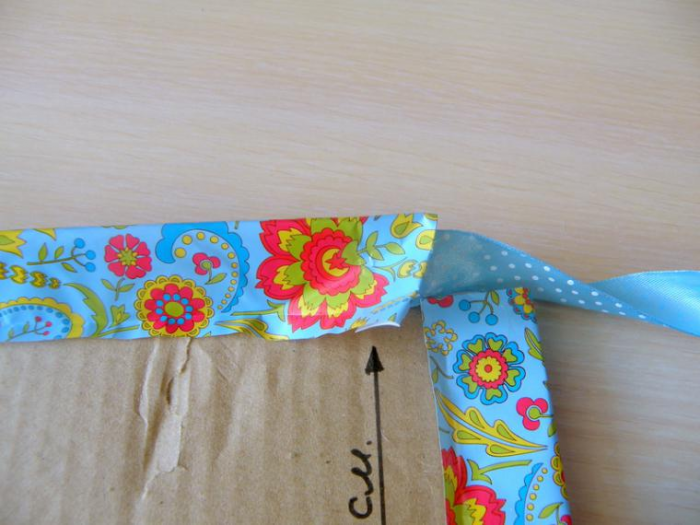
Now take satin ribbon, carefully hide its edge under the wrapping paper of the lid, as shown in the photo:

From the same ribbon, make a beautiful bow that will decorate the finished product.
Don't forget to register inner part DIY gift box made of cardboard.
You can attach special ribbons inside to firmly secure the gift. This will be needed if you send it.

The inside of the box should also be decorated using wrapping paper, then it will turn out neat and complete.
Who would have believed that such beauty could be made with your own hands at home using improvised materials?
Round box
If the gift is intended for a lady, and you want to present it in an original way, then your choice is a round cardboard box.
For it you will need not too thick cardboard, from which you need to cut out two circles and two rectangles.

Do not come up with complex schemes and do not make unnecessary movements - for small gift This simple option of creating a round box will be enough. But think carefully about the design:
You can use the quilling technique, decorative fabric flowers, beads, appliques, fresh flowers, postage stamps and other decor.
As a highlight, you can use thick, colorless cellophane to make a transparent lid for the box.

Try to start any craft in good mood, in a place prepared for this purpose. It is advisable that the room is ventilated, because you will be working with glue. There should be plenty of light in the room so you don't have to strain your eyes. All these nuances are very important, because the quality of the product depends on it.
A master class on creating a cardboard box with your own hands will help you consolidate the material that was outlined above:


