In this article we will talk about how to decorate ordinary New Year's balls in an unusual and beautiful way, turning them into something unique.
Nothing shapes Christmas mood better than decoupage Christmas balls! Of course, it is much easier to go to the nearest store and buy finished products. But we are convinced that you will get much more positive energy from handicrafts than from going to the store.
How to make decoupage of foam New Year's and old Christmas tree balls: a master class for beginners
Foam – extremely comfortable pliable material for beginners. It cannot be broken like glass. And decorative elements such as fabric or beads can simply be attached with pins.
For example, even a beginner can handle this decor. Sequins are attached close to each other using decorative pins or regular pins decorated with beads.
If you have more free time, you can try decorating a foam ball as follows. First you should stock up:
- Foam blank
- Ground
- Special varnish for decoupage
- Brush
- By water
- Needles, pin
- Sponge
- Sequins, sequins, beads, ribbon, thread
IMPORTANT: The presence of soil should not be ignored - it will give the workpieces the smoothness they need. This is especially necessary if an old toy that has already lived its life is being processed.
The procedure is as follows:
- The ball is covered primer. A dense layer is needed. You should not ignore any areas of the craft.


- The preparation must certainly dry out. If you can't wait to continue working as quickly as possible, you can use a hairdryer.
- Now it's your turn decoupage varnish. It will allow the glitter that will be applied later to stick to the ball better.
- Once the varnish is dry, you can finally apply glitter. To do this, dip a sponge or sponge into them, and then use blotting movements to treat the ball. You can use one color of glitter, or you can combine different options.


- Next is the ball pierced with a pin, to which you can attach a ribbon- for her the toy will be hung on the Christmas tree.
- Now on pins and needles beads and sequins are attached. The beads are stuck into the foam. You can create different patterns in this way.
IMPORTANT: The bead should serve as the “cap” of the needle, like a decorative pin. The sequin is placed under the bead.


Decoupage of New Year's balls with your own hands with a photo: instructions, description, photo
Such a ball will be a stunning surprise for loved ones, becoming a cozy addition New Year's interior. To implement such an idea needed:
Transparent New Year's balls
- Photos
- Tinsel
- Tweezers
- Ribbons
The procedure is simple:
- From the ball you need remove the fastening. If you are afraid of cutting yourself, you should stock up on thick gloves in advance.


- Now you need to take the previously printed photo And, roll them up into a tube and place them inside ball. Straighten paper can be used with tweezers.
IMPORTANT: Images must be printed on medium-weight paper. Paper that is too thick or thin will not work - in the first case it is difficult to push the workpiece inside the ball, and in the second it may tear or not straighten.
- Tinsel needs to be cut not small pieces
- Pour it inside The ball can be filled using a funnel made of paper. Filling should be carried out carefully - it is undesirable for the decor to get into the area in front of the photograph.
- Just as neat the fastener is inserted back. To make the ball more elegant, it is recommended attach a ribbon to it, which will hold the toy on the Christmas tree.


Decoupage of New Year's balls with bows: instructions, description, photo
For such decoupage you will need:
- Styrofoam or plastic ball
- Jute thread
- Satin ribbon
- Beads
- Glue gun
- Scissors


Decoupage order:
- First of all, to the ball you need glue the jute loop. The photo shows a base made of ordinary tightly compressed paper, but any base that is a New Year's ball will work perfectly.

 gluing a jute loop onto the base for a New Year's ball
 - Now around the ball need to be glued jute thread.
IMPORTANT: This should be done carefully, avoiding any gaps.

- Next, a hot gun is used to fastening of beads.


- Now it's time to make the bow. For him it is necessary cut three strips of tape.


- One of the tapes is needed fold in half, gluing connection point.

- The same must be repeated with the second piece of tape. These two pieces need to be attached to each other cross to cross.


- They can fasten glue, or you can simply tie it with a piece of ribbon of a different shade.


- Now all that's left is glue the bow to the jute loop of the ball. You can mask the gluing mark with another tape.


How to make bows for Christmas balls with your own hands?
To create simple bows you will need:
- Satin ribbon. It is advisable to choose two types of tapes
- Beads, rhinestones
- Ruler, scissors
Operating procedure:
- Required from each type of tape cut off one piece at a time. Their sizes should be different.
IMPORTANT: Ends satin ribbons It is imperative to scorch them with fire or treat them with glue - this will prevent them from spreading.
- Now you need take the tape bigger size, folding it in half.

- Holding the tape in the middle, you need to bend it as in the photo.


- By analogy it is necessary fold the second part of the tape.

- Then the workpiece must be turned over upside down.


- Part of the workpiece is lowered, and to where she was, glue is applied.


- Next is the ribbon glued together in the form of a bow.


- Similarly, it is created second bow from a tape of smaller diameter.
- Both bows stick together between themselves. You can also decorate beads.


Decoupage of New Year's balls with lace: instructions, description, photo
You can make a bow from lace according to the diagram for ribbons, which is attached above.


You can also decorate the ball completely with lace:
- To do this, first of all you need, as described earlier, apply primer to the ball.
IMPORTANT: The lace should be chosen so that it is easy to cut into segments.


- Next lace sticks on the ball. Regular PVA will come in handy.

- Needed for lace Apply acrylic paint or primer.

- If you want to give the lace a different shade, you need to start dilute acrylic paint of this shade with water.

- Then paint is applied to the ball. You can right away smear it with a napkin- this is how the effect of antiquity is created.

- It remains to cover the ball on top after the paint has hardened. acrylic varnish.


Decoupage of New Year's balls with fabric: instructions, description, photo
For fabric decoupage you need:
- Styrofoam ball
- Fabric in two colors. One will be the background, and the second will be the pattern.
- Tapes – both thick and thin
- A knitting needle or toothpick, a stationery knife, scissors from a manicure set
Ball making process:
- Ball to start is divided into sections. The larger the ball, the correspondingly more sections. You can do this “by eye”, or you can use a pen, thread, rubber bands - whatever is more convenient for you.
- Along the lines cuts are made with a stationery knife. Since the foam is easy to cut, there will be no problems.
IMPORTANT: Deep cuts can only be made if the ball is large. In this case, the small one risks simply falling apart.

- Textile on the reverse side should be iron.
- Need to cut out shreds, previously by measuring the parameters of the sections marked on the ball. Definitely worth it leave about a centimeter for seam allowance. It is advisable to cut the fabric in the form of regular rectangles, since during the decoupage process it may “move to the side” a little, leaving gaps on the ball.
- Next, using toothpicks or knitting needles, the fabric needs to be tucked into the slits of the ball. It's worth starting from the middle gradually moving towards the edges.
IMPORTANT: Of course, you can simply glue the fabric, but there is a high risk that it will become deformed during the gluing process. In this case, it will be impossible to correct the craft.

- Excess threads are cut off and the joints are masked with tapes.
Decoupage of New Year's balls with a napkin: instructions, description, photo
This version of decoupage seems difficult to some, because it is not easy to paste over a spherical surface without wrinkles. But probably in the following way:
- The first thing to do is process the balls themselves, sanding them and covering them with at least two layers of primer. Each subsequent layer is applied only after the previous one has dried.


- Now they are taking decoupage napkins. Naturally, the plots must be selected interconnectedly. The pictures you like are worth Carefully tear off the edges. You can cut it out, but negligence looks even better.
IMPORTANT: There is no need to separate the napkins at this stage - this will need to be done immediately before applying them to the ball.


- But after the pieces have been selected, you can Layer the napkin and glue it onto the ball. You need to apply glue on top.

- Thus the remaining plots are pasted on. They are recommended glue overlapping - uh This method is the most successful.


- Now the balls need to be left dry out.
- Then they are desirable sand- this will remove the wrinkles.
- Next are applied three layers of acrylic varnish on water based.
- Follows again drying.
- Now it's time alkyd varnish, which is sold in cans. Required two layers.
- Another one drying.
IMPORTANT: Drying cannot be neglected.
- The final stage remains - decor ball with beads, ribbons.


Decoupage of New Year's balls with wool: instructions, description, photo
For similar decoupage needed:
- Styrofoam ball
- Wool of various colors
- Needles for felting
- fishing line
- High temperature silicone adhesive
- Satin ribbons
- Beads
Decoupage is done like this:
- With a needle the wool falls onto the ball in small pieces. The material will lay perfectly on a flat foam plastic surface, so even a novice master can handle it.
- Further more pieces are added. You need to felt until the wool surface becomes smooth.
IMPORTANT: Finish felting should be done with a thin needle.
- Next you need felt the ornament.
- Carefully beads are sewn on and ribbons are tied– it all depends on the idea.


Decoupage of New Year's papier-mâché balls: instructions, description, photos
For such a craft you need:
- Plain A4 paper
- Wooden chopstick (you can use chopsticks from Japanese restaurants)
- Some kind of board with holes where you can place the sticks while drying them
- Acrylic primer, water-based acrylic varnish and acrylic paints
- Glizal – 50 ml
- Liquid used to remove nail polish
- Brush No. 10
- Bowl
- A cloth that absorbs well
- Thread, needle, lighter
- Ribbons
The ball is made like this:
- First thing, the ball is being tidied up– the top is removed, glitter and other old decor are removed with sandpaper.
IMPORTANT: It is advisable to do this under running hot water.


- Nail polish remover early paint is removed.
- Need to use it again sandpaper.
- Next is the coating acrylic primer.
- Now the ball put on a stick and dry. You can also use a hair dryer, but in this case it must be kept at a distance of at least 30 cm from the ball. After this, you will have to wait until the ball cools down.


- Pours into a bowl glue.
- Sheets need to be torn into several parts crumple up them, and then straighten out a little.
- Further paper need it quickly dip it in glue and press it to the ball.
- With your fingers folds form on a craft.
IMPORTANT: You need to work quickly, as the paper gets wet and tears soon after glue gets on it.
After all the pieces have covered the ball, you need to leave it again dry. Only this time approximately for 12 o'clock.


- Acrylic paint The already dried workpiece is covered.
- And again drying. This time on 3-4 hours.


- Now Glisal is mixed with paint. You need to coat the ball with this composition, and quickly!
- Further with a cloth need light movements walk on the ball.
IMPORTANT: You just need to remove the excess, not remove the paint.
- Preparation again dries in 3-4 hours.


- Now it's time acrylic varnish. They even need to coat cracks. After hour break more applied two layers to dry between them.
- Left decorate ball.


How to make a New Year's artichoke ball toy in decoupage style: step-by-step instructions
To bring such a beautiful and meditative technique to life needed:
- Actually, foam balls
- Scraps of fabric or ready-made ribbons
- A large number of tailor's needles
The process is:
- If in stock shreds, they need to be good iron. Ribbons are cut into pieces approximately 3-4 cm each.
- The first ribbon need to be attached as follows.

- Need the next piece fold into a triangle.
- Next you need create several triangles, and then attach their vertices to each other. In the end it turns out square.


Then you need attach the ribbons according to this pattern:


IMPORTANT: The space can be decorated, for example, with a ribbon.
Decoupage of Christmas balls in vintage style: description, photo
Materials:
- The diameter of the balls is not too small, otherwise the pictures will be inconvenient to glue
- Acrylic white primer
- Glue varnish, which is used in decoupage, as well as acrylic glossy varnish
- Decoupage napkins with vintage images
- Scraps of old newspapers, sheet music
- Acrylic paint in some vintage tones. It’s worth considering purchasing paint in an antique gold tone.
- Glitter
- Wet wipes
- All sorts of things for decoration like beads, sequins, lace, ribbons, texture paste. Since we are talking about vintage, ink, archival stamps for text, various dried flowers, sprays, etc. will also come in handy.
Now about the process itself:
- First thing, the ball is being prepared– primed with a sponge. For convenience, it is recommended to first remove the caps from the balls and place the balls on a stick. By the way, the lids should also be treated with a primer.

- The balls must be given dry.


- Meanwhile the images on the napkins are cut off.
- Once the primer is dry, you can use glue attach pictures. You need to coat the napkin with glue over the image.
IMPORTANT: You need to smooth the napkin from the middle to the edges.
- Now we need to produce coating with decoupage varnish.

- Next you can glue pieces of newspapers, sheet music. The principle is the same as with napkins - gluing it onto glue and spreading it on top.
- Now you can stick, For example, waxed cord or apply texture paste through a stencil. They will also create a vintage effect. And how can you resist crackle pastes, creating a cracking effect?


 Crackle paste is what you need for a vintage ball!
 - Then you can walk on top of all this splendor white acrylic, trying to powder and hide all the clear boundaries. The waxed cord must be completely hidden under paint.

- Now it's time colored paints. Apply them with your fingers, then lightly smear with a napkin. The result should be a worn effect.
IMPORTANT: It is preferable to work with several colors of similar tones. For example, red, brown. Applying antique gold paint to the ball
- Then, since the imitation of antique gold has gone, you can apply a little gold leaf. It is applied to the glue using a brush.
- Spray with pearlescent red tint It might come in handy here too. You just need to apply it a little.
- Now it won’t hurt to powder the workpiece a little white acrylic. There shouldn’t be a lot of it – you just need to create a dusty effect.
- If you wish, you can using ink and text stamp embellish the craft.
- It won't hurt either glitter– it is applied with a brush.
- Now you need glue the balloon cap back on, and decorate the craft itself with some decor like flowers, ribbons.
IMPORTANT: The balloon cap should also be decorated.
- Finally, it is recommended to use acrylic varnish. Moreover, it is advisable to use a spray varnish in order not to smear previous works with a brush.
Decoupage of a snowman on a New Year's ball: ideas, photos
Lacy New Year's ball Decoupage of balls with napkins and craquelure paint
New Year's ball ik, decorated with your own hands - a great idea for a gift! Anyone will undoubtedly be proud of such a unique and beautiful ball in their collection.
Video: Master class on how to decoupage a ball and a box for it:


The traditional shape of a Christmas tree toy is a ball, so we will learn how to make New Year's toys with our own hands in the shape of a ball. An interesting Artichoke technique will help us with this, the essence of which is to collect petals from fabric or satin ribbons in layers so that they look like the scales of a real artichoke.
We make a ball pattern from any fabric. I make it from chintz and flannel.
The pattern consists of four petals.
AB=1/4 the circumference of the ball, CD=1/2 the circumference of the ball.
Arc length 1/2 ball = 3.142*R
Arc length of 1/4 ball = 1.571*R
where R is the radius of the ball (half the diameter)
Example: for a ball with a diameter of 8 cm, AB = 6.27 cm, CD = 12.57 cm, plus seam allowance


Place the pieces right sides together and sew all the petals together. When making the last seam, we leave 1/3 unsewn, we will get a hole through which we will stuff the ball with padding polyester.


 /p>
/p>
We cut out 8 5X5 squares for the central motif and 16 squares for the rays. I got the balls with a diameter of 7.5 cm, the size of the squares was determined experimentally. You also need 2 squares for the backing for the central motif.

All the squares need to be folded in half and ironed, so it will be easier to sew on later, they will lie more neatly.

We find the poles of the ball and pin a backing to each, making sure that the corners are facing each other.

We fold the smoothed blanks into a triangle and pin them with their noses to the center; I do it on both sides at once, so that the lines can be immediately aligned.

We sew the corners all together, we mask the place of stitching with a bead (but not necessarily) We bring the needle under the base of the triangle
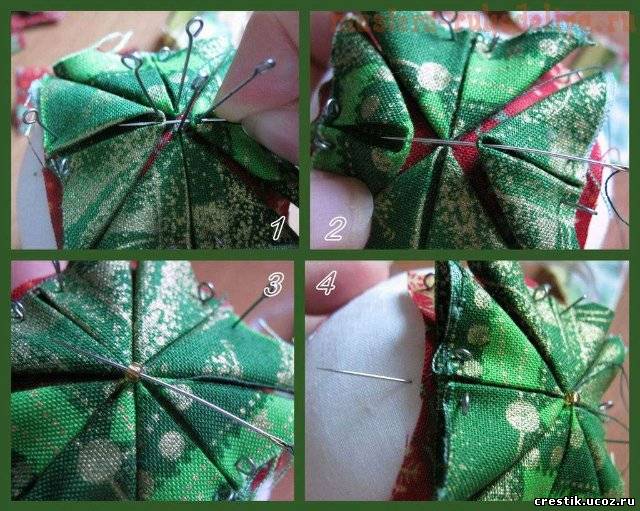
and sew all the corners over the edge. The result was such marks on both sides.


Again, on both sides at once. Ideally, you should get a straight line at the folding points. In short, solid geometry. Well, not ideal, but close to it

We grab the corners with a couple of stitches and hide them under the beads, and stitch them again along the edge so that nothing sticks out or comes out later during use.

The third layer is already a matter of technology

We measure the circumference and cut out a strip of fabric to hide all our ugliness. Well, let's hide it
I sew the strip on so it doesn’t move later.

We take a gold ribbon, just suitable for a Christmas ball, sew it along the middle of the camouflage strip along with beads, wind a loop on top for beauty, and another longer one so that there is something to hang it from. Now you have one more toy, but DIY Christmas tree decorations are much more interesting and more soulful than others :)))


