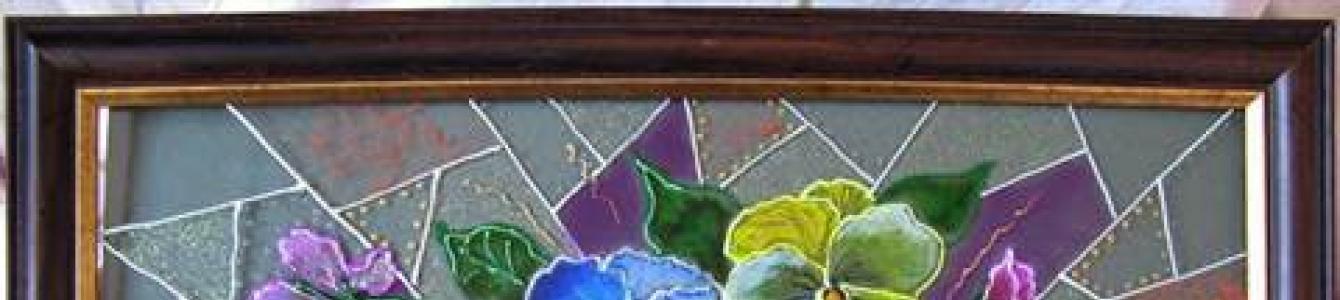
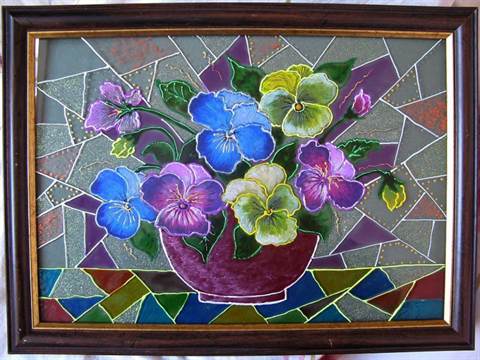
If you want to understand how to make stained glass on paper, then this article is for you. Stained glass on paper is also called squiggle design - this is an unconventional technique for making stained glass. Mainly children's activity. Making a wonderful picture using this technique is quite simple and interesting. Cardboard, glass, plastic, plywood are suitable for the base of the picture. For wall paintings, it is better to use opaque materials.
It’s up to you to decide which subject to choose for the picture. The image affects the atmosphere of the room. For a nursery, of course, it is better to choose children's drawings, for the kitchen - geometric drawings or abstraction. For other rooms you can choose various ideas, which will fit well into your interior and will look stunningly beautiful. Stained glass has been known for several centuries and is an element of luxury and a sign of wealth.
What is needed for the job? The basic list of required materials and tools may include:
- Paper – sheet A4;
- Simple pencil;
- Marker or black felt-tip pen;
- Cardboard;
- Eraser;
- Watercolor paints;
- Frame.
Let's go to the lesson
Stained glass always starts with an idea. To make a picture out of paper using watercolor paints, you will need: pencil, scissors, half a sheet of white Whatman paper.
How to draw a stained glass window and make such a beautiful picture with your own hands?

Step-by-step work:
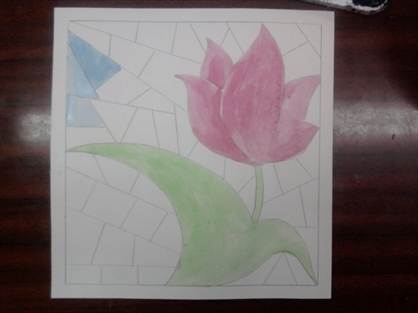
Stage 1: determine the size of your stained glass window.

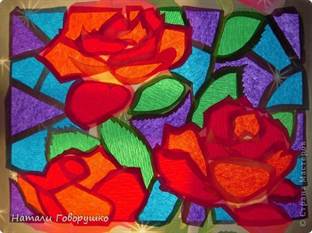
Stage 2: draw a stained glass pattern with a pencil. You can draw a sketch for a future painting yourself or download a ready-made template.

Stage 3: paint the remaining stained glass colors. First, paint all the fragments of the pattern with the same color. Let the paint dry to avoid mixing colors, then apply another color, etc. Having painted all the fragments, leave the picture until completely dry.


Stage 4: fill the space around the main pattern.

Stage 5: draw the outline in black. You can also paint it black with a thin brush or use a black felt-tip pen. It is better to start drawing from the upper left corner so as not to smudge the drawing.

A little about other types
There are many types of stained glass. The technology for making stained glass from colored paper is almost the same as using paints.

First we make a sketch. On a sheet of paper we draw a frame of 3-4 cm and transfer the drawing to it in full size. The contours should be wide. We color the outline with a black felt-tip pen. Cut out fragments of the design using a sharp knife. Then you need to cut out the parts from colored paper and glue them to the back of the work. Trim off excess. Your stained glass window is ready!
You can make a stained glass window with your own hands.


Filled stained glass is a unique process of imitation of stained glass, which is performed on a whole sheet of glass using self-made paints. To do this, place it on the table large leaf paper, with working glass on top. Trace the outline of the glass. Transfer the sketch to paper and trace all the contour lines of the sketch well and place the glass on top. Use the prepared paint to draw all the contour lines. Now prepare the fill paint and fill the fragments between the contours with paint. Fill in 3-4 layers, and the varnish should dry for 10-15 minutes after each pour. Then cover the top of the drawing with clear varnish and leave to dry completely. In 2-3 hours your stained glass window will be ready.

Little tricks
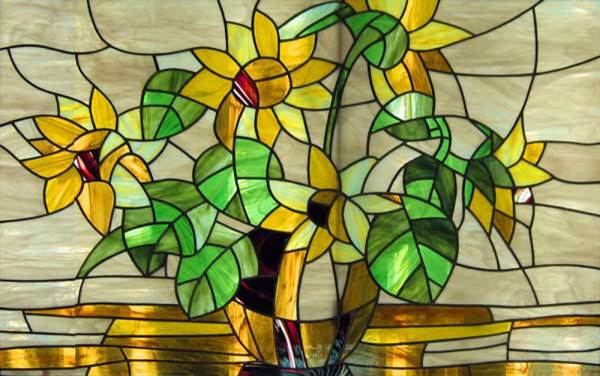
Stained glass is a decorative picture that can be made in any style.

Masters often keep silent about some, in their opinion, insignificant details. Here are some tips to help you make stained glass:
- never start learning with the most complex, start with the simplest. Never take on a large drawing with many small details at once. Try a simple pattern first, and when you master the technique a little, you can take on complex designs.
- use for work different types colors, they all also fit into the drawing differently. The brightness and light transmission of the design depends on the number of layers of paint.
- to accurately adjust the drawing, use ear sticks and cotton pads.
- Use a sharp knife or blade to remove defective lines.
- Use wet alcohol wipes on your hands.
- The lighting should be good both from below and from above the work in order to immediately reveal the shade of color and the density of the coating.
- One of the main components of beautiful and neat work is its quick completion. For example, if you apply the contour paint too slowly, it will vary in both color and thickness. If poured slowly, the paint will lay down in an uneven layer and this will affect the quality of its surface.
Video on the topic of the article
Stained glass “Firebird” (made of packaging mica and corrugated paper)
Author: Romashova Elena Vladislavovna,KOGOBU SPO "Omutninsky College of Pedagogy, Economics and Law", teacher of theoretical and methodological foundations organizing productive activities for children preschool age
Purpose: The master class is intended for teachers of any educational organization, students, it can also be made by children of creative studios and children's art centers.
Target: interior decoration of interior premises.
Tasks: development of creative skills:
in drawing (working on the skill of using graphic materials - pencil, marker, paint);
in color science (selection color range and color harmonization);
in design (decorating stained glass with various visual materials and fixing them on the contour).
From the history of stained glass:
Stained glass(French vitre - window glass, from Latin vitrum - glass) - a work of fine decorative art or an ornamental nature made of colored glass, designed for through lighting and intended to fill an opening, most often a window, in any architectural structure.
The history of stained glass began only in the era of Christianity. Although archaeological excavations prove that stained glass already existed in Ancient Egypt. From the surviving literary sources, stained glass during the period of the birth of Christianity was a set of multi-colored glass pieces of various sizes, which were fixed into slots in stone or wooden boards using putty. They served to decorate window openings. A striking example of that era are the Byzantine stained glass windows that decorated the first Christian churches.
The first medieval prototypes of stained glass served as decoration for the windows of temples in Galia, and then appeared in England and Germany.
The radiance of the first stained glass windows corresponded to early Christian concepts of the connection between light and spirit. And stained glass was perceived as an intermediary between the earthly and divine worlds. The mesmerizing beauty of the light rays that spread to all the pieces of colored glass was perceived as divine power and love.
Stained glass received a special flourishing in the Middle Ages. In the X-XII centuries. In the churches of France, narrative stained glass windows appeared from pieces of colored (red and blue) glass, cut along the contour of the images and fastened with lead strips. Colored glazing of windows was a glass mosaic inserted into stone or wooden window openings.
Nowadays, there are several technologies for making stained glass:
1. Filled stained glass windows are glass on which the outline of the design is applied with thick paint and the width and height are 1-2 mm. The contour forms areas into which thinner paint is subsequently poured.
2. Film stained glass is a kind of applique. Only instead of colored paper, film is used.
3. Real stained glass windows are made from pieces of colored glass. They are both the most beautiful and the most difficult to make. Currently, the most popular manufacturing technology for colored glass is Tiffany technology.
4. Stained glass windows made of paper.
Manufacturing technology of stained glass “Firebird”:
Materials: You will need - a Whatman sheet of A2 format; gift mica red, yellow, crimson flowers, corrugated paper in blue and light green shades; double-sided and regular tape, stationery knife, scissors, PVA glue; black marker, black gouache, brush.

Sample:

The image is reduced. Click to see original.
1. Transfer the outline of the stained glass window onto paper or draw it yourself.


2. Paint over the outline with black gouache.

3. Using a stationery knife or scissors, cut out unnecessary contour details.


4. Cut out silhouette pieces from gift mica desired color and secure them with double-sided tape (plain tape, PVA glue) on the wrong side. Trim off the excess with scissors or a utility knife. In this way, fill in all the details of the bird image.


5. Using corrugated paper in blue and light green tones, create a background for the work, also gluing it on the reverse side using tape or PVA glue.


6. You can decorate the interior!


Dear teachers, parents, children, you can use not only such materials. It is convenient to use this technique different materials(by collage type), for example, other types of paper; rhinestones, sparkles, feathers, cotton wool and more. Here are some works of my students:
Svetlana Davaeva
A wonderful time of year has come and I decided to decorate my group autumn leaves . Just draw and cut out colored leaves? No! I want something new. Again my beloved Maam comes to the rescue. After walking around the posts of my colleagues, I stopped to visit Olga Zholobova from St. Petersburg. I saw wonderful stained glass windows made of paper"Autumn leaves", which are beautiful and easy to manufacturing. Without wasting time, I made the same ones stained glass, only small change: corrugated paper was replaced with colored paper and cardboard. Many thanks to Olga Zholobova!
Material:
1. 2 sheet of cardboard: yellow and black;
2. 1 yellow sheet of paper;
3. ruler;
4. scissors;
5. glue stick;
6. a simple pencil.

Take black cardboard

Turn it over and draw a frame on the back side, in the center - tree leaf(in our case oak leaf) and along the edges of the connection line with the frame.

Cut it out with scissors, you get a black stencil

Place it under the stencil paper yellow and outline with a pencil sheet.

Cut along the contour oak leaf and paste.

Place cardboard underneath orange color and stick it on.

We do the same with maple leaves, linden.


Publications on the topic:
Dear colleagues and caring parents! This master– the class will be especially valuable preschool workers, whose pupils do not yet know how.
I suggest to your attention not complex craft with your own hands. Module from autumn leaves. Required material for making a module: -Double-sided.
Purpose: making a bouquet of flowers to decorate the group. Objectives: educational: - teach techniques of “paper-plastic” technique; developing:.
Hello, dear colleagues! The spring matinee dedicated to dear women has come and gone! On the eve of this day, the senior teacher and I are here.
Today is Valentine's Day! And I sincerely congratulate you all! Spring is coming! And of course we need flowers! Today I offer you a master class.
Master class on making paper “Frog”. Working with paper is very interesting and exciting. I present to your attention the master.
Today is World Cat Day. How can you not celebrate it, the holiday of our dear family friends and pets! White, black, red, gray,...
Stained glass is a work of art made of colored glass, designed for through-lighting. Previously, stained glass was used mainly in churches, but now it is a newfangled trend in decoration, which is becoming increasingly popular every year. Stained glass has become much more accessible; it has become possible to insert them into door panels, ordinary window frames, partitions and screens.
To make stained glass windows with your own hands, you don’t have to invite a craftsman; almost anyone can handle this task. All you need is the desire to achieve your goal, a little perseverance and precise implementation of the given advice.
How to make a stained glass window?
You will need:
- PVA emulsion;
- Special stained glass paints or aniline dyes;
- Whatman paper, cardboard or graph paper;
- Pencil;
- Alcohol or acetone;
- Scotch;
- Level;
- Brushes;
- Aluminum wire 1.6 mm thick.
Instructions:
- Before you start working, decide what pattern you want to see on the glass and what colors it will be made of. The design can be absolutely anything: an ornament, an image of flowers, birds, animals, etc. The image can only be limited by your imagination. Involve children in creating the drawing - they will definitely give you an interesting idea.
- Draw the outlines of the pattern on whatman paper, cardboard or graph paper. Mark where and what color you will put it. If you don’t know how to draw, ask your friends or use carbon paper. Take the glass out of the item you will decorate with stained glass. Degrease the side of the glass on which the stained glass will be located with alcohol or acetone.
- Use tape to secure the design to the back. Using a level, position the glass strictly horizontally. Bend the necessary elements from the wire along the contours of the drawing. Lubricate them liberally with PVA emulsion on the side adjacent to the glass and place them on the glass. To make the wire stick more tightly, place a metal plate with a weight on it. After about 1.5 - 2 hours the wire should stick.
- While the wire is being glued, start preparing the colors. Dissolve aniline dyes in distilled water and strain the resulting solution. As a result, there should be no lumps or other solid particles left in it. Mix the solution with PVA emulsion until it reaches the consistency of cream.
- To check the color saturation, apply a little mixture to a small piece of glass. After polymerization you will see the final shade. If it is too bright, you can add more PVA to the mixture; if it is too pale, you can add a dye solution. In addition to aniline dyes, you can use ready-made stained glass paints - they do not have to be diluted in emulsion and water.
- Don't just get carried away with bright colors. General color scheme must be harmoniously balanced. When all the colors are prepared, pour them into glass jars and cover with a lid to prevent them from drying out prematurely. Now you can begin the most important and important stage of the work - decorating the picture on the glass.
- Before you start, prepare a clean brush and practice a little. The color must be applied strictly sequentially, gradually pouring the solution at the contour of the pattern from the wire using a brush. When adding new colors, monitor the overall thickness of the layer - the saturation of the area being covered and the uniformity of its tone will depend on it.
- During work, do not touch the already formed layer, otherwise the emulsion will begin to dry out under the influence of contact with air, and new portions of the color will upset the balance, which will lead to a defect. If this happens, carefully wash off the piece and let the glass dry.
- Having covered all the necessary areas with the 1st color, rinse the brush thoroughly and proceed to applying the next color. In order to avoid possible bleeding of the 1st color into the others, in case of loose gluing of the contour wire, it is better to fill the color only in the vicinity of already hardened spots. In any case, be careful with the already painted areas and, just in case, place clean cotton wool and a container of water next to you.
- When you have completely painted the picture, look carefully at the back of the stained glass window. Sometimes, the places where the wire strands are glued look sloppy - this can be corrected with white enamel paint (just carefully degrease the glass). When white stripe Once dry, you can fix the stained glass window in place.
Stained glass patterns: options

Master class on making paper stained glass “Narcissus”
Golyshevskaya Natalya Mikhailovna, senior teacher of MBDOU " Kindergarten No. 12" general developmental type in BarnaulTarget: introduce children, educators, parents, teachers additional education with the technique of making paper stained glass windows
Tasks:
- develop the creative skills of preschool children in drawing, color science, design;
- teach to determine the properties and texture of various materials;
- develop graphic skills in using visual materials.
Purpose: A finished paper stained glass window can serve as a wonderful interior decoration or an original gift.
Creating a paper stained glass window is not a quick process and requires some preparation. It is the participation of an adult that will help to better organize the child’s work, determine the stages of creating a stained glass window, and in addition, the adult will help the child consolidate the visual material on the background.
To work we will need:
- black cardboard;
- green and yellow napkins;
- plastic folder Green colour;
- glue stick;
- scissors;
- a simple pencil

Template #1

Template No. 2

Sequence of work:
1. Transfer the outline drawing of the stained glass window (size 15*20 cm) onto black cardboard and then cut it out.

2. Cut out the detail of the flower petals from a yellow napkin and glue it to the outline of the flower on the back side of the stained glass window

3. Cut a strip from a yellow napkin, crumple it and glue it into the middle of the flower on the front side of the stained glass window

4. Cut out the details for the leaves from a green napkin and glue them to the back of the stained glass window

5. Cut a rectangle measuring 15*20cm from a green plastic folder and glue it to the back of the stained glass window

6. Twist a flagellum from a green napkin and glue it to the stem of the flower.

7. Cut out leaf details from a green plastic folder and glue them to the front side of the stained glass window

8. Cut a strip with “teeth” from a green napkin and glue it to the bottom of the stained glass window.

Our stained glass window is ready!


