
Knowing how to knit, you can pamper yourself and your loved ones with unique new items. It is no coincidence that Coco Chanel considered handmade things to be luxury. For example, crocheted Mittens are an original and practical accessory that will add zest to any look.
They are knitted in several ways: with a solid fabric in the round, with a side seam, from two halves, using the patchwork technique. To make mittens by crochet, the description of the work needs to be clarified using the diagrams and your own measurements. The most popular knitting options: in the round and from the middle of the fabric.
Knitting mittens in the round. Method 1
Work begins from the cuff:
- Having collected a chain of air loops, it is closed into a ring. The hand should fit freely into it. Do not forget that the chain always stretches more than the finished fabric.
- The mitten is knitted from the base of the palm to the base of the thumb. Transitions between rows will not be noticeable if you use the spiral knitting technique. In this case, you need to carefully count the rows in order to knit the second mitten absolutely symmetrically.
- Several air loops are cast from the leading loop (depending on the thickness of the thread). In the base row, the same amount is skipped. The next loop is knitted from the base. At this stage, it is better to try on the workpiece. The thumb should fit into the hole without difficulty.
- Next, the mitten is knitted to the end of the little finger. Decrease is done evenly, two loops per row.
- Along the edge of the thumb hole, they begin to knit the last piece. For female models the finger on the mitten is evenly reduced in the last third. For men - in the last row.
- The cuff is knitted with an elastic band or some other relief pattern in a straight line. Rolls up into a ring and connects. The main part of the mitten is sewn to the cuff so that the seam of the cuff connection is on the inside of the wrist. You won't need a cuff if you immediately knit more rows to the base of the thumb. A smaller hook will make the edge of the mitten more elastic.
- The ends of the thread need to be pulled inside out and secured so that they do not come out during wear and washing.
The pattern for crochet mittens No. 1 is presented below.

Knitting in the round. Method 2
The toe will turn out more neat if you start working with it:
- A chain of six air loops closes into a ring. Twelve loops of the first row are knitted from it. In the next row, twelve more loops are added and so on until a circle of sufficient size is obtained. When bent in half, it covers four fingers.
- Then knit without increments until the bend of the thumb. Although there was a clear transition from row to row at the toe, it is better to continue knitting in a spiral manner.
- The hole for the finger is formed using a chain of air loops (as in the previous description).
- Continue knitting to the base of the palm or further (to the desired length). The cuffs are sewn in accordance with the planned model.
- The finger is knitted in the same way as in the previous case.
Knitting from two halves
For beginners, crocheted mittens crocheted in this way are a real find.
The back side is knitted with a solid fabric:
- The length of the initial chain of air loops should be no less than the distance from the base of the palm to the last phalanx of the middle finger.
- At the end of the first row, eight loops are knitted from the last loop of the base. The work is turned upside down, rather than inside out as usual. Continue the same row, knitting loops from the other half air chain.
- When performing lifting loops, the work is turned over. In the second row, four loops are added evenly for rounding.
- Knitting continues until the piece reaches the desired width.
A hole for the thumb is knitted on the inside using a chain of air loops. The parts for the right and left palms should not be symmetrical. The holes are located on opposite sides.
Pattern for crocheted mittens No. 2 is in this photo.

You don't have to make a special hole for the finger in the part. Sometimes the side seam is left partially free. The part begins to be knitted on the edge loops.
The seam on this model is made on the front side; if possible, it should be decorative. It stands out with contrasting threads or large connecting columns.
Crochet mittens for children
Babies are not knitted separately for thumbs. These mitten bags are called “scratchies”. They are worn not only for warmth, but also to prevent the baby from injuring himself. One year old child can, with the help of adults, put on a mitten with a special compartment for the finger. This makes it much more convenient to hold objects in your hands and play. Children and teenagers often have their mittens tied together with a long ribbon or elastic band to prevent them from getting lost. Children's (crocheted) mittens for beginner knitters will be an excellent workout.

You can decorate an accessory for a child in absolutely incredible ways. You can use all your imagination. For example, make cute little animals out of mittens.

Crochet men's mittens
This accessory should be especially durable, warm and comfortable. You can make a fleece lining or knit double mittens. This option is best knitted in the round. First, the inner part without the cuff is knitted. The upper part is made a little larger so that it fits freely over the inner part. The cuff is sewn to both parts at once. The parts for the finger can be knitted individually or one at a time, starting from two bases at once. A double mitten is much warmer and softer than a regular one, knitted with two threads.
Needlewomen come up with various tricks to ensure that mittens provide maximum freedom of action. To do this, you can, for example, separately knit parts for the thumb and index fingers. In such a mitten it is more convenient to hold small objects in your hand or take them out of a narrow pocket.
Popular touch screens do not respond to touches through fabric. But if you leave small slits in the product for the index and thumb, then you don’t have to take off the mitten to use your phone or e-reader. The holes are made using an air chain at the beginning of the decrease in the toe and toe detail.
Mittens "with a folding top"
A very common option is crocheted mittens with a separate toe. This accessory is appropriate in the wardrobe of a man, woman and child.

The mitt is knitted. You can knit the beginning of the fingers (as on gloves) or leave a smooth edge at the level of the first phalanx. The toe is knitted separately. The part is extended so that it reaches the base of the index finger. Both parts are connected on the back of the mitten. Be sure to sew on a button to secure the removed toe.
How to decorate women's mittens?
You can add decorative elements to the finished workpiece. Appliques, beads, sequins, knitted elements, embroidery and other techniques are always at the service of the craftswoman. If you don’t want to overload the mittens with details, but at the same time you need a spectacular thing, you need to think about the decor before starting work. Mitten, knitted beautiful pattern or gradient, is a work of art in itself and does not need any additions.

This pattern works well with fluffy yarn.

Crocheted mittens using the patchwork technique are very impressive. Section-dyed yarn can also create a successful jacquard-like pattern.
Fun ideas

A crocheted mitten of an unusual shape can be a good joke and a wonderful, completely extraordinary gift. For example, mittens for walking are a set of three pieces. One general, and two - male and female - on different hand.

Mittens for drinks are suitable for football fans and all other lovers of outdoor spectacles.
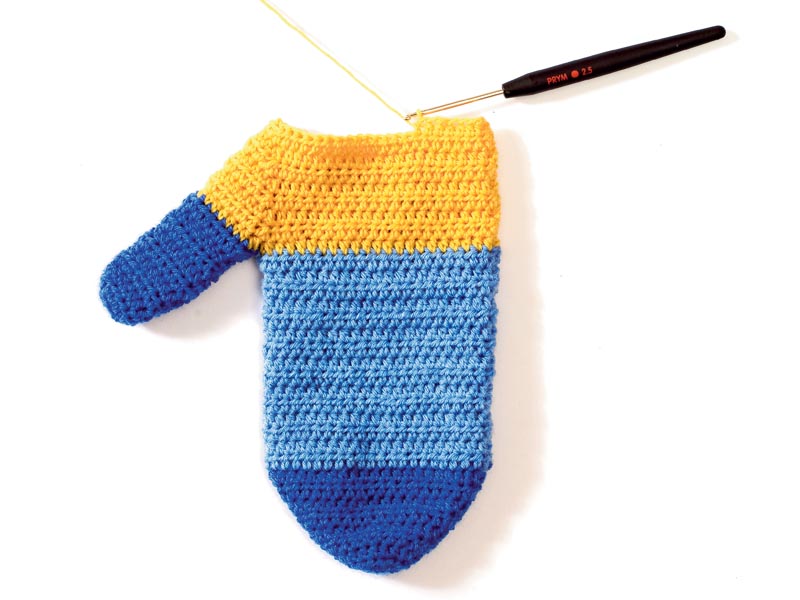
One day I wanted to knit warm wool mittens for the winter. And this is what I got.
I will try to describe in detail the process of knitting them.
Materials for work:
- Yarn - you need medium thickness; I used Yarna “Charisma” thread (100% wool, 300 m/100 g)
- Hook No. 2.5
- Thick needle and sewing thread matching the color of the yarn
- Remaining yarn of a different color for embroidery (optional)
Description of work
If you are not knitting mittens for yourself, you can make a paper hand pattern. I didn’t make a pattern because I knitted it for myself and just tried it on as I went along.
I knitted the mittens from the bottom up, that is, from the cuffs to the toe. The knitting elements are simple - air loops (VP) and single crochets (SC).

So, first we will knit the cuffs for the future mitten. To do this, I typed a chain of 15 VPs

and additionally 1 more air lifting loop (the length of the chain is equal to the desired width of the cuff) and knitted 1 row of sc on it. To make the cuff pattern elastic and resemble knitted elastic band, starting from the 2nd row, the hook must be inserted under the far thread of the loop of the previous row.

So I knitted in rotating rows with an elastic band until the stretched cuff began to wrap around the wrist. Next, I used sewing thread to sew the last row to the first.

That's it, one cuff is ready!

Then I tied the edge of the cuff with a sc.


Important point: Now you need to skip as many columns of the previous row as there are chain stitches plus 2-3 more loops - but so that the knitting pattern is not broken. You need to skip additional loops in order to reduce the width of the mitten after the point where the thumb is located.
In the next row I knitted again using pattern 1, inserting the hook into the loops of the chain above the thumb hole.

So I continued to knit rows until the end of the little finger.


Here you need to make decreases by knitting the toe of the mitten. To do this, you need to conditionally divide the mitten fabric into 2 parts and make decreases according to the pattern in 4 places of each row - at the beginning and at the end of the mitten halves. When there were only 4 stitches left in the row, I pulled them off and secured the thread on the wrong side.

Now you can start knitting the thumb on the loops of the hole left for it. I made decreases as needed, often trying on the mitten.


Then, just like on the toe, I pulled the remaining few loops into one and secured the thread on the wrong side of the finger.


The second mitten was knitted similarly to the first, only the hole for the thumb should be positioned in a mirror image.

Additionally, I decided to decorate them with simple embroidery in the shape of snowflakes (with a “forward needle” stitch) using white wool blend yarn.

Mittens are a simple product, so a video on how to crochet mittens is suitable for any level of craftsman - for beginners and experienced knitters. Several master classes are offered, and you can choose the type of mittens that you like, and then master other methods.
Crochet mittens for beginners – good workout. The products are small, the result is visible immediately, and the mistake can be corrected. And the main thing is that everything is shown in detail in the video: even if this is your first time crochet hook, everything is easy to understand and you won’t confuse anything. And soon you will dress your whole family in brand new mittens.
p.s In the last article we looked at how to knit mittens
Each video tutorial provides step-by-step instructions on how to knit mittens:
The yarn used is Yarn Art Angora de Luxe. It contains 70 percent mohair and 30% acrylic. 100 grams of yarn contains 520 meters of thread. The hook used has a diameter of 2.5 mm, since the thread is still thin. When choosing yarn, do not choose too thick: with a thread length of 100 grams less than 200 meters, the product will look somewhat rough.
It is necessary to measure the length of your palm with part of your wrist to determine how many loops you will have to cast on. 63 loops are cast on, after which we crochet the mittens - in half-stitches the entire mitten except the finger.
Video lesson:
The yarn used is Alize baby wool, which contains 40% wool, 20% bamboo and 20% acrylic; 50 g of yarn accounts for 175 meters of thread. A 3.5 mm hook was used, the yarn was taken in two colors, gray and yellow. A ring is knitted around which double crochets are formed. There are 11 of them in total. Next, the color of the thread changes, and the number of columns doubles.
The stitches are crocheted with one crochet and next to it is a raised stitch. In the second row there are 24 loops. On the third row, the color changes back to the original one. Knitting continues in the same way with an increase in the number of loops. 
Video lesson:
Given detailed description How to knit mittens from two threads of different colors. Both threads are knitted at the same time. A hook with a diameter of 5.5 millimeters was used. To begin with, we determine the length of the cuff, which can be estimated according to the arm. We knit a chain of chain stitches for the length of the future cuff. This makes 9 loops.
Next, on each loop we knit simple single crochets. Then the same single crochets are knitted, but they only cling to the back thread to form an elastic band. The remaining rows of elastic are knitted in the same way until you get a cuff large enough to fit around your arm. 
Video lesson:
The mitten is knitted step by step: first the front side, then the wrong side, then the finger and elastic. Alize Baby Wool yarn was used, consisting of a mixture of natural wool 40%, acrylic 40% and bamboo 20%. There are 175 meters of thread per 50 grams of yarn. The mitten is designed for medium hands.
From a skein of yarn, it is preferable to work not with the outer thread, but with the one that is inside the skein. Then the thread comes out easily and the skein does not roll around. A chain of 40 air loops the length of your palm is cast on. Then double crochets are knitted, and an increase is made in the latter. 
Video lesson:
Two threads were used: angora and wool. The work begins with four air loops that are connected into a ring. Next, after lifting one chain stitch, we knit 7 single crochets around the ring. Then again lift one air loop, and for each loop two single crochets are knitted.
There will be 16 stitches in this row. The next row begins with a stitch, two stitches are knitted into the next loop and then one stitch for each stitch. The most difficult thing is to knit a finger on a mitten, but this is also described in detail. 
Video lesson:
6mm yarn and a hook of similar diameter were used. Knitting is the formation of an even cylinder. First, air loops are collected in such a quantity that they can cover the wrist. In this case it is 20 loops. The chain is assembled into a ring using a connecting loop.
Having risen up two air loops, we knit double crochets in a circle. When the row is completed, we go up one chain stitch, make a single crochet and continue to knit the next row with double crochets. A total of 8 laps were made. 
Video lesson:
The yarn used is two colors produced by Pekhorka called “Australian Merino”, consisting of pure wool, in which there are 400 meters of thread per 100 grams. The hook used has a diameter of 3.% mm. Making a ring from thread gray and make three lifting air loops, after which we knit 11 double crochets.
Having tightened the ring, we continue knitting with white thread. After two lifting air loops, we begin to knit embossed double crochets. There are 24 stitches in this row. The third row is knitted like the second, only with a gray thread. 
Video lesson:
We used 50 grams of turquoise acrylic yarn. Hook No. 2 was used. First of all, a chain of 40-50 air loops is cast on. The exact size is determined by the circumference of the baby's wrist. Next, they are connected into a ring, three lifting air loops are made, and the first row is knitted with double crochets.
Next are two lifting loops, and we begin to knit 1x1 elastic raised columns, knit and purl, tying in turn to the front and back machine. On the next row, the operations are repeated until a 3-centimeter elastic band is knitted. Patterns with beads for decoration are knitted separately. 
Video lesson:
Instructions for beginners. Thin cotton yarn was used in two threads with crochet number 2. After the first loop, 7 air loops are cast on. One loop is added and single crochets are worked over the back thread of the base loop. Subsequent rows are knitted in exactly the same way as the second. In total you need to make 25 rows.
The resulting strip is connected into a ring. It turns out to be an elastic band for a mitten. Next, three single crochets are knitted onto two rows. The number of loops will increase by a third. Next, knitting continues in a circle. 
Video lesson:
A chain of thirty chain stitches is knitted. They are connected into a ring, after which an air loop is made, and a single crochet is knitted, then a chain loop is knitted again, two are skipped and a double crochet is made in the third, a double crochet is knitted, then another one is knitted in the same loop, then a chain loop and two again double crochet.
Again, two loops are skipped, and the third is knitted with a chain loop and a single crochet. The resulting fan pattern is repeated - two loops are skipped, and a chain loop and two double crochets are knitted into the third. The pattern is repeated. 
Video lesson:
Step 1
Set of loops.For the upper part of the mitten, make 8 half-columns into a thread ring, and instead of the 1st half-column, tie 2 lifting air loops. Finish this and each subsequent circular row with 1 connecting column in the uppermost lifting air loop.
In the next circular row, increase the number of loops to 16. To do this, knit 2 half-columns
on one loop of the base.
Divide these loops as follows: the 1st loop is the right middle loop, the next 7 loops are the top side of the mitten, the next loop is the left middle loop, the remaining 7 loops are the inside of the mitten.
Starting from the 2nd round, knit in rounds in a forward and backward direction so that the beginning of the round does not move. To do this, turn the work after each circular row.
Then, to expand the upper part, in every 2nd circular row, make a loop before and after both middle loops, respectively, 2 half-columns = 4 increases per 1 circular row.
The number of loops to achieve the girth of the hand, as well as the length, are given in the table (see below) or in the instructions.

Step 2
Inner side.After reaching the specified number of loops, knit further without increases until the jumper of the thumb.
For the thumb jumper, make 2 half-stitches in the loops before and after the left middle loop = 2 added jumper loops. Then leave the loops untied.

Step 3
Thumb and thumb wedge.Start knitting as follows: make 8 half-stitches into a thread ring,
In this case, instead of the 1st half-column, tie 2 lifting air loops. Finish this and each subsequent circular row with 1 connecting column in the uppermost lifting air loop. In the next round, increase the number of stitches to the number of stitches corresponding to the girth of your finger. To do this, evenly distribute, tie 2 half-columns on one loop of the base. The number of loops, as well as the length of the finger, are given in the table or instructions.
Starting from the 2nd round, knit in circular rows in the forward and backward directions so that the beginning of the round does not move. To do this, turn the work after each circular row.
Upon reaching the appropriate length of the thumb, make 2 half-stitches for the thumb jumper in the first and last loop = 2 added jumper loops.
After this, knit on all loops, while in the 1st round row knit together both first loops of the inside of the mitten, the last 2 loops outside mittens, as well as the first and last 2 thumb loops. Thus, the added loops for the thumb bridge will be reduced again.
Next, for the thumb wedge, in each round, knit together the last stitch of the outer side of the mitten with the 1st loop of the thumb and knit the last loop of the thumb together with the 1st loop of the inside of the mitten. Repeat these decreases in the same places until the thumb loops are decreased. Now the same number of loops is in operation as before the thumb jumper began.
After this, knit the mitten length indicated in the table.
Step 4
Cuff.Most often it is knitted with embossed double crochets so that it tightens slightly. If the number of loops is not suitable for the pattern, then in this case in the 1st circular row you can easily reduce 2-3 loops. At the desired length of the cuff, leave all the loops untied.
Use the end of the thumb thread to stitch the jumper and sew it closed.


Photo: “Little Diana” magazine. Special issue" No. 9/2015
And today’s master class is for those who prefer crochet needles to knitting needles. Crochet mittens for children are crocheted quite quickly. The result will please you: tight knitting with single crochets makes the finished product very warm. However, mittens can be made even warmer if you knit them a little looser than necessary for a child’s hand, and add a lining made of knitwear or even fleece.
I crocheted baby mittens in addition to. Both are made of acrylic, but you, of course, can choose the yarn at your discretion - for example, wool, if the child is older, and the mittens do not have to be washed often. Due to frequent washing, I prefer mostly soft acrylic - it holds up well to frequent washing, is pleasant to the touch and is still quite warm.
To crochet children's mittens you need:
acrylic yarn of two colors (white and blue) YarnArt Elite (100 g/300 m);
a hook of a suitable size.
Crochet baby mittens: job description
We start knitting children's mittens with an elastic band around the wrist. I offer a calculation for mittens for a 4-5 year old child. Of course, you can very easily adapt this calculation for mittens of any size, even for adults.
I made elastic cuffs on the mittens blue color, 10 chain stitches wide. Of course, you can make it narrower or wider - at your discretion.
So, we knit 10 ch with blue yarn. plus 2 ch. on the rise.

We knit 10 double crochet stitches plus 2 ch. on the rise. We unfold the knitting.

We knit 10 double crochet stitches, and for each stitch we grab the front half-loop. We reach the end of the row - 2 vp. on the rise. Turn the knitting.


This is what the knitting looks like from the other side now.

10 double crochet stitches, grabbing the back half loop for each stitch.


We continue to knit the elastic band, alternating rows of grabs for the front and back half loops.
In this way we knit 14 rows or as many as necessary.

Fold in half, right side inward, and “sew” the edges with a single crochet. The result is a cuff.


We tie the edge of the cuff in a crayfish step, cut the thread, fasten it, and tuck the tip.

Take a white thread and tie the second edge of the cuff with single crochets. I got 32 of them.


We begin to knit the fifth row. Having reached the place where the thumb should be, make 1 ch. to rise, unfold the knitting and knit in the opposite direction, to the place where the thumb should be. I have 4 loops for my thumb.


We get to that place, knit 4 ch, make a tack on the other side of the hole for the finger, fasten the thread and cut it.
We continue crocheting a baby mitten with blue thread. Determine the beginning of knitting in the middle of the palm, where the cuff seam is. We knit 6 rows with single crochets.


Then we knit 6 more rows with white thread. At this point the white thread can be cut, because then the mitten will end and it will end with a blue stripe.

We knit the first row of the blue stripe without decreasing.

Starting from the second and each subsequent row of the final blue stripe, we knit it like this: reaching the place where the knitted fabric folds, we decrease one stitch; We knit the “end” loop with a single crochet. Then, having already moved to the second side of the fabric, we decrease one loop again. We do this on each fold until the mitten closes with a beautiful corner.

Pay attention to the method of decreasing loops (without a hole):


We fasten the thread, cut it, and tuck the tail inside out.
Let's return to knitting the thumb.

We tie the hole with single crochets - I got 12 of them.

We knit 7 rows with single crochets.

Starting from the 8th, we decrease every second loop. So we do 2 rows. Then close the hole, cutting off all the loops. We cut the thread and tuck the tail inside out. We knit the second mitten in the same way (do not forget to mirror the location of the thumb).


Crocheted baby mittens are warm and beautiful, ready for a walk with your baby.
Eva Cascio specifically for the site


