
Despite the abundance of Christmas tree decorations on sale, there are more and more fans of creating their own unique Christmas tree. A forest beauty decorated with Christmas tree decorations made with your own hands from scrap materials for the New Year 2019 can bring a special unique aura and charm of magic.

In addition, this is a fascinating activity that can unite the whole family in a single creative impulse and increase mutual understanding between parents and children. We offer you a selection of Christmas tree decorations, very simple to make, but incredibly effective in result.

 Photos of Christmas tree decorations made from scrap materials
 Christmas ball pig
Prepare:
- Christmas ball;
- hot glue;
- acrylic paint, pale pink, black;
- acrylic lacquer;
- sponge;
- brush;
- polymer clay – pink and white.
Manufacturing Christmas decorations in the form of a pig:
- Remove the loop from a Christmas ball of any size you choose.

- We paint the ball itself in a soft pink color using acrylic paint and a sponge, and let it dry. It’s very convenient to make several of these cute toys for a Christmas tree of different sizes at once.

- After drying, apply acrylic varnish to the ball to fix the paint and give the Christmas tree toy a smoother and shiny surface.

- After the ball has dried again, we insert the hanging loop that was removed at the beginning; you can thread a pre-prepared ribbon into it, tying it with a spectacular bow.
- We take any work surface on which we will create all the decorative elements for the Christmas tree decoration in the form of a symbol of the coming year.

- First, take a small piece of pink polymer clay, knead it and give the shape of a round or oval shape, you can do both if you are making several Christmas tree toys for the New Year 2019.

- We attach the resulting patch in the middle of the ball, with a sharp stick or a regular pencil we form two holes on the patch.

- From a piece of white clay, divided into two equal parts, we form eyes in the form of two flat droplets, attach them above the patch, close to each other.

- Next, take a small piece of white clay, divide it in half, and give the two pieces the shape of small identical triangles.
- From pink clay we make similar triangles of a smaller size, place them on white triangles, slightly bend the tops to make them look like pig ears, and attach them to the top of the ball.

- We make a sausage from a piece of pink clay, divide it into 4 parts, make a notch on one side of each part with any object, so we get hooves. We also attach the legs to the ball and check that it stands stable.

- Remove all the parts from the ball or several balls and place in the oven for 15 minutes.

- After removing from the oven, glue all the parts to the ball with hot glue. We draw the eyes with black paint.

You can also continue the decor by applying “freckles” to your cheeks in any way.
 Photo: Christmas tree toy pig
 Christmas ball made of paper
This DIY Christmas tree toy, made from scrap materials, will decorate the atmosphere for the New Year 2019!
Prepare:
- colored double-sided paper of different colors - 12–13 sheets;
- scissors;
- glue.
- Fold each sheet of paper in half and cut out two circles with a diameter of approximately 14 cm.
- We bend each circle in half, put all the halves in one stack, determine the middle on the rounded side and make a small notch with scissors.


- We glue each circle from the inside at the notch, dripping a little glue.
- From plain paper we cut out exactly the same circle as all the others, bend it in half, then in half two more times. Unfold to the first fold, mark with a pencil the places of the last bend.


- We again collect all the bent semicircles from colored paper into a stack, attach a semicircle with notes, and make the same notes on the first colored semicircle.
- We remove the plain paper blank, align the stack in our hands and make notches with scissors in the places of the marks.

- Applying glue to the places of the notches, we glue all the colored semicircles together, placing them on top of each other one by one.

- After the glue has dried, unfold the resulting structure and glue the first and last halves of the circle.

We got a great bright ball for our Christmas tree - simple and effective!
You can thread a piece of Christmas tree tinsel into the central hole, making a knot at the bottom. We hang several of these balls, made from improvised materials with our own hands, on the Christmas tree.


Ribbon pig
A cute pig from improvised materials will decorate the Christmas tree for the New Year 2019. And you can make it together with your children using our photo master class.
Prepare:
- pink silk ribbon measuring 12 cm in width and 3.5 m in length, as well as two squares measuring 5 cm * 5 cm;
- pink felt, square size 7 cm * 7 cm;
- red or black beads – 2 pcs.;
- lace – 30 cm;
- small pieces of red and white felt or other dense fabric;
- needle and light thread;
- hot glue.

Manufacturing with step-by-step photos:
- We sew the entire satin ribbon, having previously treated the edges with a lighter, in the middle with a basting stitch, gathering it to a size of 26 cm, and secure the thread at the end with a knot.


- We cut out two circles from pink felt, a base with a diameter of 5 cm for the pig’s muzzle and a base for the snout, with a diameter of 2 cm.
- From small squares satin ribbon We make ears, for which we bend each one diagonally, and then twice more. We seal the joint with a lighter, cut off the bottom at an angle, and process it again with a lighter.


- We give the blanks the shape of ears, apply glue to the very corner, press it to create a more natural look.

- Now, in a small felt blank, mark two holes using black thread, making several stitches at a time.
- We bend the prepared cord, glue it to the felt base, and glue two ears next to it.

- Apply glue to the center of a large felt blank, glue one end of the assembled satin ribbon, then glue it in a circle, coating the base with glue.


- In the center we glue the blank for the piglet and the eyes - beads, the Christmas tree toy in the shape of a pig is ready, it will certainly appreciate your efforts.

- If desired, you can also glue together a Santa Claus cap from red and white felt and glue it on top. You can make toys with or without a cap for variety.
 Photo
Photo Snowflakes made from glue
It couldn't be simpler! And what beauty from scrap materials!
Prepare:
- silicone glue (gun);
- white acrylic paint;
- any sparkles;
- polyethylene, foam;
- paper clips

Making a Christmas tree decoration step by step:
- Samples of snowflakes can be printed from the Internet; select several types you like at once.
- Secure the snowflakes with paper clips and polyethylene, place them on the work surface so that the polyethylene is on top.
- Apply glue to each line of the snowflake, let it dry, and remove it from the polyethylene.
- Apply white acrylic paint to the snowflake, sprinkle with glitter and dry.
- Thread a beautiful lace or satin ribbon and decorate your magical New Year tree with snowflakes.
 Photo: Snowflake made of glue
 Flower garlands made from plastic bottles
You can make such a Christmas tree toy with your own hands from plastic bottles, which is quite easy and simple. The final craft for the New Year 2019 will be a decoration for the holiday.
Prepare:
- several plastic bottles with caps (depending on the size of the garland, but not less than 30–40);
- sharp knife;
- spray paints;
- scissors;
- electric garland.
Manufacturing with step-by-step photos:
- We cut off the tops of all plastic bottles, divide the cut surface into several segments, and draw the corresponding lines with a pencil.

- We cut the plastic tops along the lines with scissors, round the edges, giving the shape to stylized petals (the shape can be different, round or pointed).

- We paint all the petals with multi-colored paint, showing imagination and creativity, and leave to dry.
- While the petals are drying, we make cross-shaped cuts in each lid and insert light bulbs from the garland into the resulting holes.


Christmas tree decorations made from pasta for the New Year 2019

Prepare:
- pasta: spirals, wheels, horns, shells, bows;
- glue moment;
- PVA glue;
- gouache paint, titanium white;
- paint brush;
- any sparkles.
Manufacturing:
- Prepare the work surface and lay out the pasta various types whimsical compositions, showing imagination.
- Place the pasta tightly next to each other, seal the joints with instant glue, and let it dry.
- Cover the pasta snowflakes with white gouache using a brush and leave to dry.
- Apply PVA glue to the surface of the snowflakes with a brush, sprinkle with various prepared sparkles. Dry and decorate the tree by threading a hanging loop into any hole.
New Year's ball made of ribbons
Christmas tree decorations do not always have to be difficult to make; beautiful products with your own hands can be made from scrap materials quickly and easily!
Prepare:
- foam ball, ready-made or cut from a foam blank;
- satin ribbons of different colors;
- thin sewing needles with heads.
Manufacturing:
- You can make such balls in either mono or multi-colored colors. We cut several blanks of satin ribbon 2.5 cm wide and 7 cm long, as well as a square measuring 3 cm * 3 cm.

- We secure a square of satin ribbon of the color of your choice on one side of the ball with pins.
- We roll each piece so that we get a triangle and attach them on all four sides of the square.

- We lay the workpiece so that the top of the triangle falls in the middle of the square, secure the triangles with pins in the places where the tape bends at the bottom on both sides.

- We begin to attach the satin ribbon triangles to the second row, placing them in a checkerboard pattern.

- We fill the entire surface of the ball, close the remaining gap with a square of satin ribbon, and attach a bow from the same ribbon or a ribbon of a smaller width on top.


 Photo: This is beauty from improvised means
 Christmas balls from disposable alcohol cups
Prepare:
- foam balls 7 cm in diameter;
- small disposable cups – 17 pcs. (for one ball);
- various acrylic paints;
- brush;
- hot glue;
- PVA glue;
- any sparkles.

Manufacturing:
- We paint all the cups with acrylic paint from the inside using a brush and dry them.
- We paint the rim on the outside and inside with white paint and dry it.
- Apply glue to the white rim on the outside and inside and sprinkle with glitter.
- We attach the prepared cups to a foam ball with a bottom greased with hot glue, placing them as close to each other as possible.
- We make a small hole in a free space on the foam ball with a sharp object and insert the end of a loop prepared from any thread, lubricate it with glue.
- Similarly, you can make Christmas balls, gluing multi-colored cones painted with paint, as well as fluffy pompoms made from knitting threads, to a foam ball.
Christmas tree made of satin ribbons
Prepare:
- blanks made of multi-colored satin ribbons size: 2.5 * 5 cm, 4 * 7 cm, 5 * 9 cm - 15 pcs.;
- hot glue;
- small base pin;
- lighter;
- a loop from any Christmas tree decoration;
- scissors;
- beads or rhinestones, as well as one shiny element to decorate the bottom of the Christmas tree.

Manufacturing with video step by step:
- We fold each piece in half twice, and treat the bottom with fire from a lighter.
- We stack the resulting blanks of three different sizes one on top of the other in descending order of size.
- We fold the resulting structure in half, cut off the bottom at an angle and treat it with fire. So we prepare all the elements, giving them the shape of a stylized petal.
- Glue the petals together in groups of 5, smearing the sides and pressing them tightly to each other. We will have three tiers for the Christmas tree decoration.
- We string all the blanks onto the prepared pin, coating the joints with the blanks with glue.
- On top of the stylized Christmas tree we attach a loop from a Christmas tree decoration using glue.
- At the bottom of the Christmas tree we glue a prepared shiny element or a large bead in the center.
- We glue a bead or rhinestones into the central inner corner of each leaf, and an incredibly stylish and elegant Christmas tree toy is ready.
Video of making a beautiful Christmas tree toy:
Felt Christmas toys
Felt Christmas tree decorations amaze with their variety, they are easy to make and are an excellent decoration for a cozy home Christmas tree.
Prepare:
- felt multi-colored pieces;
- multi-colored knitting threads;
- needle with a large eye;
- beads, rhinestones, sequins, buttons and other similar decorative elements;
- padding polyester or cotton wool;
- paper;
- pencil;
- scissors.
Patterns for felt Christmas tree decorations (photo gallery):


Manufacturing step by step:
- We put animal figures or other objects on paper and cut out patterns.
- We place the patterns on the prepared pieces of felt. If we are making a toy from thick felt, then we cut out one part of each pattern.
- If we make three-dimensional toys from thin felt, then we cut out two parts for each figure.
- We sew the parts either from the inside, then turn them inside out, or we sew them with a decorative seam using multi-colored knitting threads on the front side of the toy.
- We fill the workpiece with padding polyester or cotton wool, giving it the required volume, and process the open space.
- We sew the corresponding decorative elements onto the toys, showing imagination. You can also actively use embroidery, as well as decorative colored stitching, to decorate felt toys.
- If we are making a toy in the form of an animal, then we attach all the necessary details from scrap materials: eyes, nose, mouth.
- We sew loops onto the resulting bright and varied felt Christmas tree decorations and decorate the tree for the New Year 2019.


Christmas tree decorations made from multi-colored paper napkins for the New Year 2019
Prepare:
- paper napkins of different colors;
- scotch;
- stapler;
- scissors;
- PVA glue.
Manufacturing:
- First, we prepare a ball of small diameter from newspapers, squeezing them into a tight lump, such a ball will be very light. Having achieved the required diameter, we secure the paper with threads or tape, then wrap it in white paper and coat it with glue.
- We make blanks from paper napkins, for which we fold them in four if the napkins are ordinary. We first cut large holiday napkins into large squares along the creases, and then into three strips, which we also divide into squares.
- We put the resulting squares in a stack, take 8 pieces each and connect them with a stapler in the center. You can round the squares and get circles for a greater variety of options for such crafts.
- We lift each square upward and thoroughly compress it, then we fluff all the layers a little and get a nice stylized flower.
- Glue a loop from a Christmas tree toy onto the ball using hot glue.
- Apply glue to the base of each flower and glue them onto the ball tightly to each other, filling the entire surface of the ball with flowers.
If desired, you can glue various shiny decorative elements in some places, the incredibly beautiful, fluffy and light Christmas tree toy is ready.


Christmas tree toy made from a wooden blank
Experienced crafters will appreciate this Christmas tree toy!
Prepare:
- round wooden blank for needlework;
- acrylic paint of any color;
- white acrylic paint;
- sponge;
- brush;
- glue;
- decorative elements.
Manufacturing:
- We generously paint the wooden blank with acrylic paint in the color of your choice and dry it.
- We paint the end part of the workpiece with white acrylic paint using a sponge.
- We glue the prepared decorative elements onto both sides of the Christmas tree decoration, showing our imagination.
If the blank you purchased has an eyelet for a rope, then use it and thread a ribbon or cord, securing an elegant bow made of satin ribbon at the base of the eyelet, securing it with glue.
CURRENT
See how to do it New Year's toys for a Christmas tree from plastic bottles, from yarn, from felt and even from bushings from toilet paper, as well as the symbol of 2018 - a dog.
Christmas toys made from yarn

You can quickly create such openwork decorations from scrap materials. You will need:
- yarn;
- plastic tray;
- Bowl;
- pins;
- PVA glue;
- marker;
- paper.

Now lay the yarn so that you get symmetrical curls or use a pattern that you come up with yourself.

Set aside the work, let the product dry completely, after which it’s time to hang it on the Christmas tree. In the same way, you can make a smaller copy of this tree. Don't forget to make a loop for hanging it on the tree.
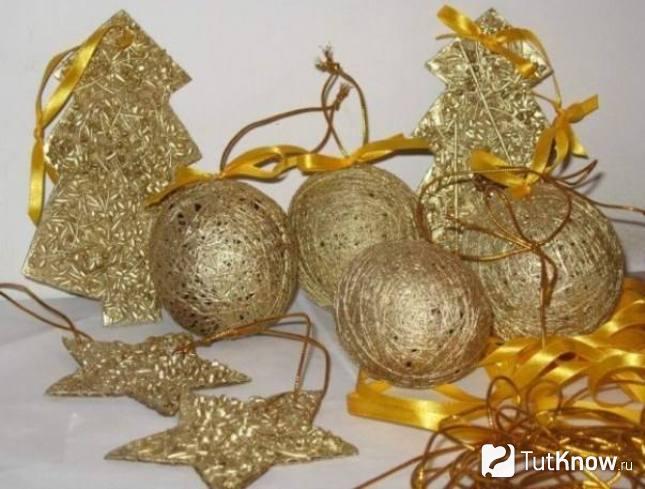
Yarn is a very pliable material, so it can be used to create toys of almost any shape.

To make such a ball for the Christmas tree, take:
- white threads;
- Balloon;
- glitter;
- PVA glue;
- a bowl.

Now take the ball out of the bowl and let the glue drip off. Then cover the piece with glitter and hang it up to dry. When a day has passed, pierce the ball with a needle and remove it through the hole. Such a product can not only become a decoration for the Christmas tree, but will also decorate the room after the New Year.

Not only white threads, but also colored yarn will quickly turn into Christmas tree decorations. You will start 2018 with your own hands by contemplating a decorated Christmas tree, the items for which you will make yourself or with the involvement of other family members.

Very soon you will have such sparkling balls. To make them, you need to take:
- yarn;
- air balloons;
- bowl;
- glue;
- scissors;
- a needle.

As in the previous case, saturate the ball with PVA glue diluted with water. Hang the workpiece to dry, then pierce the ball to remove it. If you want, don't pierce it, just untie it and let the air out. Then you can remove the whole ball and use it.

If you want, make a backlight for each product by attaching Christmas tree garlands or an LED inside the element.
For such creativity, you can use almost any thread, even jute cord. See how decorating such products with satin ribbons gives them additional charm.

If you wish, cover the finished balls with gold paint, it will turn out very beautiful.
The next DIY Christmas tree decoration can then be taken to school or kindergarten.

Similar decorations are also made from yarn. First, pompoms are created from it, then they turn into an animal or bird. To make such a Christmas tree toy, take:
- yarn of the desired color;
- PVA glue;
- colored cardboard.

By the way, you can use this base to create other Christmas tree decorations. It can be round, heart-shaped, drop-shaped or Christmas tree-shaped.

You will need to wrap the cut-out cardboard blank with threads, secure the ends with glue, then decorate the toys at your discretion.
How to make Christmas tree decorations from felt?
This material is very beneficial; even beginners can use it to create decorations for the New Year’s holiday. In this case, you do not need to have sewing machine, since the presented felt Christmas tree decorations are sewn by hand.

If you want to create such a Christmas tree, then take:
- cookie cutter;
- green felt;
- scissors;
- light green threads;
- a needle;
- multi-colored beads.
Decorate the Christmas tree with beads; you can also use round buttons on the stem.
If you have red and white felt By combining these colors, you will create incredibly beautiful Christmas tree decorations.

If you don’t know what to give your friend, mother, or grandmother for the New Year, you can sew oven mitts from felt that match the mood of this holiday and give them to them.
To make the following felt Christmas tree decorations, you don't need any patterns. But if you are not sure that you can immediately cut out the star correctly, then first draw it on a cardboard template, cut it out, and then attach it to the felt. Draw with chalk and cut out two parts for each toy.
Such blanks are placed one above the other, a padding polyester is placed inside and swept along the edge with a basting. Sew on the beads, attach a loop on top and you can hang the decorations on the New Year's tree.

Even small scraps of felt will be useful. Cut out snowflakes of various shapes from them, sew them to each loop so that you can hang these products on the Christmas tree.

To make the next decoration, you need to cut a strip of felt 5 cm wide, and if you need a Christmas tree decoration for a large Christmas tree, then make it 10-15 cm wide. Cut one of the long edges of this strip of fabric in a straight line, making cuts at the same distance.
Roll this cut ribbon into a tight log. Sew a braid on top to secure the workpiece in this position. Sew on the loop, after which the work can be considered completed.

Decorate the Christmas tree with felt pine cones. To do this, take light and dark colored material.
On cardboard, draw patterns of flowers of different sizes, consisting of 4-8 petals. Thread a strong thread into a needle, string these blanks onto it in the following sequence: first put on it a small brown circle with a tail made of the same fabric, then put on a small light flower, and on it a brown one of the same size. Next comes a pair of slightly larger blanks.
Using this technology, assemble the cone so that the largest pieces are in the center. String further smaller ones, the smallest flower last.

If you are crafting with your child, have him draw a Christmas tree on paper, cut it out and use this template to create a felt tree. It is decorated with white circles that represent snowflakes.

Under the strict guidance of adults, a child will be able to make a snowman out of felt.

For such a toy, you need to cut a blank out of white fabric, consisting of two circles of different sizes. You will need 2 parts for each character. They are not completely sewn along the edges, then the padding polyester is put inside, and only then the remaining slot is swept away. All that remains is to decorate the figurine with a scarf, a hat, and sew on facial features from leftover fabric.
If you want to make a New Year's wreath, you can also use felt or other thick fabric. For the base, you need to cut two rings from such a fabric and one from padding polyester or holofiber. This soft filler is placed inside, the edges are swept away.

Now you need to decorate the wreath with gingerbread characters. Look, they are given in the next pattern.

For each, you also need to cut out two parts, seal them with filler, and decorate the blanks, following the photo hint.
DIY Christmas tree toy in the shape of a dog
Since 2018 is the year of the dog, don’t forget to hang a toy made in the shape of this animal on your Christmas tree.

If you want the New Year’s dog toy for the Christmas tree to be as voluminous as in the photo, then you need to cut out two outer parts of the body from fabric, as well as two inner lower ones. Small blanks are sewn together and also ground together with large ones. The head will be more voluminous if an insert is sewn on top.
A dog Christmas tree toy can be made from almost any material. Even a toilet paper roll will do. See how this scrap material can be turned into a fun dog.

To do this, just press well on the top of the workpiece to mark the animal’s ears. Then you need to paint the sleeve and glue the parts of the dog’s muzzle, tail and paws to it.
Here's another idea for such a decoration. If you want the toy to hang on the Christmas tree, then fold the thread into a loop and glue it to it. The bushings are arranged horizontally, then to each you need to glue the muzzle and paws of an animal made of paper, paint it all in the appropriate colors.

You can make a lot of funny dogs out of these bushings. It will be enough to glue to each paw and a muzzle on which ears and facial features are drawn, and the dog’s New Year’s toy for the Christmas tree is ready.

If you need to quickly decorate trees or a room for this holiday, then inflate balloons and glue two ears to each. Using a marker, draw the features of the muzzle, you will get wonderful dogs.

Even old hats can be turned into original dogs. Cut out eyes and ears from felt, and make a nose from pompoms. Glue these elements onto the hat, after which you can admire the work done.

If you have popsicle sticks, glue them onto a cardboard base to create the animal's face and front legs. Attach eyes for toys, other facial features, as well as ears and tail.

You can also make a dog for the New Year from a plastic bottle. The following photo tip will help you create it.

By the way, you can make other decoration elements for this bright holiday from plastic containers.
New Year's toys made from plastic bottles

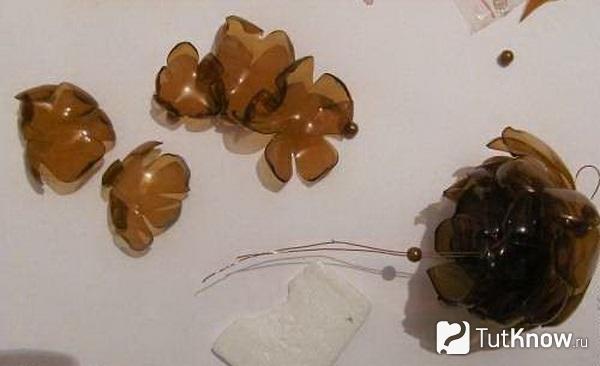
To make such a pine cone, you need to take:
- brown plastic bottles;
- scissors;
- pliers;
- awl;
- wire;
- beads.
Make a hole in the center of each with an awl. Hold these flowers over the flame of the burner, holding them with pliers. When the pieces have cooled, string them onto the wire, starting with the largest one. Secure with beads so that the elements do not move out.
To make a ball from a plastic bottle, take this container and cut out rings of the same size from it.
Now connect all of them together so that the blanks resemble a ball. Tie individual elements using rain.

Now you can decorate the balls with tinsel and sparkles by gluing these elements to the base.

What's a Christmas tree without a New Year's bell? To make such a toy, take:
- plastic bottles;
- scissors;
- glue gun;
- polystyrene foam ball;
- ribbons;
- organza;
- sandpaper;
- nylon thread;
- decorative elements;
- gold paint.
To prevent the cut from being sharp, go over it with sandpaper or burn it over a flame.
Paint the items with gold paint. Through the neck, lower the nylon thread down, to which you need to tie a polystyrene foam ball. The organza ribbon should be glued to the bottom of the bell. Attach wire to hang the bell on the tree. But first, don't forget to decorate it as you wish.

The wreath will become a decoration for the Christmas tree or room decor. To do this, you need to cut off the bottoms of plastic bottles, cut them to make these pointed flowers, and then connect them to form a wreath.
Options for how to do it Christmas decorations made of paper for the New Year, a lot, we tried to make an interesting selection of ideas and master classes. All you need is available materials that can be found in any home, any paper, a little patience and creative imagination!


Balloons
The most common and versatile toys on New Year with your own hands - Christmas balls. You can make it from any thick paper: colored cardboard, colorful postcards or old magazine covers. Plain colored balls will give a uniform style to the room, while multi-colored ones will give an atmosphere of fun and fairy-tale magic.

So, before you start making New Year's paper toys, you need to prepare the following:
- thick paper with a pattern;
- scissors;
- PVA glue;
- a compass or any object that, when outlined, can be used to reproduce a circle (jars, lids, glasses, etc.).
How to do:
- Draw 21 identical circles on paper and cut them out with scissors.

Prepare the mugs as follows:
- bend the circle in half twice (this is necessary to determine the center);
- straighten the circle and bend one side so that the edge of the circle is exactly in the center;
- bend two more sides of the circle to form a triangle with equal sides;
- cut out the resulting triangle, which will act as a pattern for the remaining parts;
- Place the triangle on the remaining circles, trace with a pencil and bend the edges outward along the lines.
- Glue 10 circles together on both sides so that you get a strip: 5 circles on top, and 5 on the bottom. The strip must be glued into a ring. This will be the base for the ball.

- Divide the 10 remaining parts into 5 pieces, which are glued into a circle. The result was two “lids”.

- Glue the upper and lower “lid” to the base in sequence.
- The loop by which the ball is suspended can be made from a thread threaded through the top of the toy with a needle, or from a beautiful ribbon. The ribbon loop is secured with a knot and threaded through the top of the ball “cap” before gluing it to the base. The knot remains inside the toy, and the loop remains outside.
Original paper toy ready for the new coming year with your own hands!
Balls made from strips of paper
Make these New Year's balls so simple that there is no point in describing it in detail - see the pictures below. The secret of success: pleasantly colored paper and decorative beads for decoration.


Volumetric snowflake
Another indispensable attribute of the New Year is snowflakes. They can be the simplest, cut out of a sheet of paper in a random design, or they can be voluminous using the origami technique. We suggest making the latest version of the New Year's snowflake with your own hands.

To do this, you need to cut out six squares of the same size, fold each of them diagonally, and then in half. Parallel cuts are made along the fold. The square unfolds, the inner tabs are wrapped and fastened together.
The outer petals are connected to the same petals of the remaining squares. You can attach them using either glue or a regular stapler.
Paper candies for the Christmas tree
This decor can be made even for kids. How to create well Christmas mood together with children, who did this - knows what I mean :)

Lots of ideas and master classes on DIY paper candies for the holiday.
Cubes with photos
Original and memorable toys for New Year's holiday will be made from paper cubes with photographs of family members or events of the past year.
Moreover, you can make such Christmas tree decorations with your own hands every year by pasting in a current photograph.
Thus, in a few years you will have a whole Christmas tree photo album!

To form such a cube, you need to cut out six identical circles from paper or squares. The edges of each element are bent so that a square is formed at the base. Then the folded edges are glued between the remaining parts into a box. Favorite photos from the past year are glued to the sides of the toy and a loop is threaded.
Paper lanterns for the Christmas tree
I think everyone made paper lanterns when they were kids. Old idea in a new incarnation:


More diagrams and photographs of paper lanterns.
Paper angels for the Christmas tree
What's Christmas without angels? The easiest way to make a must-have for each home is from paper:


A large selection of master classes with stencils of angels.
By the way, these could just be angel wings, look how simple and beautiful it is:

Stencil, click to enlarge:

Magic garland
On the eve of the New Year, you can make an original magic lamp from a simple LED garland. To do this, you just need to cut out ordinary paper snowflakes with your own hands.

If you don’t have the time or desire to do this, you can buy lace paper napkins at the store and use them as snowflakes.
All that remains is to thread the garland bulbs through the finished snowflakes and hang the tree, wall or window. The twinkling of colorful lights through intricate patterns will create a truly fabulous atmosphere for the New Year.
Paper snowflakes for Christmas tree
There’s nothing new to say here, perhaps we’ll just recommend trying it out of paper.


Paper flowers for the Christmas tree
It's a good idea to vary the decor. Why only snowflakes, balls and lanterns? Let's decorate the Christmas trees with flowers! See the photo below and get inspired:


Paper stars for Christmas tree
The star on the tree is a classic. Let's make it out of paper, and the pictures below will help you evaluate the options:


Cardboard Santa Claus
Funny paper Christmas decorations are made using a small piece of cardboard, glue and a felt-tip pen. You can make any fairy-tale character for the New Year, but the most relevant one is Santa Claus.
A red cardboard square is rolled up into a tube and fixed with glue. The top of the toy is bent in the shape of a triangle-cap, the bottom is crushed into a semicircle in the form of legs. A white beard triangle is glued to the cap, and a face is drawn with a black felt-tip pen. All that remains is to secure the loop.
In a similar way, you can perform a whole New Year's landing of Santa Clauses and decorate the entire Christmas tree with them. (Click to enlarge image).
Such unusual toys with your own hands for the new coming year will remain in the memory of all household members for a long time, especially the little ones.
Santa Clauses made from cones


New Year cards
Did not you forget? ? Watch the video for simple and quick ways:
I really liked the simple and stylish cards made from kraft paper:
Everyone wants to give a surprise to their loved ones on Christmas and New Year. And you can bring the celebration closer with your creative powers. Take note original ideas, which we have collected in the selection below, and then the upcoming winter holidays will sparkle with completely new colors. Don’t be afraid to create, involve everyone at home in the process - this will bring the family closer, and maybe even become the beginning of a new tradition.
Winter flowers
It’s not difficult to make a beautiful New Year’s tree bloom. In order to make such Christmas and New Year toys with your own hands on the eve of 2018, you don’t even need to use a special colored paper, opting for old books or newspapers. Such buds will look original, and you will pay tribute to the currently fashionable eco-trend. So let's get started:
- cut out a perfect square from paper;
- fold it in the same way as shown in the photo;
- repeat this with the remaining 4 sheets of paper;
- glue the resulting blanks together to form a flower;
- We decorate the middle with tinsel, beads, in a word, anything that seems suitable to you.
Ice shards
Who would have thought that old CDs could be used to create such creative balloons? Yes, in most cases, making New Year's Christmas tree decorations will not require either serious material expenditure or the skills of a professional designer. This is what the next master class proves.
To work, you will need transparent (in principle, you can use colored) plastic or glass balls, an unnecessary CD, scissors, and a glue gun.
- using scissors, cut the CD into pieces of arbitrary shape and size;
- Apply droplets of glue to the surface of the ball and fix the “mirror” fragments in the desired order, evenly covering the ball on all sides and leaving no empty spaces.
The result is a wonderful toy, no different from expensive designer works. Their soft shine will perfectly complement the overall impression of a magnificent Christmas tree.
Cute snowflakes
A simple but wonderful decoration in its laconism is snowflakes. Backing material... rolls left over from toilet paper or kitchen towels. Also stock up on scissors, glue, decorative elements in the form of large rhinestones and thin fishing line. The whole process looks like this step by step:
- we crush the sleeve, pressing it well from the edges;
- cut the bushing into strips of equal width. The resulting elements are visually reminiscent of flower petals;
- glue the resulting blanks together in the center so that you get a flower;
- decorate the middle with rhinestones;
- We thread a fishing line through one of the petals. That's it, the snowflake is ready to float near the branches of your Christmas tree.
Felt fantasy
Here are some more fun DIY crafts. The toy can become either an independent element of holiday decor or act as a integral part a whole garland.
- Cut out a square from felt of the desired color;
- draw it out as shown in the photo;
- cut along the lines with a stationery knife, not reaching the center;
- glue the strips together, folding the corners on top of each other;
- we alternate actions alternately from one side to the other;
- We hang the finished toy on a fishing line, decorating it with beads.
If desired, you can create a whole vertical garland from several similar parts, interspersing them with beads. The toy can be hung on the Christmas tree or placed in the interior.
Snowball game
It’s very easy to make fluffy balls of snow that won’t melt no matter how warm it is in your house. We use foam blanks in the form of balls, mother-of-pearl beads, sewing pins, glue, scissors, and braid. The process of making such a toy comes down to the following steps:
- string beads onto pins;
- Having coated the end of the pins with glue for better fixation, we stick them into the ball;
- We continue this until we cover the entire surface of the toy with beads;
- We attach a braid or ribbon to the ball, using which we will hang the decoration on the Christmas tree.
Funny ninjas
Small ninja toys with cute moving eyes will save your home’s beautiful Christmas tree from being too formal. After all, looking at such New Year’s decorations, you involuntarily want to smile.
To work, you will need very few materials: dark opaque balls (they can even be made of plastic), narrow ribbons of different colors, toy eyes (a pair for each ninja).
- We wrap each ball with two turns of ribbon, securing the improvised fighter’s bandage to a knot at the back. For greater reliability, the tape can be placed on glue.
- We glue the eyes to the ribbon on the front, that's it - decorations for the New Year can be hung on the Christmas tree.
Beauty cone
Will fit perfectly into the New Year's decor... ordinary Pine cone. It would seem how unpretentious an accessory it is, and what wonderful toys can be made from it and how many ideas can be realized. The cone can simply be hung by a coarse twine, and the top can be decorated with a beautifully tied bow made of satin ribbon to match the overall color scheme. Or make one from pine cones Christmas trees, crowning them with numerous multi-colored plasticine balls. It seems simple, but it looks really unusual and creative.
Snowflakes made from... pasta
For a thrifty and creative housewife, even pasta can become the basis for creating amazingly beautiful decorations in the New Year 2018. You can give free rein to your imagination here - after all, every new snowflake may be completely different from the previous one. All you need to do is stock up on as much as possible different types pasta in the nearest supermarket (flowers, Christmas trees, spirals, shells, etc.). You also cannot do without glue, white paint and braid (ribbon, fishing line, thread) for hanging.
We form the pattern starting from the center, maintaining symmetry. How the toys turn out depends only on your imagination. We glue the parts of the decoration together with glue. At the end of the work, paint the snowflake in White color, additionally decorating the decor with sparkles to your liking.
New Year's toys with sequins - festive glamor
You can surprise your loved ones on Christmas and New Year's Eve by making unusual, shiny decorations for the Christmas tree with your own hands. The special beauty of creating such balls is the process itself, which is addictive and very simple. So, we stock up on a small foam ball that fits easily in your hand, sequins of any color, and sewing pins.
We fix the sequins to the ball with pins, as shown in the photo, proceed sequentially, placing the shiny elements close to each other, avoiding gaps. When the ball is ready, all that remains is to place an element in its upper part to fix the decoration on the tree.
Who wants some ice cream?
Do you like ice cream? Why not decorate the Christmas tree with your favorite delicacy for the New Year, especially since you don’t need a lot of materials for this. It is enough to find thick paper to imitate waffle cones and colored napkins or small pieces of compressed paper, a needle, and thin fishing line. Having formed a cone from thick paper, we make ice cream balls from colored paper, the number of which depends on your desire. Then we form a loop from the fishing line, by which our sweets will be hung on the tree, and we thread it through our balls, as was done in the photo.
Rooster on the Christmas tree
It will look good made of paper or other materials. You can make a lot of these cockerels and collect the pendants into a garland to decorate your home. If you're going to do paper cockerel, take cardboard as a base, which you will paste over on both sides.
- You will need multi-colored sheets of colored paper (you can use colored cardboard) and a sheet of cardboard. Draw the silhouette of a rooster on cardboard and cut it out.
- Using a cardboard blank as a template where necessary, draw the details on colored paper (cardboard): head, torso, wings and tail - first fold the sheets in half so as not to waste time preparing blanks for the second side.
- The next stage: we cut out our blanks.
- Now we glue the parts made of colored paper (cardboard) onto the cardboard blank. After the cockerel has assembled into a whole picture, you can decorate it with sparkles, beads - whatever comes to mind.
- Make a hole in the blank, thread a ribbon and hang it on the tree.
You can make a similar toy from felt and also use it to decorate a Christmas tree.
Draw the pattern by hand or use any ready-made one, for example, this one:
Homemade cockerels made using the origami technique will look original.
pillow toy
Not easy, but very exciting activity for making toys is the creation of a pillow in the form of a symbol of the year, which will delight you not only in the year of the Rooster, but much longer. You will need a pattern, fabric, filler, felt (depending on the chosen model), thread and needles. Here it's a matter of small things, we trace the pattern, sew the parts together, leaving a hole to fill the pillow with filler. We turn it inside out, put the filling inside the toy, and sew it up until the end.
There is also a more complex plan with fabric painting - this is batik, thanks to which the pillow will acquire a bright color. After you have traced the cockerel on the fabric, paint it using special paints; they can be replaced with gouache if you mix it with PVA glue. We leave it for a day so that the paint dries and continue to finish the pillow in the shape of a rooster.
From salt dough
Children are often asked to bring some New Year's crafts to school competitions. Make it from salt dough. A craft made from bioceramics can also be an excellent gift from children to grandparents. Moreover, this activity is so exciting that it quite claims to be a hobby.
Before you make a toy from salt dough, you need to prepare the dough itself. To prepare the dough, use a fine table salt, ordinary wheat flour and water in a ratio of 2:4:2, respectively. First, mix flour and salt, and then add warm water, kneading the dough thoroughly for at least 10 minutes.
There is another recipe for making dough. In this case, take flour and salt in the same proportions, only the flour is pre-sifted. You need to take a little less than 1 1/3 cups of water. The cooking method will vary. According to this recipe, water must be brought to a boil and salt dissolved in it. Only then is flour added.
When the dough is ready, start making crafts. If you are doing crafts with your child, simplify the task by taking cookie cutters, for example, in the shape of Christmas trees or bunnies - you will get wonderful Christmas tree decorations. Make a toy (you can use beads or seed beads for decoration), don’t forget to make a hole at the top. To harden the toy, it is left for 24 hours or baked in the oven. After the toy has hardened, it is painted acrylic paints, gouache, watercolor, allow to dry well and cover with either colorless nail polish or nitro varnish for wood. Thread a thread or ribbon through the hole. So the New Year's gift is ready.
Photo ideas for crafts made from salt dough
Soap figures
Soap is always useful. A little unexpectedly, soap can also be used to decorate a Christmas tree. Soap toys for the Christmas tree are made by hand. The process is simple. First, we grate the baby soap on a coarse grater, melt it in a hot bath (make sure no bubbles form), pour the liquid into a mold and leave until it hardens.
- If you want to make colored soap with a pleasant aroma, then add dyes to the base - these can be either food coloring or the juice of berries or vegetables, for example, cherries, beets, carrots. Smell can be added using perfumes or flavorings.
- If instead baby soap If you use a ready-made transparent soap base, you can make soap with a “filler.” After you fill the mold halfway with melted soap, let it sit for 20-30 minutes, put a slice of lemon or orange on top, coffee beans and fill the mold completely with soapy liquid.
- In order for the soap to also have a beneficial cosmetic effect, ground coffee is added to the base, which will work as a scrub, various oils, lemon zest, ground oatmeal. Such a toy, which doubles as an excellent gift, will definitely not go unnoticed.
Big toys
Using threads, you can also create wonderful jewelry of rather large size - giants. Just inflate the balloon, wrap it with a thread soaked in PVA glue and leave it for 24 hours. After drying, the ball is burst, leaving an airy New Year's toy made of threads, which, for decorative purposes, can be coated with silver or gold paint, decorated with beads, seed beads, sequins, and ribbons. Thread the ribbon and the accessory is ready. If you prepare two or three balls of different sizes, you can make a snowman.
Christmas trees are made from threads using the same principle. Use a Whatman paper cone as the base on which you will wind the thread. You can make such a toy in miniature if you take a simple sheet of cardboard instead of whatman paper. Light beads and ribbon bows are useful for decoration.
By the way, use a cone of whatman paper for the base if you are going to make Father Frost and the Snow Maiden. It is enough to glue such a cone, paint it, or make clothes from paper or fabric. The head can serve as an inflated balloon with a painted face.
For giant toys, boxes from under household appliances, which can be covered with foil, colored paper, appliqués, or even made into a Nutcracker.

There are only a few days left before the New Year and Christmas, Christmas tree decorations have been purchased or taken from the back shelves of pantries and mezzanines, all that remains is to hang them in their places. But if, due to some set of circumstances, you have nothing to decorate your house for the New Year, then for a change you can build New Year’s toys with your own hands. This process is not complicated, interesting and will not take as much time as it seems at first glance, and the result of the handicraft will certainly please its creator.
A little about the tradition of making Christmas tree decorations with your own hands
It so happened that in our pre-revolutionary country the Christmas tree was erected only for the holiday of the Nativity of Christ. At that time, the production of toys was poorly established, and the main symbol of the winter celebration was ennobled with attributes brought to the country from Germany, or with decorations of their own production, which reflected the events taking place in the world.
They decorated holiday trees with apples to honor the tree of Good and Evil. Candle products and angels were a reflection of purity, and the six-pointed star was a memorable symbol of the Bethlehem miracle of the Nativity of Christ.
After the revolutionary upsurge, a ban was imposed on the celebration of this bright holiday, but the tradition did not sink into oblivion, but continued to exist. At that time, underground organizations were formed for the production of Christmas tree decorations, which were distinguished by their simplicity and simplicity.
Nothing could destroy the “spirit of Christmas,” so the tree became legal again in 1935, although it was already a symbol of the New Year. It was then that the Christmas tree decoration underwent serious changes, which did not stop from year to year, but became more diverse and perfect. Not only the form of decorations changed, but also their content.
Now is the time when you can openly trace the life and traditions of previous generations. However, now it is possible to purchase not only an ordinary holiday toy, stamped at a mass production factory, but also to create unique New Year’s decorations with your own hands, using modern materials.
DIY New Year's toys
What materials can you use to make your own Christmas tree decorations?
In general, Christmas tree decorations can be made from almost any material. Therefore, before you throw something away, think about whether it might make an original decoration for your New Year tree. Below we have given just a few examples of how you can create New Year's masterpieces from simple things.
DIY gingerbread toys for the Christmas tree
Decorations made from gingerbread and cookies have quite ancient roots; they are also traditional in our country. It's on sale now great amount dyes of all colors and names, and in the old days, gingerbread cookies were covered with glaze and gold or silver foil. In special cases, gold leaf was used, which was so thin that it was impossible to separate it from the product itself, so confectionery products were eaten with it.


DIY New Year toys made from salt dough
Salt dough toys also have a traditional focus. However, they are completely unsuitable for food, despite the fact that just by looking at them they cause appetite. They also differ from gingerbread in their for a long time storage and ease of manufacture.
A simple recipe: To make the dough you will need only 1 cup of salt, 2 cups of flour and approximately 250 grams of cool water. All ingredients are thoroughly mixed together, then the dough is kneaded and rolled out.
You can cut out various figures from the rolled out dough, which can later be given color using paints. But first, salt dough products need long-term drying. They need to be dried outdoors two or three days. There is a faster option, which takes from six to twelve hours: the figures are placed in the oven with the door open (the oven should be set to the average heating temperature).
Finished products are decorated with paints or decorated with various shells, buttons, beads and stones. If you don’t have time for a long enough coloring process, then it is recommended to mix dye with water, flour and salt.
It is better to create New Year's toys from salt dough (as, indeed, from any other materials) with children. In this case, you will combine business with pleasure, in addition, joint creativity will allow you to concentrate entirely on the task at hand, and not be distracted by childish pranks.


DIY New Year's toy made of beads and seed beads
There is nothing more elementary than collecting beads onto a common thread or wire, which is then given the desired shape. This method allows you to create jewelry of completely different sizes and character.
If you want something truly unusual, you can sew beads on scraps of fabric with a complex texture; this will add more variety to the production process.


Christmas tree decorations made from pompoms
Everything inside is filled with warmth just by looking at the charming owls or sheep decorating the branches New Year's tree. There is a feeling that just a couple of minutes ago they came out of the pages of fairy-tale children's publications.
To make such toys, you need threads, preferably thick ones, then you will need much less of them, a small amount of cardboard, glue and decorative eyes, which can also be drawn if you couldn’t find ready-made ones in the store.
Threads are wound onto a pre-cut cardboard circle, then they are cut along the edge of the cardboard blank, which is subsequently removed. The resulting thread model is tightly tied in the center with the same thread and fluffed, then the desired image is formed, eyes, hoof horns, etc. are added.


How to make a Christmas tree decoration in the form of a snowman from rice and socks
It's easy to make but very effective. New Year's craft, which is gaining more and more popularity among DIY enthusiasts.
It is not necessary to buy new socks to create such a New Year's decoration; a fairly worn pair of socks will do just fine, even though they may have become thin at one time.
Cut off the nose part near the heel, pour a small amount of rice inside and tie the edge well with a strong thread. Now divide the workpiece approximately in half and tie it in the middle beautiful ribbon or a strip of knitted fabric. Thus, you have formed the head and body of the snowman. All that remains is to decorate the craft.
You can place a cut from the top of the sock on the head, first tying it with braid or thread along the cut line, thereby getting a funny hat. But you shouldn’t stop there, since the body of the newly-minted Christmas tree toy can be trimmed with beads or various buttons, and the face is carefully drawn with mother’s shadows, pencils and fondants.


Snowman made from a sock in 15 minutes
How to make Christmas toys with your own hands from threads
Making New Year's toys from threads is very similar to the process of making decorations from pompoms. You will need the same materials: threads, glue, cardboard. However, there is one difference, which is the structure of the threads, which must be silky in order to Christmas decoration it turned out to be more interesting.
Figures of various shapes are cut out of cardboard, which can be replaced with foam plastic. Then they are wrapped with yarn on top. Next comes the decorating process, where all sorts of beads, rhinestones, bows and so on are used.


DIY felt toys for the Christmas tree
Felt makes very beautiful Christmas tree decorations, giving the tree a special atmosphere that harmonizes perfectly with the spirit of the holiday itself. Felt decorations seem to break the time barrier, taking you back to the past and allowing you to plunge into the world of mysteries and New Year's magic. They are simple to make. Cut out the figure according to the template in two copies and sew the blanks together, stuffing a little cotton wool or padding polyester inside. Decorate the resulting craft with beads, seed beads, ribbons, and pieces of felt of a different color.


How to make New Year's toys from twigs, wire, straw
If you have wire, straw or ordinary tree branches on hand, try making your own New Year's toys from these materials. They are flexible enough to handle various kinds manipulation. You can pre-coat them with spray paint.


How to make a New Year's toy from foam plastic with your own hands
There is nothing simpler than toys made of foam plastic, which first needs to be shaped into some geometric figure or, for example, a heart, and then decorated.
Various decorative ribbons, beads, fabrics, sparkles and beads are the most common materials for decorating foam Christmas tree decorations. To securely attach decorative elements with a foam base, you need to use transparent superglue.
Ready-made Christmas tree decorations made from this material, sold in shopping centers, often have an unreasonably high cost. Moreover, such decorations can be found in many homes, which cannot be said about toys. self made, which look no less attractive and original, and their cost is absolutely delightful.

DIY paper Christmas toys
Paper is the simplest and most common material from which you can make Christmas tree decorations. Each of us at least once in childhood created New Year's crafts from this material. Using paper with skillful hands, you can create memorable New Year's toys that will show off on the Christmas tree and delight the eye. Moreover, you can use not only colored paper, but also newspapers, if such a design suits your taste.
Not only funny cones are made from paper, but also real balls made using the origami technique. The process of creating paper balls is sometimes quite long and difficult, but this method is good because thanks to it you can make completely simple toys, which in any case will look advantageous.


