Gloves, in all their fantastic variety of colors, lengths and materials, are back in fashion and a must-have for good clothed woman. Whether it's a pair of long sexy gloves made of elastic satin or a calm and elegant model made of the finest kid, they will leave few people indifferent.
The renewed interest in this most eternal of fashion accessories applies not only to the creations of Gaultier, Louis Vuitton, Prada and Hermes. In the nightclubs of major cities around the world, gloves are becoming a fashion statement. It's never been easier to choose the right pair of gloves for the right occasion - from short leather models during the day until evening, black elbow-length gloves.
Hand measurement
Glove size is the circumference of the palm, expressed in Parisian inches, measured at the base of the fingers.
Along with the actual size of the gloves, other dimensional characteristics are also important for the correct design of the glove. The finger length that deviates from the standard should be determined. It is necessary to remember: the length of each finger is measured from the highest point at the base of the finger to the tip of the finger. The length is also determined thumb.
Ampon- a dimensional feature that is measured from the base of the thumb to the base of the index finger.
Ribs is the main dimensional feature for determining the length of the glove. Ribs are measured from the muscle tuberosity at the base of the thumb (wrist) to the desired length.
It is useful to indicate additional information about the deviation of the hand shape from the standard (for example, a long, narrow hand, short and thick fingers, etc.).
In addition to complete information about dimensional characteristics, data on the material and processing technology is needed.
Material: nappa, suede, velor leather, jersey, elastic fabrics.
Glove lining: knitted, wool, silk lining fabric, fur lining (short-haired).
Glove seams: rustic (cuts on the outside) hand and machine stitches, traditional machine stitches (cuts on the wrong side), various decorative stitches.
The most common units of measurement in glove production are:
- "Parisian" inch = 27.07 mm
- English square foot = 9.29 square decimetres.
Construction of a drawing of gloves
The value of the dimensional attribute Palm circumference divided by 8.
19.2:8 = 2.4 cm.
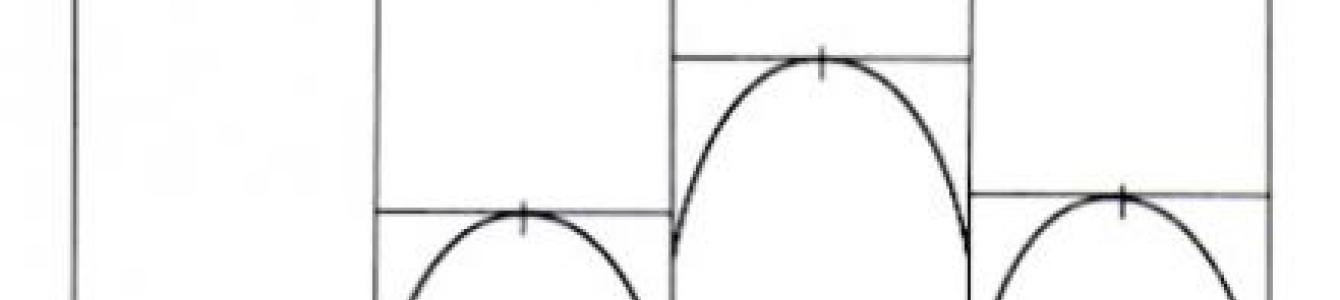
Draw five vertical lines about 20 cm long with an interval of 2.4 cm. Draw a horizontal line approximately in the middle (to mark the finger lengths).
On the little finger area, move 1 cm down from the horizontal and draw another horizontal line here (the base of the little finger on the hand is lower than the other fingers).
From the horizontal lines, plot the resulting finger length values upward. Draw horizontal lines through the resulting points and divide them in half.
Create rounded lines for your fingertips.
Draw a hole for the thumb; to do this, along the 0/1 line, move 5 cm down from the horizontal (Аmpon). From the resulting point, set aside another 5 cm (the length of the muscle tubercle at the base of the thumb).
Set aside 0.5 cm inward from the right outer line and line 2/3.
From a point on the 0/1 line, 5 cm away from the horizontal, set aside 2 cm upward. From the resulting point, set aside 1.1 cm horizontally to the left and right (if your palm is wide, you can set aside a larger value). Make the top section of the hole for the thumb.
From the resulting horizontal line, move up 1 cm along the 0/1 line. Through this point (on the 0/1 line) draw a line 2.1 cm long from the upper left point - a slot for the thumb (if you have a large hand, the line may be longer). Draw line segments c and d.
From the mark corresponding to the lower point of the hole for the thumb (from the lower point of the muscle tuberosity), place the Rebras (corresponding to the length of the glove). Connect the bottom point of the thumb hole with points 0.5 cm away from the vertical lines.
The following materials are cut out (for one glove):
- 1 piece with thumb hole;
- 1 piece without thumb hole - for the upper part of the glove.
Drawing a thumb drawing
Draw mutually perpendicular vertical and horizontal lines. Vertically from the intersection point, put the length of the thumb up, down - the length of the muscle tubercle at the base of the thumb.
Horizontally set aside from the vertical line to the left and right the value of the circumference of the thumb plus 1 cm.
From the top point of the vertical line, set aside 1 cm to the left and right and draw rounded lines for the fingertip. Draw a smooth line (see drawing) on the lower section of the part for the thumb through the bottom point of the drawing.
The length of the line should be the circumference of the thumb hole plus 2.1 cm.
From the horizontal line, set aside 2.1 cm (b) upward along the outer contour of the part to determine the location of the segment d/c.
Along a horizontal line, set aside 1.5 cm to the left from the right side of the outer contour of the part.
From the end point of segment b (2.1 cm up the outer contour of the part from the horizontal) towards a point 1.5 cm away from the outer contour of the part, draw a segment 2.2 cm long.
Middle finger parts
Draw the middle parts for the fingers in accordance with the drawing. The base line of the fingers is equal to the width of the fingers in the glove drawing (2.4 cm).
All middle parts for the fingers, shown in the drawing once at a time, are cut out of the material (for one glove).
Glove sewing technology
Connect the parts manually or by machine in accordance with the markings (the seam processing allowance is 0.2 cm).
The connection of the thumb part with the glove part should begin at the hole slot and grind sections a, b, c, d of the thumb part with sections a, b, c, d of the glove, respectively.
Then sew the thumb piece into the thumb hole on the glove.
Sew the middle parts for the fingers together at the base: the part for the little finger - with the first part for the ring finger, the second part for the ring finger - with the first part for the middle finger, the second part for the middle finger - with the part for the index finger.
Connect the interconnected middle parts for the fingers to the upper part of the glove.
Connect the lower part of the glove with the thumb part sewn in to the upper part of the glove.
The outer sections of the glove parts are joined last.
Glove length standards
When determining the length of gloves, the number of loops/buttons of the fastener matters. Although loop and button closures on gloves have almost completely fallen into oblivion due to the widespread use of elastic materials, the classic “button length” still defines the norm for glove length. The length standard corresponds to the measured distance between the seam of the thumb joint and the top edge of the glove. The unit of measurement for the uncovered part of the hand is the “French inch”.
Let's start with the shortest gloves:
Two buttons: These gloves traditionally have a total length of 20-23 cm and end at the middle of the wrist, revealing the beauty of the forearm and hugging the hand. The hole on the inside of the wrist serves as an eye catcher on one side, and on the other hand makes it easier to put on the glove. So-called palm-length gloves of this type can be worn all year round.
Four buttons: glove 25-28 cm long, hiding most of the wrist. A good compromise for a woman who wants to declare her elegance. These gloves look especially good under jacket cuffs.
Six buttons: another compromise, quite exciting. It's less extravagant than the eight-button option, but it's an attractive length that will allow the wearer of the gloves to even glance at the watch - even if that's sometimes difficult! These gloves should be worn with bare hands or under a jacket.
Eight buttons: The glove reaches the middle of the forearm. These are traditional three-quarter gloves that cover the forearm by 14-15 inches. Although the return of these gloves to fashion is not as obvious as with other styles, this is exactly the length that simply radiates charm in the Jackie Onassis style.
Twelve buttons: the so-called queen of gloves, which reaches to the elbow. Such gloves were worn by Audrey Hepburn and a whole horde of fashion trendsetters.
Sixteen buttons: A classic opera glove that is 24 inches long and ends exactly midway between the elbow and shoulder. The basic rule for opera gloves: the shorter the sleeve, the longer glove. Therefore, opera gloves should be worn with sleeveless dresses, with short sleeves, without straps or with straps, but without sleeves, as well as with evening dresses with short sleeves.
Glove size is the circumference of the palm, expressed in Parisian inches, measured at the base of the fingers.
Glove pattern
Along with the actual size of the gloves, other dimensional characteristics are also important for the correct design of the glove. The finger length that deviates from the standard should be determined. It is necessary to remember: the length of each finger is measured from the highest point at the base of the finger to the tip of the finger. The length of the thumb is also determined.
Ampon is a dimensional feature that is measured from the base of the thumb to the base of the index finger.
Ribs are the main dimensional feature for determining the length of a glove. Ribs are measured from the muscle tuberosity at the base of the thumb (wrist) to the desired length.
It is useful to indicate additional information about the deviation of the hand shape from the standard (for example, a long, narrow hand, short and thick fingers, etc.).
In addition to complete information about dimensional characteristics, data on the material and processing technology is needed.
Materials: nappa, suede, velor leather, jersey, elastic fabrics.
Glove lining: knitted, wool, silk lining, fur lining (short hair).
Glove seams: rustic (cuts on the outside) hand and machine seams, traditional machine seams (cuts on the wrong side), various decorative seams.
The most common units of measurement in glove production are:
"Parisian" inch = 27.07 mm
English square foot = 9.29 square decimeters
Construction of a drawing of gloves
Glove pattern
The value of the dimensional attribute Palm circumference divided by 8.
19.2:8 = 2.4 cm.
Draw five vertical lines about 20 cm long with an interval of 2.4 cm. Draw a horizontal line approximately in the middle (to mark the finger lengths).
On the little finger area, move 1 cm down from the horizontal and draw another horizontal line here (the base of the little finger on the hand is lower than the other fingers).
From the horizontal lines, plot the resulting finger length values upward. Draw horizontal lines through the resulting points and divide them in half.
Create rounded lines for your fingertips.
Draw a hole for the thumb; to do this, along the 0/1 line, move 5 cm down from the horizontal (Аmpon). From the resulting point, set aside another 5 cm (the length of the muscle tubercle at the base of the thumb).
Set aside 0.5 cm inward from the right outer line and line 2/3.
From a point on the 0/1 line, 5 cm away from the horizontal, set aside 2 cm upward. From the resulting point, set aside 1.1 cm horizontally to the left and right (if your palm is wide, you can set aside a larger value). Make the top section of the hole for the thumb.
From the resulting horizontal line, move up 1 cm along the 0/1 line. Through this point (on the 0/1 line) draw a line 2.1 cm long from the upper left point - a slot for the thumb (if you have a large hand, the line may be longer). Draw line segments c and d.
From the mark corresponding to the lower point of the hole for the thumb (from the lower point of the muscle tuberosity), place the Rebras (corresponding to the length of the glove). Connect the bottom point of the thumb hole with points 0.5 cm away from the vertical lines.
The following materials are cut out (for one glove):
1 piece with thumb hole;
1 piece without thumb hole - for the upper part of the glove.

CONSTRUCTION OF THE DRAWING OF THE THUMB
Draw mutually perpendicular vertical and horizontal lines. Vertically from the intersection point, put the length of the thumb up, down - the length of the muscle tubercle at the base of the thumb.
Horizontally set aside from the vertical line to the left and right the value of the circumference of the thumb plus 1 cm.
From the top point of the vertical line, set aside 1 cm to the left and right and draw rounded lines for the fingertip. Draw a smooth line (see drawing) on the lower section of the part for the thumb through the bottom point of the drawing.
The length of the line should be the circumference of the thumb hole plus 2.1 cm.
From the horizontal line, set aside 2.1 cm (b) upward along the outer contour of the part to determine the location of the segment d/c.
Along a horizontal line, set aside 1.5 cm to the left from the right side of the outer contour of the part.
From the end point of segment b (2.1 cm up the outer contour of the part from the horizontal) towards a point 1.5 cm away from the outer contour of the part, draw a segment 2.2 cm long.

MIDDLE FINGER DETAILS
Draw the middle parts for the fingers in accordance with the drawing. The base line of the fingers is equal to the width of the fingers in the glove drawing (2.4 cm).
All middle parts for the fingers, shown in the drawing once at a time, are cut out of the material (for one glove).
Glove sewing technology
Connect the parts manually or by machine in accordance with the markings (the seam processing allowance is 0.2 cm).
The connection of the thumb part with the glove part should begin at the hole slot and grind sections a, b, c, d of the thumb part with sections a, b, c, d of the glove, respectively.
Then sew the thumb piece into the thumb hole on the glove.
Sew the middle parts for the fingers together at the base: the part for the little finger - with the first part for the ring finger, the second part for the ring finger - with the first part for the middle finger, the second part for the middle finger - with the part for the index finger.
Connect the interconnected middle parts for the fingers to the upper part of the glove.
Connect the lower part of the glove with the thumb part sewn in to the upper part of the glove.
The outer sections of the glove parts are joined last.

Glove length standards
When determining the length of gloves, the number of loops/buttons of the fastener matters. Although loop and button closures on gloves have almost completely fallen into oblivion due to the widespread use of elastic materials, the classic “button length” still defines the norm for glove length. The length standard corresponds to the measured distance between the seam of the thumb joint and the top edge of the glove. The unit of measurement for the uncovered part of the hand is the “French inch”.
Let's start with the shortest gloves:
Two buttons: These gloves traditionally have an overall length of 20-23 cm and end at the middle of the wrist, revealing the beauty of the forearm and hugging the hand. The hole on the inside of the wrist serves as an eye catcher on one side, and on the other hand makes it easier to put on the glove. So-called palm-length gloves of this type can be worn all year round.
Four buttons: a glove 25-28 cm long, covering most of the wrist. A good compromise for a woman who wants to declare her elegance. These gloves look especially good under jacket cuffs.
Six buttons: another compromise, quite exciting. It's less extravagant than the eight-button option, but it's an attractive length that will allow the wearer of the gloves to even glance at the watch - even if that's sometimes difficult! These gloves should be worn with bare hands or under a jacket.
Eight buttons: the glove reaches to the middle of the forearm. These are traditional three-quarter gloves that cover the forearm by 14-15 inches. Although the return of these gloves to fashion is not as obvious as with other styles, this is exactly the length that simply radiates charm in the Jackie Onassis style.
Twelve buttons: the so-called queen of gloves, which reaches to the elbow. Such gloves were worn by Audrey Hepburn and a whole horde of fashion trendsetters.
Sixteen Buttons: A classic 24-inch-long opera glove that ends exactly midway between the elbow and shoulder. The basic rule for opera gloves is: the shorter the sleeve, the longer the glove. Therefore, opera gloves should be worn with sleeveless, short-sleeved, strapless or strapless dresses, as well as evening dresses with short sleeves.
P.S.: people, you will make peppers, Special attention Pay attention to the details between your fingers. according to this tutorial, it turned out that (I made myself gloves without fingers) the fingers turned out to be trash flares, but maybe I’m missing something, but I warned you *O*
Hello!!!
A very convenient and cute accessory are mitts. They give us the freedom we need so much in the world of modern touch screen gadgets. In addition, wearing mittens you can show off your well-groomed nails :)
Mittens come in a variety of designs, from wedding to sports.


I offer to your attention 3 way how to make mitts.
First way. You can create wonderful mittens from leather gloves. Turn the gloves inside out and carefully cut off the fingers. We bend the edge and stitch it. We decorate with rivets, beads or rhinestones.


Second way. I think each of us has a sweater that has already gone out of fashion or is simply boring. So we take it and cut off the sleeves to the length that you want your mitts to be. We try them on and cut a hole for the finger in the seam of the sleeve. We tuck the edges and process the hole for the finger. Decorate the mitts and you're done!


And finally, method 3! I suggest you sew mittens from fabric and for this we need a pattern. We measure the girth of the hand and the girth of the arm slightly below the elbow. Or above the elbow if you want long mitts.
It is better to sew mitts from thick fabric, such as knitwear, denim or leather. The pattern is very simple.

We transfer the pattern to the fabric and cut out the details. Place the two pieces right sides together and sew them together. We make a hole for the thumb and process all the edges.
Sewing gloves - step by step guide.
How to sew such wonderful gloves? Find out in the master class below.
How to make a pattern? If you are sewing gloves for medium-sized ladies’ hands, then an A4 sheet of paper is enough for the pattern. Fold the sheet in half. Place your hand on this sheet so that your thumb is on the fold side.
and trace it along the contour (I think many had fun with this in childhood). In this case, it is necessary that the fingers are not pressed against each other and are not spread apart. They should be in a free and natural position. In addition, everything is outlined except the thumb, which will be cut out separately. Next, mark on the fold point “A” - the upper base of the finger and point “B” - the lower base of the finger.
After this, you can cut out the pattern without unbending the leaf. Don't forget that you don't need to cut the fold. You just need to cut out the pattern along the outline and cut out an oval on ONE side of the pattern. The result should look like this:
Next, draw an oval equal in height to “AB”, and in width to about half “AB”.
Cut out an oval.
Now the pattern can be transferred to the fabric. Don’t forget that we have a RIGHT hand and a LEFT hand, that is, we need to cut out two parts in a mirror image.
The thumb is cut out separately. The thumb pattern looks something like this:
The length of the “CFD” line should match the full length of the oval cut on the main pattern piece.
Further, since our fingers are not flat, but have a certain volume, then for the fingers we need to cut out an additional ribbon (or several ribbons) to sew them on the inner sides, where the fingers touch each other if they are pressed against each other. The width of the tape should be approximately 0.8 - 1.0 cm (in general, this depends on the thickness of the fingers and seam allowances, and is selected according to the situation)
Now, onto the actual sewing. If you are cool and very good at sewing very small details on a machine, then you can sew everything on a machine somehow knitted seam. I personally am not capable of such virtuosity, so I sew gloves by hand using a “back needle” seam.
It’s convenient to start sewing with your little finger (although you can also start with your index finger). If you start sewing from the little finger, then you must first sew the PART side seam gloves.
I draw your attention to the fact that you should not sew the entire side seam at once if you later plan to somehow decorate the edge of the glove (for example, sew lace to it)
You can sew a single ribbon, or you can make separate ribbons (three in total for each glove) at the spaces between the fingers. It makes sense to make separate ribbons if your fingers are thin. In this case, it is advisable to bring the ends of the ribbons “to nothing” at the ends of the fingers so that the fingertips of the glove do not turn out thick. If the fingers are quite large or simply plump and even from base to tip, you can sew a single ribbon along the entire length from the little finger to the index finger.
Once you have sewn all four fingers together, you can begin sewing in the thumb. First, you need to fold the part in half with the wrong side out, aligning points “C” and “D” and sew the part along the “CE” line. Then I recommend basting the finger to the hole cut out for it, and only then carefully sewing the needle back with a seam.
After the thumb has been sewn in, you can decorate bottom part gloves with lace, or decorate the glove itself in some other way. At the end, sew the side seam to the end and the glove is ready.
Any, even very beloved, things are short-lived. So my cycling gloves, which served faithfully for many years, broke one not-so-wonderful day. I really didn’t want to go to the other end of town to get new ones, but I had the right leather, tools and materials at hand. The thought has matured: why not try to sew gloves yourself?
Planned - done. In this article we will tell you how to sew short leather gloves.

Constructing a pattern of short gloves
It all started with finding the right pattern. Unfortunately, nothing on short fingerless gloves was found on the Internet. There were only patterns for models with long fingers. Well, this defect had to be corrected on our own. With the help of old gloves, a lot of calculations and recalculations, I made my own pattern, although it didn’t work out the first time.
The main pattern turned out to be fingerless gloves (plus 3 more parts for sewing between the fingers, they will be discussed below).


I have size S (palm circumference 18 cm).
You can draw the pattern yourself, you just have to take into account the size ratio.
- The width of the glove along the line of the pads is 3 cm larger than the hand
- The width of each “finger” of the glove is 2 times wider than the finger of the hand
- the space for the thumb should be 2.5 times wider than the finger (if it is too narrow, it will be difficult to remove the glove)

We cut out the pattern from a sheet of A4 paper folded in half.

You can determine the size by measuring the circumference of your palm along the pads, as shown in the photo.

We check the resulting number with the size table.
Men's gloves
| Size in cm | 20 | 22 | 23 | 24 | 26 | 27 |
|---|---|---|---|---|---|---|
| XS | S | M | L | XL |
Ladies gloves
| Size in cm | 16 | 18 | 19 | 20 | 22 | 23 |
|---|---|---|---|---|---|---|
| XS | S | M | L | XL |
Tools and materials for sewing short leather gloves


To sew gloves we will need tools and materials:
- Pen, ruler
- Scissors or stationery knife
- Awl, marker
- Hole puncher
- Needle with thread
- Buttons
- Actually skin
The skin should be soft, not thick (0.8 - 2 mm thick), elastic. It should stretch slightly, not tear from any effort, have a durable outer coating or coloring (so that it does not rub off on the steering wheel), and not slip. for work is described in my previous material.
For the gloves I used 1.5mm thick pigskin.

Before cutting out parts from leather using a pattern, you should try the pattern on your hand to make sure that the dimensions are correct. The seam along the line of the thumb and index finger should meet.


If all is well, we move on to transferring the pattern to leather. Do not forget that there are 2 gloves and you should trace both blanks.
Lay out the full width and outline ballpoint pen(you can use soap or a special fabric marker) template on the wrong side of the material.
The skin should lie flat, not be stretched or, conversely, gather into folds.

Carefully cut out our future gloves. We fold it, check that nothing protrudes anywhere, and that the lines converge on the hand as expected.

After this, we mark 3 parts that will be sewn between the fingers. All three are different lengths:
- part between index and middle finger - 2×5cm (1)
- part between the middle and ring finger - 2×4.5cm (2)
- part between the middle and little fingers - 2×4.7cm (3)

We cut out 2 pieces of each part.

A complete set of blanks for gloves is ready.

Sewing gloves
We move on to marking the holes and lines for sewing the seams. If you have sewing machine, which can sew on leather - everything is much easier. You just need to stitch the parts you need together.

First we mark the rectangular parts. Holes should be made at a distance of 2-3 mm from the edge with a gap of 3-4 mm between them. We mark the holes with a marking wheel, then with an awl. If you don’t have a special tool, you can make markings using a regular ruler.

Then you should mark the holes on the gloves themselves. We carefully ensure that the workpieces do not move apart or move to the sides.


When everything is marked, we move on to flashing the parts.
If your leather is soft and thin enough, you can sew it from the wrong side. But if the leather is thicker than 1 mm, it is better to sew right away from the front side, then the seams will not interfere with the fingers, press anywhere, bulge and affect the internal size of the gloves.
We start sewing from the bottom, from the thumb. The needle passes in a “dotted line” through the holes, then turns around and goes back, closing the gaps.
First we fasten the thread from the wrong side.

Then we move on to the firmware. We carefully make sure that there are no unnecessary gaps between the holes, that the thread is well tensioned everywhere, that the leather does not wrinkle or move out of place.


We reach the end of the line (the top of the thumb), fasten the thread and go back.


Returning to the beginning of the seam, we also fasten the thread, bring it to the wrong side, trim it, and carefully glue the edge so that it does not stick out.
After this, we sew the part between the thumb and forefinger.

With due diligence, the seam is smooth and neat.

Let's try on the sewn part again: is everything marked correctly and is it comfortable for the thumb.


If everything is fine, we proceed to stitching the remaining part of the glove. Take the first rectangle (1), bend it in half with the front parts facing each other and insert it between the index and middle fingers of the glove. You should get a “triangle” on your index finger.
Having made sure that all the parts fit together and nothing protrudes anywhere (if it protrudes, the excess needs to be cut off), we begin to sew.
Particular attention should be paid to this recess between the fingers - the skin there should lie perfectly flat, the seam should be tight, otherwise the fingers will be uncomfortable, and the gloves will quickly wear out.


We sew the seam, as usual, in both directions, fasten the thread, and trim off the excess. We sew on the other side.


In the same way we sew the two remaining parts between the middle and ring fingers both the ring and little fingers.
Memo: the most important thing is to keep an eye on correct location sewn parts - the front side is directed in the desired direction and the edges are without distortions (so as not to sew the left part to right side or vice versa).
After both gloves are sewn, we try on our creation. The hand should be comfortable, the seams should not interfere, and the fingers should bend freely. Over time, the skin will stretch and take the shape of a hand.


Glove decor
Since we have cycling gloves, mostly for the summer, they need to be made lighter and more ventilated. And it will be much easier to remove them with a wrist clasp.
We mark where we should have the button and cut a strip of leather right on the top of the glove. A strip 1 cm wide (the size of a button).
For better ventilation, we also make a round hole in the gloves, calculating that it should be located below the knuckles (when the fist is bent) by 2-3 cm with an indentation of 1.5-2 cm on each side of the palm.

We put it on the hand, tighten it on the wrist, mark where the button should be located.

After this, use a hole punch to make two holes: for the top and bottom of the button.
With the help of the installer, we secure the buttons (you can use improvised tools - a pin of the required diameter and a hammer, but this is not very convenient).
We connect the front part of the cap button with bottom, which is shaped like a “donut” on the longer part of the strip that we cut out.


We secure them with a button installer.


We secure the bottom of the button in the same way.


We place the upper and lower parts tightly on top of each other: the pin is on the bottom, the button is on top.


We check that everything adheres well and works correctly. Open and close the button several times.

At the end, you can make an additional perforation in a semicircle above the cut hole to provide additional ventilation. To do this, we make identical holes at equal intervals (about 1-1.5 cm) with a hole punch.


We perform similar operations with the second glove.


After the final fitting, you can go for a ride without fear for the safety of your hands.
A few notes:
- Leather tends to stretch, so even if you made a slight mistake with the size initially, everything may not be so critical.
- It is advisable not to wet the gloves. Water can stain their hands. And if you get caught in the rain on a bicycle and ride for some time, the gloves will then take the shape of your hands on the handlebars.
- If you ride a lot and under the sun, a “bicycle” tan appears on the back of your hand, which will only go away in winter.


