
Quick navigation through the article
Cardboard is easy to bend, cut, paint, glue, stitch and hold its shape, and it is always available. What you need for children's creativity and development fine motor skills, hand-eye coordination, logical thinking and imagination! In this material we presented 13 super ideas, 100 photos, 1 step-by-step master class and a selection of video tutorials on making cardboard crafts with your own hands.
Where can I get cardboard?
To make children's crafts, in addition to sheet colored or corrugated cardboard from the store, you can use the following scrap and scrap materials:
- Cardboard boxes (you can ask the warehouse workers at your nearest store);
- Disposable paper tableware;
- Bushings from toilet paper and paper towels;
- Packaging of cereals and sweets, such as corn flakes;
- Egg packaging (it’s good to use cells);
- Packaging of dairy products.
13 ideas for cardboard crafts + Master class
Idea 1. Construction toys
The good thing about cardboard “constructors” is that they are easy to make and decorate, fun to assemble and, of course, play with. You can come up with and design such a toy yourself, or you can make it using a ready-made diagram from our article or found on the Internet.


Click on the photo to download the templates for these figures

Click on the photo to download the templates for these figures


Idea 3. Puppets or just dolls with moving parts
Making a puppet out of cardboard is very easy and at the same time interesting. You just need to draw the details of the man, cut them out and fasten them with mini pins (sold in scrapbooking stores).

- Instead of special fasteners, you can use thin wire (for example, for beading). Simply cut a piece of wire 2 cm long, thread it through the holes of the parts and twist its ends on the front and back sides as shown in the photo on the right. You can also use metal rings as fasteners.
If you want the figurine to become a real puppet, then you can:
- Connect the arms and legs with a single thread, as shown in the photo below, or with two threads (one thread connects the legs and the other - the arms).


- Tie a rope to each arm and leg, then tie all 4 ropes to the ends of sticks folded crosswise. An example of such a puppet is shown in the following photo.


Idea 4. Finger puppets
Finger puppets are made even easier and faster: a small figurine is drawn, then two holes are cut out in its lower part. Woo-ala, the first “actor” for puppet theater ready! In the following selection of photos you can get some ideas for finger puppets.


Idea 5. Land, air, water and space transport
A car, plane, bus, ship, boat or rocket made from cardboard is no worse than one bought in a store. After all, making such a toy with your own hands together with your parents already seems like a fun adventure. And when you get tired of the cardboard vehicle, you can use it to make other toys and crafts.


Idea 6. Mini kitchen
If you have a couple of boxes square shape, then why don’t you make a mini-stove and sink out of them?


You can make a refrigerator from one elongated rectangular box.

If there is enough space in the room, a washing machine can complement the kitchen.


For a master class on how to make a cardboard craft in the form of kitchen furniture, watch the following video.
Idea 7. Toy equipment and household items
Need props for role playing games or things to decorate a cardboard house? We suggest making them from cardboard with your own hands.


Idea 8. Masquerade costumes
IN kindergarten Or is there a matinee or performance coming up at school? Or does your baby just love transformation? You can make an amazing outfit from cardboard. Here are photo examples of cardboard fancy dress costumes for boys.


And here are photo examples of cardboard costumes for girls.


Idea 9. Bookmarks
To make bookmarks, it is better to use not too thick colored cardboard, and in order for the craft to last as long as possible, it should be laminated with transparent tape.


Idea 10. Aquarium with fish
Cut off the lids of a cardboard box and paint it inner part in blue tones, if desired, decorate the aquarium with applications made of plasticine, glitter, colored paper, etc. Cut 3-5 holes along the top of the box and pass a thread through each hole. Next, cut out 3-5 fish from colored paper. Attach a large button (from the outside of the aquarium) and a fish to each thread. That's all, the aquarium is ready.


Idea 11. Town in a box
You just need to trim the sides of the box and paint them on the inside and... voila! You get a city with roads, with which the child will play for hours, moving cars and figures of men.

Idea 12. Three-dimensional toys made of corrugated cardboard using the quilling technique
Volumetric crafts can be “twisted” using the quilling technique from corrugated cardboard. Having mastered the skill of forming various figures, the child will be able to experiment with shapes and colors and even create figures of their favorite cartoon characters.

Materials and tools:
- Cardboard box;
- Tracing paper or white tissue paper;
- Black cardboard (you can paint regular cardboard with a thick layer of black paint);
- White pencil;
- Wooden skewers, straws or wire;
- Scotch tape and/or glue;
- Scissors;
- Stationery knife.
Step 1. First we need to make the theater body. To do this, cut off the lids from the box, and then cut out its bottom.
Step 2. Cut a piece of tracing paper larger than the box size. Carefully glue it to the sides of the theater with slight tension, as shown in the photo.
Step 4. Now it’s time to cut out the characters for the future performance from black cardboard. Keep in mind that the more detailed the silhouette of the figure, the more realistic the shadow theater will be. Therefore, it is best to draw figures using templates found on the Internet and printed.

Step 5. The shadow theater is almost ready, all that remains is to glue the figures to wooden skewers or wires. You can glue them as shown in the photo below or perpendicularly to make it easier to control the characters.
Content
It is believed that every gift should contain a piece of the soul of the one who presents it. This can be a gift that is completely made with your own hands or ready-made (bought in a store), but decorated with your own hands. Today we invite you to go through master classes that will help us create a beautiful box do it yourself from cardboard with a lid. In such packaging you can give almost any gift, even the heaviest one. It all depends on how carefully you think through everything during the preparation stage.
In almost all cases, you will need a template. It is more convenient and easier to work with, and the box itself will turn out smooth. What other tools and materials may be required:
- corrugated cardboard;
- thin colored cardboard;
- scissors;
- PVA glue;
- laces, ribbons, ribbons;
- stationery knife;
- ruler;
- a simple pencil;
- a pen that no longer writes;
- tape (double-sided tape will also be needed);
- any decor to decorate the box.
These are general tips for working on packaging; they will also be useful to you in creating other crafts:
- try to make a box first from plain paper, and only then, when you get the hang of it, you can take on the main material;
- To carefully bend thick cardboard, use a pen that no longer writes. Use a rod to go over the folds and then they will turn out even;
- think in advance what the lid will be like - in the form of a valve (it will be part of the box itself) or a separate one that will cover the box;
- take care of the material when you already know what you will give. If the gift is heavy, then it is better to choose thick corrugated cardboard, and if it is light, then you can take ordinary colored cardboard;
- to decorate the box, it is better to use hot glue - it will dry faster and ensure reliable fastening of the decor;
- For work, give yourself a spacious table in a ventilated room. Don't neglect the light - you shouldn't strain your eyes to see small details;
- It’s quite convenient to work with cardboard, but you need to do it on a hard, flat surface so that the product turns out smooth and neat.
Box with lid
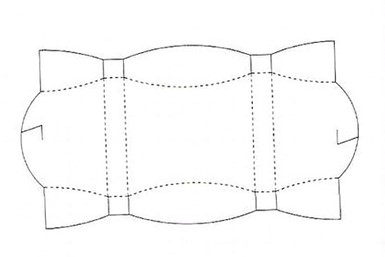
Well? Let's proceed directly to creating the box? To get started, we suggest choosing one of several templates. There are options with a hinged lid and a lid that will separately cover the box.
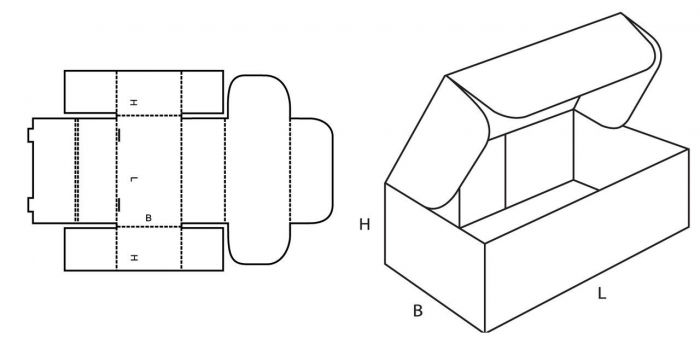

Each of these box options is interesting. For example, a narrow box is more suitable for watches, gloves, books, a tie, jewelry, and a voluminous wide box is more suitable for toys, vases, tableware and other gifts.
So, first you need to transfer the pattern to the main material and cut it out. Now you need to carefully bend the box along the dotted lines (use a creasing tool).

Use double-sided tape or PVA glue (or any other glue) to join the box pieces together.

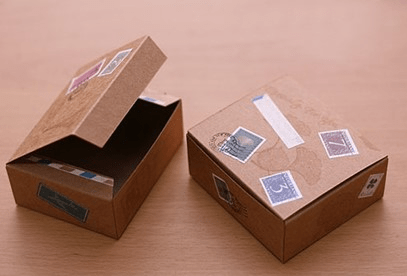
Now all that remains is to decorate the box, for example, using regular postage stamps or any other decor that will match the theme of the gift.
Round box
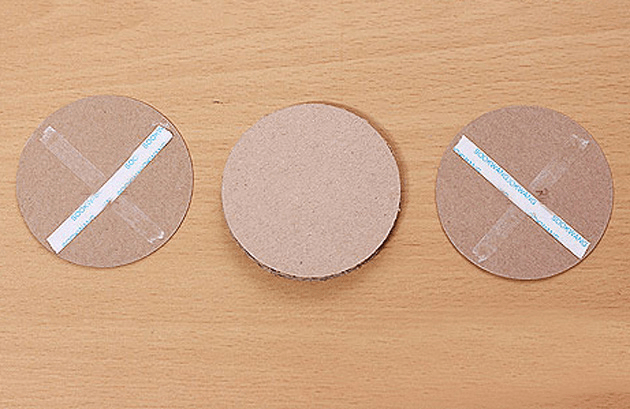
To create a round box you need to use a compass. You will need four circles of regular thin cardboard and two circles of thick cardboard. In addition, you will need one strip that will serve as the walls, one for the lid, and one strip should be a centimeter narrower than the strip for the walls. Visually it looks like this:
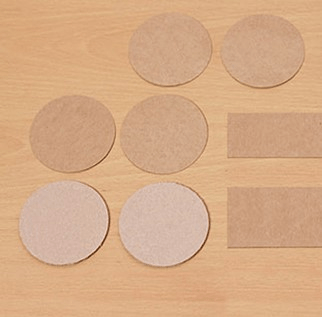
Now you need to cover the corrugated cardboard circles with regular cardboard circles so that you get a beautiful and neat bottom of the box, as well as a lid.
Now you need to glue the wall of the box with the strip, which you made 1 cm narrower. It should look something like this:

After this, you can begin assembling a cardboard gift box.

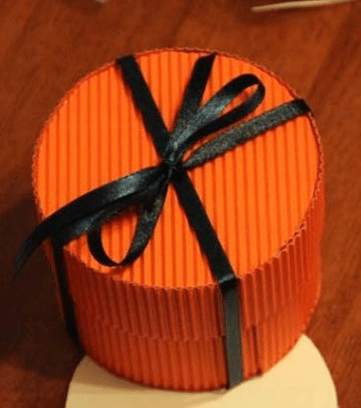
A similar action must be done with the lid. Already at this stage the box can be decorated. Use ribbons, decorative prints, stamps, beads, dried flowers and other elements. Usually a round box is used to give a gift to women. The gift looks very romantic and touching in such packaging.
How to make a box with your own hands from cardboard without a drop of glue
This is a very convenient option because you don’t need to fuss with glue and wait for it to dry. All you need is material, scissors and a template. Since we have made a gift box for a woman, let’s make a simple cardboard box for a man.
All you have to do is print the template, transfer it to cardboard and cut it out. Now bend the box along the dotted lines and try to create a box like this:

Special valves allow you to close the box tightly and conveniently carry the gift.
The following option is more suitable for sweets, jewelry, a small figurine and other small gift.

Another option, but it’s more like a cardboard gift bag in which you can present a small souvenir. The packaging is also created without a single drop of glue, and all because of the well-thought-out design.

We really like the following version of a small cardboard chest, which is suitable for decorating a souvenir for guests at a wedding or for presenting jewelry. Use a utility knife to make the cut. And in this case it is better to choose thin, beautiful cardboard.
Here's what your cardboard box will look like:

DIY box made of cardboard in the shape of a piece of cake
Believe me, it looks simply amazing. You can create one piece to give a touching gift or create an entire cake from pieces that will be decorated in different ways. First, you definitely need to get a template:
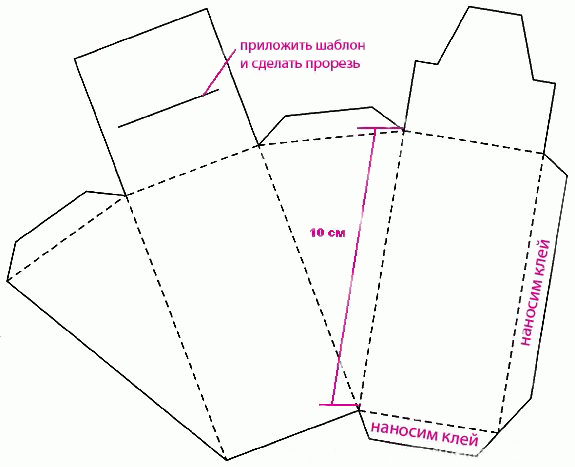
Use thin cardboard, then the product will turn out elegant and will be more convenient to work with.
The cake without decorations looks something like this:

A cardboard box is an amazing thing! You can pack something big in it or, on the contrary, collect some small things, and it can also be useful for gift wrapping if you work hard on it. Of course, nowadays we can buy a box of any format, but why? It’s so interesting to make it yourself - it will be beautiful, original and meet your requirements.
First, decide for what purpose you need the box, what shape and size it should be. If it's just a box for things, then you will need thick cardboard. If you want to make a gift option, you will also need a beautiful wrapping paper or fabric and other decor. In addition, prepare: PVA glue, scissors or a construction knife, a ruler.


beautiful box , then the cardboard must be covered with fabric, colored or wrapping paper, or even old postcards. You can paste over both a finished box and a solid sheet of cardboard before cutting. The finished box can be decorated on top with flowers made from ribbons, origami, lace, etc. As you can see, there is nothing complicated in making a cardboard box! Its strength will depend on the chosen material and glue, and
appearance - from your imagination. Don’t be lazy, go for it – handmade will always be appreciated. The article will tell you how you can make it yourself and use it.
A box is the easiest way to pack or hide something. The box can serve as an excellent means of storing things: jewelry, cards, small items and cosmetics. Of course, modern stores will provide you with a lot of options for boxes: large, small, curly, square, with lids, decorated and simple cardboard.
It is much more pleasant to create something with your own hands and decorate it the way you would like it and the way the product itself will correspond to the style of the holiday, room, or occasion. You can make a craft from absolutely any cardboard. The material can be purchased at a craft store (you will find big choice color solutions and cardboard textures), or you can use the one in which they are often packaged household appliances(refrigerators, for example, or washing machines).
For work you will need:
- Cardboard (as much as needed for your preferred size product).
- Hot glue (you can, of course, use any other glue, but hot glue is preferable due to its quick drying and strong bonding of the material).
- Template (with the help of it you can understand exactly how you should cut, bend and glue the material).
- Scissors and pencil - for marking and cutting. This is necessary to ensure that your product looks neat and aesthetically pleasing.
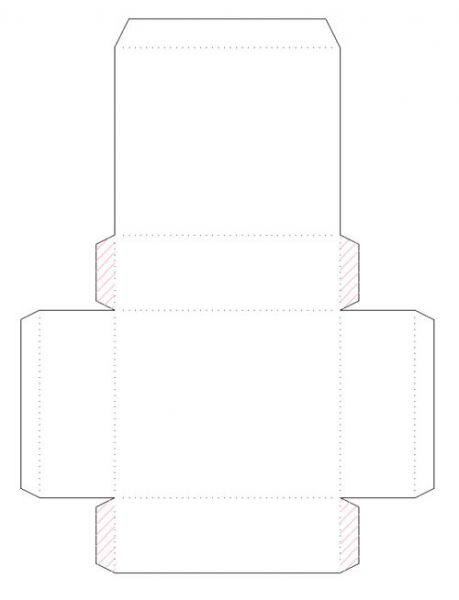
Flip Lid Box Template Flip Lid Box TemplateIMPORTANT: There are two main types of cardboard boxes with lids. One assumes the presence of a lid that covers the top of the box, the other - a lid that folds back, but is part of the box.
How to make a box with a lid step by step:
- Prepare all the supplies, print the template for the box on a printer or draw it in the exact proportions on cardboard.
- Cut out two elements from cardboard
- Start folding the dotted lines and gluing them carefully.
- Press the edges firmly to hold the material together.
- Let the product dry a little
- After drying, you can decorate the box to your liking.
Video: “Box: master class”
How to make a round cardboard box: diagram, template
A round cardboard box is a very beautiful and practical product that will always find its use. Having decorated it to your liking, you can store jewelry and jewelry, sewing and embroidery kits inside, cosmetical tools, clippings and more.
Making a round cardboard box is a little more difficult than, for example, a square one. However, it is quite possible to “figure it out” with your own hands, without spending a lot of money on materials. Use thick cardboard and follow the template provided exactly; you can only change the size, but not the shape of the parts.
How to make a round cardboard box, templates:

 Round Cardboard Box Template No. 1
 What parts does a round cardboard box consist of: template No. 2
 In what order should the parts of a round box be glued together: template No. 3
  Round cardboard box with handle: finished product
 Video: “Gift box or casket made of cardboard: detailed master class”
How to make a heart box from cardboard?
A heart-shaped box is much more difficult to make than a round or square box. However, if you follow the tips and templates, you can easily create this beautiful piece.
A heart-shaped box is not only a storage box, it is an ideal packaging for giving a gift to a loved one. Such a box can be filled with many surprises: sweets, souvenirs, trinkets, gifts, keychains, flower petals, even butterflies can fit in it.
IMPORTANT: The heart box is in many ways similar to a round box, but here everything depends on the bottom: if it is proportional, then the whole product can look neat and even. The box has two bottoms: internal and external, the walls of the box are attached according to the principle of a round box.
Different templates for making a heart-shaped cardboard box:

 Heart-shaped box template from one piece: template No. 1
 Heart-shaped box template from one piece: template No. 2
 Step-by-step work in photos:

 Prepare identical hearts: two bottoms and a lid
 Cover the bottom with the side of the box
 Fix and wait until completely dry, make a lid
 Video: “Heart-shaped box: master class”
How to make boxes from paper and cardboard?
Giving gifts in bags, cellophane wrappers and paper wrappers is no longer attractive and is considered a sign of “bad taste.” Your gift will look much more impressive in a paper or cardboard package that you glue and decorate yourself.
IMPORTANT: The size and shape of your box depends only on what exactly you will be giving. Heavier gifts require thick cardboard, but for small and light ones you can even glue a paper box together.
Boxes made of cardboard and paper, different templates:

 Simple Rectangular Box: Template
  Hinged Lid Box: Template
  Triangular box: template
 Simple square box: template
  Box-pouch: template
 How to make a box from colored cardboard?
In a modern creativity store you will find a huge selection of cardboard:
- Kraft cardboard (solid sand-colored material)
- Colored cardboard
- Velvet cardboard
- Holographic cardboard
- Glitter cardboard
- Cardboard with prints, drawings and inscriptions
- Textured cardboard and much more
IMPORTANT: All this variety of choice allows you to create cardboard boxes of incredible beauty and use them for any purpose.

 Cardboard for creativity
 Video: “How to make a cardboard box?”
How to make a cardboard box without a lid?
If you need to make a cardboard box without a lid, you should also use a template. This product is perfect for storing personal items: pencils, cosmetic brushes, hair accessories and much more.

 Box template without lid
 Video: “Do-it-yourself box without a lid using origami technique”
How to make a cardboard box for candy?
Boxes of chocolates don’t have to be bought in a store; you never know exactly what will be inside. It’s always nicer to make a box with your own hands, fill it with candies to your liking and give it as a gift. to a loved one. This will not only be a “delicious” gift, but also very original and special.

 Box with handles: template
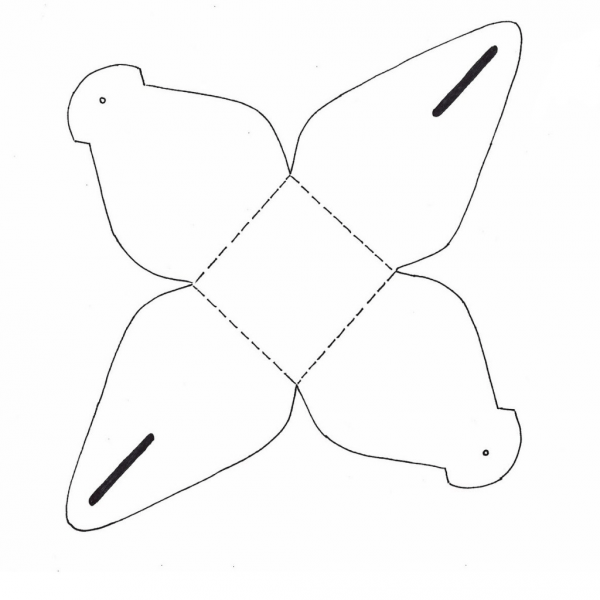
 Box with a butterfly: template
  Triangle box: pattern
 How to make a jewelry box from cardboard?
It is very convenient to store jewelry, jewelry and watches in a cardboard box. You can buy it or make it yourself, decorating it to your liking. If desired, you can make one or several sections inside the box.
A few tips and templates for making a flat cardboard box will help you make your own packaging of any size.

 Template for flat box
 Video: “DIY Flat Storage Box”
How to make a square box from cardboard?
small square box can be used as a bomboniere or packaging for small surprises for your loved ones.

 Simple square box template
 How to make a triangular box from cardboard?
A triangular box can exist as a separate unusual package, or it can be part of a cake-shaped package.
 Triangular box template
 Do we decorate cardboard boxes with our own hands?
Decorating a homemade box depends only on how original and great your imagination is. The box should also be decorated based on the occasion (a holiday, for example, or the decor in the room).
How and with what you can decorate any cardboard box:
- Lace and fabric
- Satin ribbons
- Scoop and burlap
- Stickers and stickers
- Buttons and other accessories
- Sequins and stones
- Colored paper
- Kraft paper
- Drawings and inscriptions
Video: “5 ideas for decorating a box”
Need to wrap a gift? Or do you want to create a container for storing small items so that they do not collect dust on the shelf? Don't know how to make one with a lid? It's actually not difficult. You just need to understand the principle of obtaining a three-dimensional form or use a ready-made diagram. The manufacturing process is not difficult. Eat interesting ways decorating boxes that will help you create a real work of art, and finding a use for it will definitely not be difficult.
What will you need?
If you are wondering how to make a box with a lid out of a box, then you already have the most important thing - a cardboard container.

It will act as the basis. In addition to this, you need to prepare the following:
- pencil;
- ruler;
- eraser;
- or scissors (the second option is less convenient);
- a knitting needle, a toothpick or a non-writing rod (to make guides along which the cardboard will be bent);
- glue;
- decor (design paper, fabric, stickers, satin ribbons, beads, flowers, feathers, butterflies, lace).
As you can see, available means Easily turn an ordinary box into gift wrapping or interior decoration.

A sheet of cardboard or a box: what is better to make from?
If you decide in advance to do beautiful packaging for a DIY gift, you have the opportunity to choose the source material, evaluating the advantages and disadvantages of the options. When there is no time for preparatory work, use what you have available. After studying the article, you will understand how to make a box with a lid from a box, but it is worth warning that it will be easier to make the product from a flat sheet of cardboard.
if you have ready box, but it is without a lid, of an inappropriate shape or larger than necessary, you will have to disassemble it to a flat sheet and already draw the workpiece on it. The problem is that on this sheet you will already have folds, and you will have to adjust the template so that the expected fold lines coincide with the existing ones.

The advantage of this option is that it is cheap. Easy to find. You can ask at any store. They always have unnecessary packaging left over.
If you have time to search for decorative cardboard and are not trying to save money, then feel free to purchase sheet (preferably thick) colored, metallized, printed (printed with a pattern) material. From a single flat sheet you can make a box according to any template of completely different shapes. In addition, you won’t have to waste time gluing the front side to give an aesthetically pleasing look to industrial gray-brown cardboard. In any case, the choice is yours.
with a lid yourself?
The shapes of the boxes are very different: cylindrical, based on a square (rectangle, pentagon or hexagon), in the form of a pyramid, heart, house and other objects. If your main task is to make a product with a lid, choose the template that contains this part. It could be separate part, which is removable, or a single whole, that is, reclines. To do the first option, work like this:


How to make a box with a hinged lid?
If you want to make gift wrapping in less time, choose those templates where the lid is one piece with the base. In this case, the sequence of work will correspond to that presented in the previous section and will be limited to stages No. 1 to No. 6.

How to make a box from individual parts?
If you don’t know how to make a box with a lid from an existing blank, because none of the blanks you found fit in size, since the folds do not match those on the original box, use the following method:
- Choose any layout and print in the right size on a piece of paper.
- Cut the template into individual elements (bottom, lid, side edges).
- Lay out the parts on your disassembled box so that the existing folds do not interfere (do not fall on the elements).
- Trace the parts with a pencil.
- Cut everything out.
- Make holes around the perimeter of each part with a needle or awl (depending on the thickness of the material).
- Sew the joints of the elements with a needle and thread (the number of holes along the edge connecting the two faces should be the same).
In this case, you don't even need glue. The same can be done with tape, but then you will have to decorate both the front and back sides.
How to decorate a box?
Now, most likely, you have already decided and understood how to make a cardboard box with a lid from what you have. But if all you have is taupe packaging from groceries or other goods, you might want to think about decorating. You can decorate the product either already completed or at the stage of cutting out the parts. You can choose from the following list of decoration options:
- cover the base with fabric, beautiful paper, lace;
- paint, write text, make a pattern, for example acrylic paints with preliminary surface priming or felt-tip pens;

- use the decoupage technique (suitable for thick cardboard);
- wrap in attractive wrapping (thin) paper;
- decorate with applique, satin ribbons, beads, flowers made of paper or fabric.
These are just a few basic options. Based on them, you can create your own unique masterpieces.
So, you've learned how to make a box with a lid out of a box. It is not difficult. Choose simple circuits, if you are short on time. And when there is enough of it, you can use any proposed option or even develop your own based on the sample you like.


