
Without a pattern, the instructions and tips below will help you quickly make a stylish product. It is best to use knitwear for work. It doesn't wrinkle, stretches perfectly and will keep you warm on cold evenings.
Tips on how to quickly sew a cardigan with your own hands without a pattern
There are many interesting and stylish styles of cardigans, but it is best for novice craftsmen to opt for something simpler that does not require a complex pattern. For this occasion, you can choose loose outerwear with a belt, which is sewn from knitted fabric or a wide shawl. If you don’t know how to quickly sew a cardigan with your own hands without a pattern, the photos and instructions below will help you with this.
To begin with, you can try your hand at making outerwear that does not have shoulder seams. The main thing is to choose the appropriate style and cutting method. For tailoring, it is recommended to use jacket draping fabrics. A knitted or knitted fabric will look great.
Features of sewing a cardigan
When starting to sew a cardigan, you need to familiarize yourself with some of the features of this item of clothing; they will greatly facilitate future work:
How to sew a cardigan with your own hands without a pattern quickly? Description of the technique
If you choose a material whose edges do not fray, you can make a cardigan even faster. For sizes 42-46 you will need a piece of fabric, the width of which will be about 160 cm. Everyone will decide for themselves the length of the product, since everything depends on the desired result.
A piece of fabric is folded in half. Measure 15-16 cm from the side from the top down, and 20 cm to the middle from the free edge. From the point of intersection of these lines, you need to make a cut down 15 cm - these will be the armholes.
To make the sleeves, you will need two identical rectangular pieces measuring 70 by 30 cm. They are sewn along the long edge and attached to the armhole.

DIY cardigan made from a scarf
To make such a product, you will need a piece of fabric about 2 m long and about 70 cm wide. If you use a scarf with the required dimensions when sewing, then outerwear of this type can be worn on both sides. In this case, it is also better to use fabric whose edges do not fray.
Step-by-step instruction:

If you want to sew a cardigan with your own hands quickly, then make an effort and spend very little time, and you will succeed. You can get a warm new thing in just a few hours. It looks impressive and is quite simple to do. Having mastered easier manufacturing methods, you can move on to complex methods of sewing various products. Voluminous cardigans will go well with a short dress. You can cover your legs with tapered trousers.
The combination of a voluminous cardigan and a short dress looks quite bold. If you want to cover your legs, tapered trousers are best.
You will need:
- Mohair knitted fabric 150 cm wide and 1.90 m long for all sizes
- Sewing threads
Besides:
- Silk paper for transferring patterns from a pattern sheet ()
- Pencil
- Paper scissors
- Tape measure ()
- Pins()
- Tailor's chalk ()
- Cutting scissors or small craft scissors (buy at Burda store)
- Burda copy paper and copy wheel for transferring the pattern ()
- Sewing machine needle and hand sewing needles
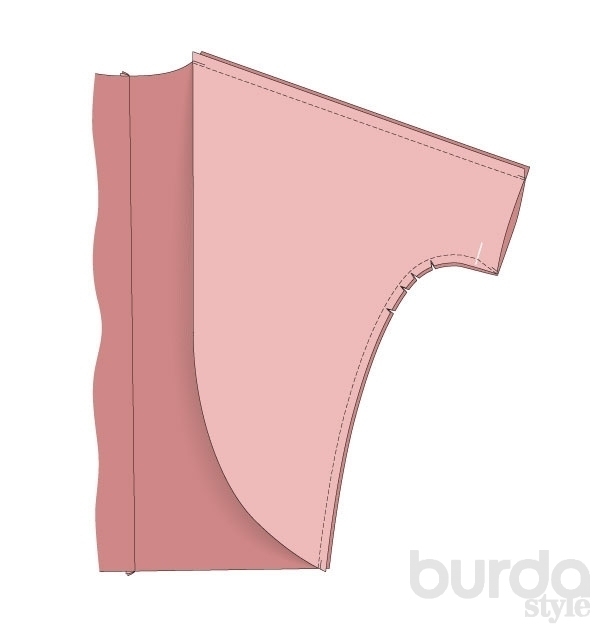
Layout plan
 The layout plan shows how to arrange the paper pattern pieces onto the mohair knit fabric. Pin the paper pattern pieces. Make sure that the arrow of the grain thread is parallel to the edge or fold of the fabric.
 - 1 Shelf, one-piece with 2 sleeves
- 2 Back, one-piece with 2 sleeves
- A) 2 strips long: size. 34/36 - 137 cm each, Size. 38/40 - 141 cm each, size. 42/44 - by
- 146 cm and 10 cm wide, including allowances.
Step 1. Cut
 Fold the fabric in half with the right side facing inward. Place the paper pattern pieces onto the canvas, paying attention to the direction of the pile, and pin. Around the details of the paper pattern, mark allowances on the canvas with tailor's chalk: for hems of the bottom of the sleeves - 4 cm, for all other cuts and seams - 1 cm. Draw parts of the strap (a) directly on the canvas with chalk, see dimensions on the previous page.
 Tip: When cutting, the seam lines (contours of parts) do not need to be transferred to the canvas.
Step 2. Sleeve cuts, middle back seam

Along the bottom edges of the sleeves, mark the hem allowance on the wrong side. Fold the back pieces right sides together, pin the middle sections and sew a middle seam along the back (the seam allowance width is 1 cm). Sew the seam allowances together and press to one side.
Step 3: Shoulder and Sleeve Seams
Fold the shelves together with the back, right side to right side, pin and stitch the shoulder sections and the upper sections of the sleeves, as well as the side sections and the lower sections of the sleeves. Stitch all the pinned edges (the seam allowance width is 1 cm), when sewing the bottom seams of the sleeves, sew a line diagonally from the marked bottom line to the seam allowance cut. Sew the seam allowances together and press to the back.
Step 4. Prepare the bar

Fold the plank parts right sides together, pin the short sections, stitch to a width of 1 cm. Press the seam allowances. Fold the plank in half lengthwise with the wrong side facing in. Iron it. Pin or sweep open sections.
Step 5. Stitch the bar

Pin the placket along the edges of the cardigan, right side to right side, aligning the placket seam with the middle seam along the back of the cardigan. Sew the bar (seam allowance width -1 cm). Sew the seam allowances together and press onto the jacket.
Step 6. Hem the bottom of the sleeves
 Overcast the hem allowance at the bottom of the sleeves, press to the wrong side and sew by hand using loose blind stitches.
Photo: Jan Schmiedel (4), U2/Uli Glasemann (1). Illustrations: Elke Traier-Schäfer,
You can sew a square coat, a fashionable circle vest, or a cardigan without a pattern in less than a couple of hours. Master classes for beginners and video tutorials will help with this.
How to sew a square coat?

You can create such a robe literally in one evening. As you can see, the base of this coat is square. The sleeves are sewn separately, then they need to be sewn to the pre-cut armholes. The ties will keep the collar from sliding down. You can secure this coat to yourself using a zipper, hooks, snaps, buttons or ties.
If you do not have suitable fabric, you can sew a square coat from a warm fabric blanket. If you have blankets of a suitable color with a light synthetic filling such as holofiber or synthetic padding, these will also be suitable.
A pattern will help you sew a coat. It's very simple.

- As you can see, the main canvas is a rectangle. Make its length at your discretion. If it is a jacket, then it is shorter than a coat. Slits for sleeves: their width is 5, their height is 25–30 cm.
- The sleeve is also created on the basis of a rectangle, but it needs to be slightly narrowed towards the bottom on one side and the other at your discretion. At the top, the place where the sleeve is sewn into the armhole is made slightly rounded.
- You will also need to additionally cut out a collar 25–30 cm wide from the main fabric. Cut out the collars for the coat from the same fabric; they will be located on the right and left sides of this square vertically.
- Place the parts, namely: the collar horizontally, the 2nd selection vertically. Sew them to each other from the wrong side to make a piece that looks like the letter P.
- Place it on the main square. Cut out a rectangle from the lining fabric, it should be of such a size as to fill the internal space formed between the collar and two ribs, stitch the lining to these parts.
- If you want to sew a demi-season coat, then two layers are enough for it, the first is the main fabric, the second consists of a lining, collar and rims. Place these 2 parts right sides together, sew three sides from the wrong side, leave the fourth side unstitched, which is the hem.
- If you want to sew a winter coat, then you need to put another layer inside; it consists of sheet padding polyester or other similar warm and light synthetic material.
- The sleeves also consist of two or three layers. If you are using the winter version, then attach the cut padding polyester sleeve to the wrong side of the main one. Sew the sides of this double piece, and do the same with the lining piece. You now have two parts for the sleeve. Turn the main one right side out, insert the lining piece into it, and sew the resulting triple sleeve into the armhole.
- Turn up the cuff and stitch around the edge. Decorate the hem of the coat in the same way; you can sew it here and on the arms with a hidden seam.
- If you want the coat to sit well in the neck area so that the shoulders do not move, then make two parallel seams here at a distance of 2 cm from each other, creating a drawstring. You will insert a cord here and use it to tighten the coat, separating the neck from the shoulders.
- Sew any type of fastener from the above or simply tie a coat or jacket to a belt.

If you are sewing a coat from fabric or plaid, then you don’t have to make lining layers, use only the main fabric. In this case, you can decorate it with fringe. It is created very simply. Place the finished coat in front of you, and use a needle to remove the threads located around the perimeter of the square. After a few rows you will have a fringe. You can tie your coat with a leather belt; this option looks very stylish.

Another similar pattern will help you quickly sew a jacket; this product is made using the same technique.

If you're looking for other ideas, check out the following.

This outerwear square is even smaller than the previous ones. But the highlight is that it is tied in the center at the waist, with a ribbon, thus separating the collar from the front of the coat.
If you have a blanket and want to quickly turn it into a coat square, then check out another pattern.

The blanket needs to be folded in half, right sides together. On the wrong side you will draw holes for the sleeves, which are 40 cm apart from each other, but 20 cm from the fold of the fabric. If the initial product has a length of 270 cm, then 60 cm will be the sleeves, and from the rest you will sew a blanket coat .
Sew in the sleeves at the sides. Based on the pattern markings, cut a hole in the rectangle for the armholes and sew the sleeves here. This versatile blanket coat can be worn front to back or back to front, with the floors at the back.

How to sew a poncho?
This Indian cape will help you create several coat options. You will create the following using a rectangle of fabric. Its length should be twice the desired length of the coat, plus allowance for the hem at the front and back. With your arms spread out in different directions, measure the length from the cuff of one to the wrist of the other, adding allowances for the hems. This value will be the width of the rectangle.
Mark its middle, make a small cutout for the back. From the center of this point, draw a straight line to the bottom of the hem and cut along it. Edge this front shelf with edgings on one side and the other.
You can sew the area below the armpits to define the sleeves or leave them loose.

The pattern of a poncho trimmed with fur is very simple. As you can see, it consists of a semicircular part and a hood.

- Take a piece of fabric one and a half meters wide; you will need a piece of fabric 6 meters long. Fold it in half. Draw a semicircle to fill the given rectangle.
- Cut out the neckline. You can trim it with store-bought trim to match, which stretches well, or cut it from the same main fabric. The entire lower edge, that is, the hem of the poncho, is shaped in the same way.
- The hood consists of two identical parts and one that looks like a ribbon. Place it in the center between the two main parts of the hood and stitch. The hood is then sewn to the neckline.
- To make such a poncho look chic, trim the sleeves and hems with a strip of fur.

Fold the fabric, 150 cm wide and 164 cm long, in half. Make a cutout in the center for the neckline, move the scissors further to cut the shelf into two equal parts.
If you are making a warm coat with a lining, then according to the presented pattern you also need to cut out a part from the lining fabric and padding polyester. Quilt it on a machine.
Here's how to sew the coat next. Starting from the bottom of the cuff of one sleeve, make a seam to the armpit of that arm, then it goes along the side, to its bottom. The same seam must be made on the other side of the coat. In the same way, sew the blank from the lining fabric and padding polyester. Place it in the main coat, edge it on the sides and bottom with strips of fabric.

From the same fabric, cut a rectangle equal in length to the diameter of the neck, fold it in half. Between the sides of this collar, place the upper part of the neck of the coat, sew it here.

Poncho for beginners
Very quickly you can sew a poncho with fur trim.
- 2 meters of plush, with a canvas width of 150 cm;
- interlining;
- pattern;
- scissors.
- a piece of woolen drape measuring 1 m 45 cm with a fabric width of 150 cm;
- a strip of fluffy faux fur 20 cm wide, 550 cm long;
- scissors;
- tape measure.

The dimensions of both new clothes are identical; for them you need to cut out a square with a side of 83 cm and make allowances for the seams.
For the first poncho, the following are created:
- 1 one-piece back piece;
- 1 one-piece stick piece;
- collar measuring 63 by 20 cm;
- non-woven strip 63 x 10 cm.
To prevent the edges of the seam from being imprinted on the front side of the product, iron it with steam, without heating the iron too much and only lightly press on the surface to be treated.
- To make the first poncho for women, sew the shoulder sections of the back and front, while leaving the neck sections free. Press the seams.
- Sew the edge of the stand-up collar on the small side so that its width becomes 2 times smaller, that is, 10 cm. Align its front part with the back of the neckline, stitch here, iron the seam. Turn the facing over to the other side, turning the edge in one centimeter. Sew from the face to the front of the front and back neckline.
- Fold the edges of the product and stitch them too. For the first cape poncho the work is complete. For the second one, we will continue with it.
- Place the faux fur trim right sides together and sew corner seams at a 45-degree angle. You will get a square edging made of fur. Place it on the poncho, sew this edging to the main fabric on all four sides.
- To make a stand-up collar, you need to sew on the wrong side the small sides of the fur strip intended for processing the upper part of the product. Sew one half of the collar from the inside of the neckline, turn it right side out, and stitch here.
DIY vest models for women

Its diameter depends on the volume of your hips. Determine this value; if it is 97 cm, then the diameter of the circle will be equal to a meter. If the hips are 105–107 cm, in this case, the diameter of the circle is 110 cm.

As you can see, the armhole height is 25 cm, the distance between these values on the back is 46–50 cm.
Before you start cutting from the main fabric, so as not to spoil it, cut out a circle from plastic film or unnecessary fabric, try it on yourself, and make adjustments.
You may have a wider or narrower back. Then you need to vary the distance between the armholes, based on individual measurements, the same applies to the diameter of the circle.
Such beautiful vests need to be created from double-sided coat fabric; leather can also be used. These fabrics hold their shape, so the collar stands up well.
Take a roller from a fabric of a suitable color or from a basic width of 5 cm, use it to process the edges of the product, as well as the armhole. To do this, the beginning of the roller along its entire length is sewn to the wrong side of the vest, ironed, after which you need to fold its edges onto the front side of the vest and stitch along its edge.
If you do not have such a well-stretching tape, then overlock the edges. Try on the finished product, determine where you need to sew the fastener. This could be a zipper or buttons with loops, buttons. To highlight your waistline, wear a wide leather belt. You can make it yourself or buy it.
If you wish, read the description of the women's vest, which is sewn without seams. For this you will need:
- knitted fabric;
- matching braid;
- scissors;
- tape measure.
- Measure the circumference of your hips, add 5 cm to the resulting figure for a loose fit. This is the width of your vest rectangle. To determine its length, place the beginning of the centimeter in the middle of the shoulders and lower it down.
- Determine the length of the future product. This second number is the height of your rectangle.
- Now you need to make adjustments to its upper part. Determine where you need to make U-shaped cuts for the arms, bevels for the neckline so that the neckline looks like an English letter V.
- Place the vest in front of you and trim the armholes with the prepared braid.
- It is important that it is knitted or cut this roller diagonally from the fabric so that it stretches well. Close the shoulder seams, and also use braid to trim the neckline and hem of the front.
- If you have a thick knitted fabric, you don’t have to trim these edge parts of the vest.

How to sew new cardigans in a couple of hours?

That's how long it will take you to create your next update.
- As you can see, this model has loose sleeves, which are secured at the wrist with a cuff made of knitted fabric. You will use the same fabric when decorating the borders and bottom of the cardigan.
- Cut out the one-piece back and two front pieces, connect these pieces at the sides and at the shoulders.
- Make cuffs of sufficient width from knitwear. Connect its small edges with a seam, fold the workpiece in half so that it is inside. Sew the edges of the cuff to the bottom of the sleeves in the same manner as described earlier.

If desired, it can become an option for a light autumn-spring coat. The back and front are created using the same pattern, only the back is one-piece, and the front consists of two parts. The shelf has a deeper cutout.
Open out the double collar and sew it to the neckline. On the right side of the hem, make slits for the loops and decorate them. Sew buttons on the other side.
This is how you can quickly create several pieces of outerwear to keep you warm in the cold season. Reproducing these models will not be difficult even for beginners. To make the task even easier, we suggest watching the intricacies of such needlework on video.
The famous fashion designer Olga Nikishicheva shows how to quickly sew a coat without a pattern.
After watching the second story, you will learn how to create a cardigan from a scarf with your own hands.
My dear seamstresses! Finally, the long-awaited warmth has arrived, and we can already feel that May is still spring, and not February))). And so today I will tell you and show you how to sew one of the most necessary and beautiful items in a woman’s wardrobe - a cardigan. AND we will sew a cardigan without a pattern and quite quickly.
In today's master class I sewing a cardigan from knitwear and, therefore, the technological process has slight difficulties and requires the seamstress to have little experience working with knitwear. But if you are a complete beginner, you can still sew such beauty, you just need to take non-stretch fabric (jacquard, for example).
So, for the cardigan I needed:
- knitwear - 2 m (width 150 cm)
- artificial leather – 50 cm
- matching threads
Cardigan WITHOUT pattern
Well, my dears, it’s time for me to tell you that the pattern of this cardigan is just a circle, it couldn’t be simpler! There is only one point - you need to find the correct location of the armholes in order to make cutouts for the sleeves.
We cut out a square with sides of 150 cm from our fabric:

Then you need to find the center of this square. To do this, fold a square of fabric in four and at the fold (in the lower left corner - marked in red in the photo) pin: 
Then we unfold our square, and from a point in the center of the fabric you need to use a centimeter and a piece of soap (or chalk) to draw a circle, imitating a compass. 
How to draw a large circle on fabric without a compass, see here:
This is the circle we should get. We take the maximum radius so that we get a circle across the entire width of the fabric.

Then we take any blouse from our closet that fits you well, but is not too tight (with a little freedom in the cut), lay the blouse on the fabric in the center, retreating 15-25 cm from the top of the circle.

We transfer the lines of the sweater's armholes onto the fabric. The photo below shows how the back armhole lines are translated, that is, the front armhole lines need to be completed by yourself. 
To begin with, we will make small armholes and cut the fabric in the middle. Now you definitely need to try it on to adjust the depth and size of the armholes.
Important!
While the armholes were small, as in the photo, the cardigan did not fit well, it did not lie nicely on the shoulders at all, since the armholes on the back needed to be enlarged. And as I cut more and more fabric at the back armhole, the cardigan fit better and better. And, perhaps, the larger the opening on the back, the more beautiful the collar will lie. But I stopped my search at a certain point, because I still planned to sew sleeves to the cardigan, and with a very large armhole I wouldn’t be able to do it.
But a cardigan can also be made without sleeves; in this case, the larger the opening on the back side (within reasonable limits, of course), the more beautiful the collar will be.

Also, using fitting, when the ideal armhole sizes have already been found, we mark a line on the collar where we will duplicate the cardigan collar with faux leather. It should be taken into account that the line for sewing on the artificial leather should be on the wrong side of the cardigan and should not be visible from the front side. Therefore, standing in front of the mirror, we mark on the cardigan with soap the line where the collar folds. And then we lay the fabric on the floor, and further increase the drawn line of the collar by 2-3 cm, so that later the seam of the skin on the fabric is not noticeable.

So just remember, maybe you have a leather jacket lying around that you haven’t worn for a long time - you can use it too)))

This is how I joined the pieces of leather and sewed them into a single piece for the collar of the cardigan.

Now, placing the piece of the cadigan and the leather insert face to face, we stitch along the top line of the collar. I sewed with the maximum stitch size to avoid stretching the fabric along the line. This is important when working with knitwear.
I make allowances of 4-5 mm; before turning the part right side out, be sure to make notches on the allowances, since the rounding is in progress.
Then we turn the collar right side out and sew an interfacing stitch along the front part of the collar, departing 4 mm from the edge. This way we fix both layers of fabric. I also did this line on the largest possible stitch.

Now you need to sew on the bottom part of the leather insert. A little difficulty awaited me here. I don't like basting. So, as usual, I pinned and went to sew. As a result, I received a huge distortion of the fabric, since both knitwear and stretchy faux leather decided to live their own lives under the machine needle. I still had to unravel everything and pre-baste the leather to the knitwear.

We sew first with a straight stitch at the maximum stitch, and then with a zig-zag.

Sleeves for a cardigan
You will immediately have a question - where can I get them?, where can I get the pattern?
There are two options:
- If you have never built a sleeve for yourself, this is the place for you.
- If you already have a sleeve pattern from any other product, we will use it.
I took the sleeve pattern from this dress. But my armhole turned out to be 10 cm larger than the sleeve cap on the pattern. Therefore, I need to increase the sleeve cap by eye. Purely theoretically, you can simply add 5 cm from each side of the sleeve, but then you will get a slightly unnatural shape. Therefore, we also increase the height of the collar by 3-4 cm, and increase the sleeve by the required amount (for me it is 5 cm) on both sides. All these calculations now concern the sleeve cap, i.e. its upper part, I hope you understand))).
Then we measure the size of the armhole on the cardigan with a centimeter, compare it with the piping line on the sleeve, and adjust the piping line on the sleeve if necessary.
I also want to note that I used a tight sleeve as a basis, like on a dress. But I definitely need freedom on the cardigan sleeve. Therefore, we measure the size of the required freedom on the wrist (for me it is 22 cm, despite the fact that the sleeve itself on the pattern is 17 cm, i.e. I added 5 cm for freedom; and this turned out to be enough).
Now we draw new side lines of the sleeve, taking into account the increased line of the bottom of the sleeve.
And we will have a pattern for a large sleeve for a cardigan.
We cut out the sleeves from the fabric, remembering that the grain thread on the sleeve runs vertically.

Sew the sleeves along the side seam:

Now we try on the cardigan again, and mark the lowest point on the armhole (it should look like in the photo below), mark these lowest points with pins:

Now we baste the sleeves to the armholes, matching the bottom point on the armhole and the seam on the sleeve:

Then I decided to make the sleeves 3/4. Because it’s more beautiful)).
We process the sleeve sections and the entire cardigan around the circumference (not counting the collar) with a zig-zag stitch on the largest stitch.
You will get this beauty: 
By the way, I completely forgot that I also wanted to sew square pockets made of leather, it will look even more stylish).
And since the cardigan itself didn’t want to stay on me, I had to help it))) - I sewed three small rings on each side, and threaded a chain (I bought both the rings and the chain at a jewelry accessories store). It turned out very beautiful:

I hope, friends, that you will also be able to sew a similar cardigan. If there is anything, ask questions and write by email, I answer everyone))
Sew with me, and see you again on the blog pages))!
There is also this cardigan option:
Hello, dear needlewomen! Today we invite you to sew a super-simple and super-effective convertible cardigan from a rectangle with sleeves that can be worn in many ways. Surely, many of you have seen how some lady wraps herself in a long cloth and various images appear one after another. A long time ago, Donna Karan invented such a universal clothing model called COZY, which quickly and easily transforms, radically changing the image. The idea of transformer clothing is, of course, not new, and today we will show you how to simply and quickly sew a transformable cardigan from a rectangle without a pattern.
Here are just a few options on how you can wear such a cardigan:
![]()
![]()
![]()
![]()
How to sew a transformable cardigan with your own hands, pattern
A cardigan is sewn without a pattern, since it is essentially a rectangular cape with sleeves, and all measurements can be taken from a personal knitted T-shirt. The whole secret of this transformable cardigan is that it is made of light, thin, very elastic knitwear, which at the same time is quite elastic. Choose knitwear that does not require edge finishing. The author of the product indicates that he used viscose jersey with the addition of elastane (3-5%), with a density of 160-170 g per square meter.
Required:
- knitted fabric 2.5 x 1.5
- pattern paper, pencil and ruler
- threads, pins, centimeter, soap, scissors, disc knife.
- sewing machine or overlocker
- t-shirt
Transformable rectangle cardigan pattern
![]()
Take your T-shirt and take your measurements:
- A – shoulder width,
- B – back width,
- C – ½ chest circumference.
Fold the knitted fabric in half and transfer the measurements
- width 220 cm, fold it in half (F = 110 cm),
- height is D+E = 75 cm,
- measure from the top the height of the side D = 25 cm,
- insert the mold into the hole, the appropriate distance from the folded edge (½ A ½ B and ½ C), and the height of the edge from the top edge (D).
We designate armholes

We make a pattern for the sleeves, also using a T-shirt

- sleeve length (K)
- sleeve width at the bottom (L)
- M = 2 x desired cuff height.
- N = width of the lower part of the sleeve L – 3 cm.
Add 1 cm to the sleeve pattern (seam allowances)

Check the symmetry of the sleeves

Sew the sleeves to the rectangular fabric
![]()
How to sew a transformable cardigan with your own hands from rectangular fabric
![]()
![]()
That's all, the transformable knitted cardigan is ready, all that remains is to try it on and try out different drapery options. Below you will find a video demonstrating in detail the different ways to drape a cardigan.
![]()
Click “Like” and receive only the best posts on Facebook ↓


