
Content
Recently, decor items that are made from recycled materials or from materials that are conventionally called garbage, for example, are in fashion. carton boxes from under the technology. On the other hand, it has become fashionable to create various figures and models of equipment from paper. In this article we will try to create several interesting models ships made of cardboard. For some of these models you will need ready-made templates, and some products can be created without diagrams, using your imagination. At the end of the article you will definitely find a video tutorial that will help you consolidate your knowledge and create an interesting product from available materials. Let's not waste time, prepare the materials and start creating.
Templates
Let's first try to create a ship using templates. They are easier to work with. What you will need:
- thick cardboard (you can use an old box);
- scissors;
- pencil;
- ready-made template;
- glue or tape;
- colored paper and other decor.
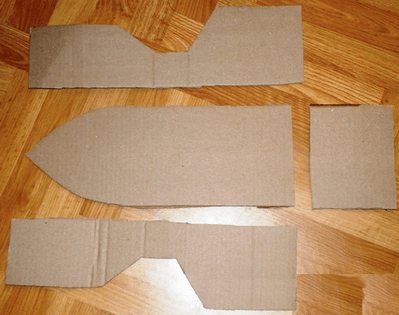
First you need to print the template and transfer it to the main material. By the way, if you are using cardboard that is not too thick, you can print the template directly on it.
You should get something like this:
Next, you need to dilute a little PVA glue with water, cut plain paper into pieces and dip them in the solution and glue them to the base of the ship. Remember the papier-mâché technique. It is better to connect the ship parts themselves using tape.
All that remains now is to decorate the blank with the prepared decor. It could be colored paper wrapping paper, textile. The ship can also be painted with ordinary watercolors.


You also need to make a mast for the ship. You can use an ordinary twig and several round pieces of thick cardboard.
Every boat must have a flag. For it, use fabric and applique made of paper or material. The sail can also be made from cardboard, use the bushings from toilet paper.

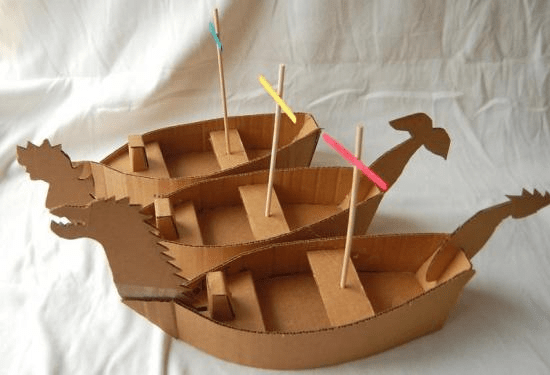
Making a big ship
This option is suitable for young children who love exciting games. For such a ship you will need big box. This could even be packaging from under a refrigerator or from a large TV.
First you need to connect the valves of the box and make a sharp bow of the vessel. On the sides you need to cut out several round timbers to make improvised portholes. Use a thick stick and fabric to make a flag. Use paints to decorate the ship.

Don't forget about details such as the anchor - it also needs to be made of thick material and decorated. A large do-it-yourself cardboard ship is ready to sail across the endless expanses of the apartment.
We use matchboxes
Let's call this modeling, because we will create a whole ship from several matchboxes. What you will need:
- cardboard;
- glue;
- matchboxes;
- wooden skewer or thick paper;
- colored paper;
- markers;
- scissors.
First you need to glue two matchboxes together short sides. Glue another box on top in the middle.

Now you need to cut out a rectangular piece of paper and glue it to the structure on top.
Now we need to cut out a strip from thick colored cardboard, with which we will form the bow of the ship.

Now you need to cut out a piece of cardboard that will correspond to the contours of the ship, look at the photo:

Now the bottom and top of the ship need to be fastened with glue. Next you need to make the mast. You can use a wooden skewer or roll up an A4 sheet very tightly and secure the tip to prevent the sheet from unwinding.

A hole needs to be made in the top matchbox of the ship so that the mast can be inserted. Don't forget to use glue.
Now all that remains is to cut out the sails from colored paper, paint them and attach them to the mast.

The matchbox ship is ready! It can be made wider and higher if you use large quantity matchboxes. If you use very thick cardboard for the bottom of the ship, then it is quite possible to float it on the water and participate in competitions for the title of the fastest boat.
DIY cardboard spaceship
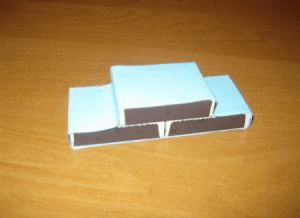
We suggest using a fairly simple option that will allow you to literally create a 3D model. To do this, you need to cut out several identical parts from cardboard, but of different sizes. The parts need to be fastened together, but either a thin piece of foam rubber or a small piece of thick paper must be placed between them. It will look something like this:

Or like this:
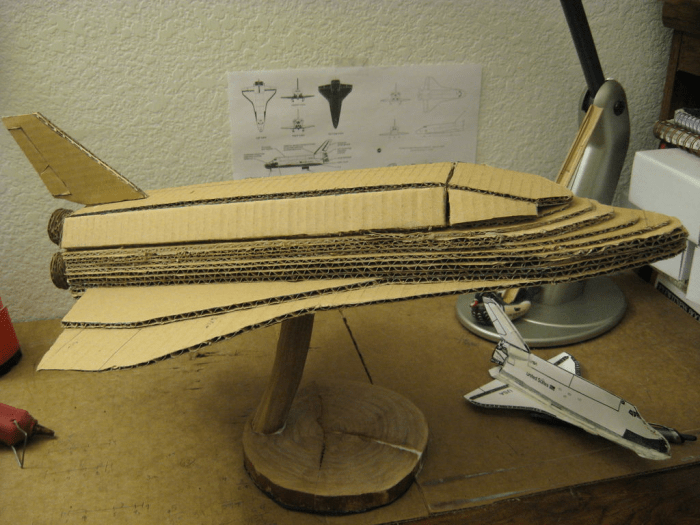
An entire space station can be made using cardboard rolls from toilet paper and tape.

Use silver foil, a compass, a black marker and a pencil to give the spaceship a realistic look.
Cardboard is a fairly convenient and easy-to-work material, but if you know a few nuances, the work will seem even simpler, and the product itself will turn out neat:
- When working with very dense material, use fairly sharp scissors, or even better, a stationery knife;
- before bending the cardboard parts, it is better to draw along the dotted lines with the non-sharp side of scissors or an old pen that does not write, then the material will bend neatly and evenly;
- Not in all cases you can use a glue gun. For example, if you are working with thin material, then it is better to use office glue or PVA;
- work in a room where there is not too much high humidity, otherwise your products may delaminate or parts may not stick together;
- the room should be light, it is advisable to have a window that can be opened and ventilate the room;
- We also always advise you to work only in a good mood.
How to make a ship out of cardboard with your own hands - a few more interesting options
We would like to offer a few more interesting and beautiful options ships that you can make with your own hands.

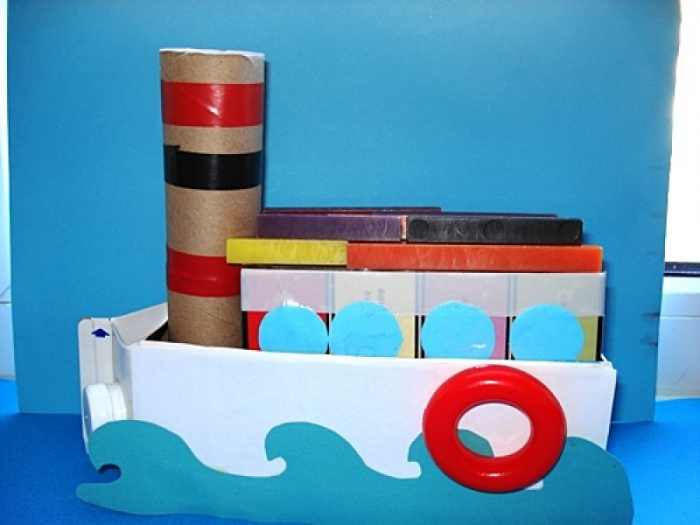
In this case, a milk carton, cardboard boxes and a sleeve are used.

And this is a luxury boat made from an ordinary cardboard box.
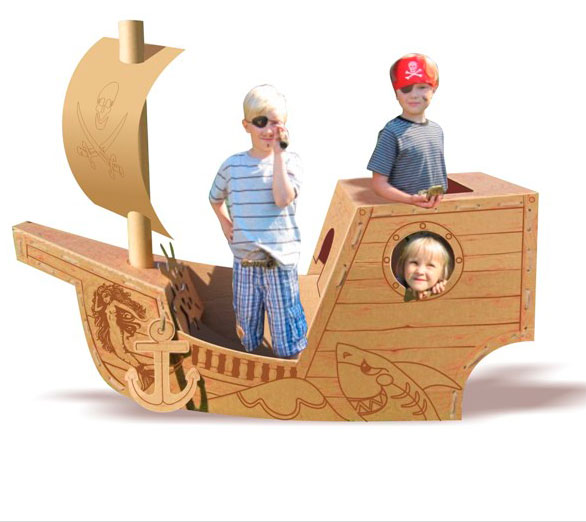
With a little practice and imagination, you can create such a beautiful pirate ship made of cardboard with your own hands. We always advise you to involve children in creativity. They will be especially pleased to know that they are creating a boat just for themselves. At the same time, you can think about a pirate costume, and also make it out of cardboard telescope, hat and cardboard knife. Such participation of children in creativity helps to develop their imagination, attentiveness, perseverance, and the desire to create something with their own hands for themselves. Be sure to involve children in cleaning too. Explain to them that after themselves they need to fold all the materials, put them in their places, and also need to clean the work area so that later they can get creative again.
Paper origami is the oldest and very popular art of folding funny ones among children and adults. The main difference between the origami technique and other types of paper crafts is that the figure is folded from a whole sheet, without the use of glue, and as a result, if the craft is unfolded, we again get an undamaged sheet of paper.
The most common paper craft is, of course, a boat, because everyone remembers what pleasure this cheerful favorite children's pastime brings - to float a paper one or with the flow of a river.
Origami paper boat diagram
Building a paper boat is very simple, but not everyone knows how to fold it correctly. To make it, we only need a blank sheet of white or colored paper. When building origami, it is better to be guided by a detailed diagram.

Paper boat master class
For clarity, we will show you detailed master class how to fold a paper boat model. Let's take a blank sheet of paper. We choose the dimensions of the sheet based on the desired size of the future craft, however, we take into account that in the process of making the boat the paper will be folded several times, and as a result the origami will be much smaller than the sheet. For example, we use a standard A4 format casting; the resulting boat will be no more than 10 centimeters in length.
- On clean slate with a simple pencil or use a felt-tip pen to draw a vertical line dividing it strictly in half. This will be the first bend line.
- Now, strictly along the bend line, fold the sheet in half vertically.
- Let's mark the next vertical axis, but you shouldn't mark it with a pencil, since in this case the line will be visible on the future craft, this will ruin it appearance. To avoid this, simply carefully fold the sheet in four, mark a line and fold it back. Then take the two upper corners and fold them to the vertical axis as shown in the figure. The resulting bend lines should be carefully bent; for this, the resulting bend lines should be carefully bent; for this it is better to use some kind of hard object, such as a paper knife.
- We still have a free double strip of paper under the folded corners. Let's first bend the top strip, again carefully securing the bend line.
- Then we'll do the same with the bottom strip.
- Now we begin to open the resulting triangle from below.
- Next, we fold the open triangle into a square so that the side corners are located in its center; to do this correctly, we are guided by the drawing. Then tuck the corners of one strip under the corners of the other.
- Now let's bend the upper part in half, placing it on the bottom of the figure's base, and align its upper and lower corners.
- In the same way, fold the resulting part on the reverse side so that an isosceles triangle is formed.
- Now let’s open the triangle from below, spreading the side parts apart.
- Having opened the figure, we bring the lower corners together, we get a double square.
- Now let’s take the resulting square in our hands and, carefully, so as not to tear the paper, stretch the upper corners of the figure to the sides, simultaneously lifting the side of the boat.
- Let's expand the figure and get an almost finished origami boat, all that remains is to modify it quite a bit.
- To make our boat more stable and float well with the flow without capsizing, let’s give its bottom the shape of a rhombus.


Finally, the paper boat is ready to set off on an exciting journey along the fast flowing river.
Good afternoon, dear needlewomen!
Many will remember unforgettable moments from childhood - how great it was to do paper boats and launch them along a river or at least a puddle! Years have passed, and now your hands have forgotten how to make boats. Now that you have your own children, it’s time to remember and introduce your child to this exciting spring lesson- make paper boats and put them on the water!
You can come up with a game: put together several boats with a child and send them to the river for a bet: whose boat floats the longest is the winner.
In this article you will learn how to make it yourself paper boat, and also watch the video instructions.
How to make a paper boat
Did you know that the origami technique is useful for a child because it develops thinking, attentiveness, logic and fine motor skills? Therefore, arm yourself with a piece of A4 paper and start making your own crafts. For work, you can take a white sheet, which you can later repaint in any color you like, and it is also better to take paper that will not get wet after 30 seconds spent in water. There is another secret of “survivability”: a paper boat can be coated with melted beeswax or paraffin, this will make the paper moisture resistant.
First, we will introduce you to the diagram of a paper boat, then we will proceed to step-by-step photos and videos.
Paper boat folding diagram
1. Fold a white sheet of paper in half. (Fig. 1) Bend the two upper corners of the rectangle at right angles to the center point (Fig. 2)
2. We bend up on both sides the free edges of the sheet on both sides (Fig. 3)
3. Tuck the corners as shown in Figure 4 so that the overall composition forms a triangle (Figure 4)
5. Bring the corners of the bottom of the composition together (Fig. 5) so that we end up with a square (Fig. 6).
6. Fold bottom part up to form a triangle again (Fig. 8)
7. Hold the composition by the corners and carefully place it into a square.
8. Pull the corners until you get a boat, do not forget to align all sides of the ship well, this will give it stability and neatness.
Paper boat.
Perhaps every boy folded paper boats in childhood, and most likely, upon becoming a parent, not everyone will be able to fold a paper boat just once or twice. Let's refresh our memory and origami technique and fold a boat with our own hands together with the “Master of Handicrafts”
As we have already said, make a craft from thick paper that will retain its appearance on the water longer. Beeswax or paraffin will increase the boat's moisture resistance.
How to make a stable and beautiful ship, and how to decorate it? You can decorate the boat, firstly, acrylic paints, secondly, from toothpicks and fabric, napkins or paper, you can make a flag for the ship and attach it so that balance is maintained.
Now let's move on to the paper boat folding technique.
We only need a sheet of A4 paper.

Fold the sheet in half.
And again in half - to make a fold line.
Unfold the last fold.
We will schematically denote it with a dotted line.
We bend the upper corners to this dotted line.
Be careful that both ends are symmetrical and meet in the middle of the craft.
Bend the lower free ends upward on both sides.
Carefully bend the protruding corners.
This is what happened on one side.
Do the same on the other side.
Fold the workpiece crosswise, as shown in the photo.
Open the boat to make a diamond shape.
Measure a short distance from the top corner, mark it or eyeball it. Fold the bottom edge to this point.
We do the same on the second side.
Now we need to open our paper boat again. A little more and your DIY craft will be ready!
Now grab both sides of the ship with your fingers.
Pull them and open the boat.
This is how it should turn out. Now we need to straighten the boat well.
It is important to properly straighten the boat, otherwise it may lie on its side in the water; pay special attention to the bottom.
Learning how to make a boat out of paper is simple, you probably became convinced of this by looking through the instructions. Systematic folding of paper using the origami technique develops creative thinking, logic, hands, outlook and eye. Using the origami technique you can make anything: boats, airplanes, insects, flowers, animals, bows - whatever your heart desires!
Therefore, a paper boat is just the beginning! Next, make a paper boat, a paper cruiser, and so on with your child! Below are video tutorials on how to make them.
How to make a paper boat video
How to make a boat out of paper video
How to make a sailboat out of paper video
Text prepared by: Veronica


A paper boat is a wonderful craft! It develops fine motor skills (if you fold crafts carelessly, you won’t get a boat), it trains spatial thinking wonderfully, and besides, you can go outside and play with the resulting boat! Alone, in the company of friends, with parents. Organize a sea expedition or speed race. Boats can be made from colored paper, painted and painted, and a crew of small toys can be selected for them. In bad weather, you can launch boats in the bathroom, and in the country - in a basin... In a word, practice with these schemes, and you won’t regret it!
Simple paper boat
This is exactly the kind of boat that most dads, and many mothers too, can make out of paper. And if you make it from a sheet of newspaper, you will get a quite tolerable headdress!

During the Soviet Union, these were popular among finishing workers - they provided excellent protection from lime splashes, and after the end of the working day they were simply thrown away. Well, the design of such boats is very, very simple!

If you weren’t into origami as a child and now look at the diagram of a boat with bewilderment, here’s a video for you: detailed, visual, accessible.
Steamboat with two pipes
The second most popular diagram of an origami boat is “from childhood”. Without any doubt, and without a diagram, you will remember how to make it, but, just in case, we are still posting the diagram and video.
(Click on diagram to enlarge)
A curious detail is that this particular origami pattern does not seem to be found at all on foreign sites dedicated to children's crafts.
So, perhaps this is ours, a Russian steamship! And with two pipes!
Ship with sails
But such a boat, on the contrary, for some reason is not popular among Russian children. Making a romantic boat with sails is not at all difficult; moreover, we found two ways that lead to the same result. It should be noted that such a boat does not sail so well, but it looks beautiful, and on our streams it is also fresh and unusual!
(Click on diagram to enlarge)

(Click on diagram to enlarge)
* Tip - when watching a video, turn off the sound, for some reason duringexactlyDuring this filming, someone was diligently torturing musical instruments in the background.
Tricky boat
The diagram of this boat is called "Tricky boat", sounds a little like the word "trick". The name can indeed be translated as “cunning, tricky, confusing.” Well, it’s not for nothing that it got such a name! After sitting over the diagram for a good half hour, the author was still unable to fold the boat.

(Click on diagram to enlarge)
Fortunately, a video was found on the Internet, and the complex immediately became simple. We must warn you, for the first minute and a half the piece of paper is simply crumpled and smoothed out in all directions (apparently this necessary condition to perform a clever trick), but then the real magic begins!
If you took a poll about which paper craft is the most popular, probably half of you would say it was an airplane, and the other half would say it was a boat. It’s not surprising, because launching paper airplanes into the sky or floating a paper boat down a stream is fun entertainment for any child. Making such figures is easy and does not require a lot of time or materials. This is what makes paper origami great; the boat turns out beautiful, and you can not limit yourself to one model, but make a whole fleet of different ships.
Origami paper boat - collecting materials
If you are planning to make a boat out of paper, the instructions begin with preparing the materials. This is the easiest stage, because very little work is needed:
- paper;
- scissors.

Most often in the photo there is a paper boat white, however, you can choose absolutely any colors you like. On the contrary, the brighter the more interesting crafts available.
Paper origami - classic boat

A model of a classic paper boat is the simplest design that is accessible even to children. The procedure is as follows:
Fold a rectangular sheet of paper in half.
We outline the middle, bend the upper corners towards the center.
We bend the remaining paper at the bottom upward and repeat the same on the other side.
We bend small corners on both sides, you should get a triangle.
We open the structure and fold it again, now the workpiece should turn into a square.
We bend the bottom corner up, repeat on the other side, we get a triangle.
We unfold the structure and fold it again along other fold lines.
We open the side parts of the figure to the sides and get a boat.

This origami model is accessible even to beginners, step by step photos paper boats will be an additional hint.
An important point: if you choose thick paper or cardboard for this model, the boat will be able to stay on the water longer, which will undoubtedly please the child.
How to make a paper boat - motor ship
This master class on creating a paper boat with your own hands is considered more complex, although it takes very little time.
The scheme of work is as follows:
Draw diagonal lines on a square piece of paper.
We bend each of the four corners of the square towards the center.

We turn the structure over and bend all the corners to the center again.
We repeat the same thing again: turn it over and bend it.
Turn the workpiece over again and open the side pockets.
We open the structure and get a motor ship from origami paper.

Origami boat - video master class crafts
Do you want to make an unusual paper boat? The video below will definitely help you!
Interesting paper sailboat
Another one step by step diagram a paper boat that will definitely surprise your child. A simple piece of paper turns into a real sailboat, and all this in a couple of minutes. Let's get started:
We bend a square sheet of paper diagonally, then along the other, marking the fold lines.
We unfold the workpiece and bend three corners to the center, we get an envelope.
We bend the lower part of the envelope down, departing from the bottom edge about 1 cm.
Fold the workpiece in half along the diagonal line.
We fold the structure, pointing the center inward.
We bend the lower corner of the workpiece to one side so that the paper sailboat can stand.

Yes, such a paper boat will not be able to float, but it looks original and very unusual. And if you make a lot of sailboats out of paper with your own hands, you will get an excellent interior decoration.

A paper sailboat, a paper steamship, a simple origami boat - on this interesting schemes don't end! For even more great ideas with master classes, see our article
You can create a paper fleet from different figures, make a boat from origami modules, use glue and additional materials in your work. Start with simple circuits and move towards complex origami paper boats.


Master classes, videos, step-by-step photos, as well as your imagination will definitely help you create real masterpieces!


