It is important not only to look impeccable yourself, but also to teach your children to do the same. Mothers should remind their daughters that their girls are beautiful, and also support them appearance. Repeatedly, mothers of cute long-haired princesses were convinced that braids are the simplest and most beautiful children's hairstyles. There are quite a lot of varieties and methods using braids. There are complex multi-level weaving that looks more like a work of art.
If your daughter is restless, but you want to give her a beautiful hairstyle, then correct solution– These are quick DIY hairstyles. This will be useful even for calm and patient children, because in the morning we are all in a hurry to get somewhere and have absolutely no time to braid complex braids. Here are a few master classes on creating express hairstyles for school or kindergarten.
Hairstyle "Two braids"

This pretty haircut, consisting of two braids, is good for hair middle length and is a simple option for daily styling.
- You can make such a basket yourself, without anyone’s help.
- We call this hairstyle everyday, but it is also appropriate for a holiday.
- Make a straight parting on combed hair.
- Temporarily fix one half so that it does not interfere with the adjacent braid.
- We braid a braid on one side using the spikelet method, starting from the bangs area and placing it closer to the ear so that the finished hairstyle resembles a cute basket.
- The second part of the hair also needs to be turned into a braid, symmetrical with the adjacent braid.
- At the end of the weaving, we connect the ends of the braids.
- These ends need to be intertwined and secured with an elastic band.
- An alternative is to tuck the end of the braid behind the opposite braid.
- The result is braids laid behind each other in the form of a basket.
Quick track hairstyle

- Spray the baby's hair with water from a spray bottle, it is important that the strands are slightly damp.
- Then the curls are easy to style.
- Divide all the hair with an even parting, each side into two more strands.
- Try to keep all the strands the same size.
- The remaining hair is pinned or slightly curled.
- Each strand is twisted in one direction, secured with a beautiful hairpin or bobby pin, it all depends on the idea.
- The same principle looks good on long and medium hair.
- Interpretation of an ordinary spikelet Everyone knows how to weave a little dragon, he alone looks ordinary and boring, we invite you to use your imagination
- Divide your hair into four equal parts horizontally.
- Start weaving a regular spikelet from one ear to the other from each separated strand.
- Connect all the braids into a ponytail and secure with a bow.
Original braids

Waterfall hairstyle for girls

- Separate three identical strands at one of the temples and start weaving a regular braid.
- Each strand is designated by a serial number from left to right.
- Take curl number one and place it on the middle one, do the same with number three.
- Now we put the left strand (previously it was the second one) again on the middle one.
- We put the right curl (which was the first) on the middle one.
- We leave the strand that is hanging down to hang down and replace it with another one taken from the head of hair.
- We add hair from the total mass to the top strand and move it to the middle.
- We also move the new strand, which replaced the curl falling down, into the middle.
- We repeat all the steps, leave one curl to fall, another strand takes its place, we move it to the middle.
- We continue to braid to the opposite ear or simply leave the braid hanging down (it all depends on the amount and length of hair).
- The braid can be finished by braiding a flower; some begin to weave a waterfall on both sides, connecting the curls into a ponytail or French braid.
- You can experiment with variations every day.
Watermelon made from hair

- We make an even vertical parting in the middle.
- Divide the head into 4 even squares. You get 4 ponytails that need to be tied with elastic bands.
- Then each of the squares must be divided into two more parts. The result is 8 equal pieces, that is, 8 tails. If desired, the hair can be left as is. However, it will be better if you put them on top.
- Next we connect the tails in a circle.
- We insert the remaining tip of the ponytail into the very first elastic band where the connection began.
- Hairstyles for 3 year old girls should look exactly like this: fun and interesting
Braiding with a ponytail

- Comb your hair thoroughly.
- We start by tying a high ponytail at the top of the head using an elastic band.
- Separate half of the tail and hold it with your hand.
- Having selected a small narrow strand, we move it to the front and ask the daughter to hold the strand.
- We tie a not very tight ponytail from the remaining hair in our hand.
- We open it in the middle and thread the lower tail into the resulting hole.
- We repeat the entire process starting from separating 1 narrow strand.
- We repeat all the steps step by step.
- Having reached the end of the tail, we tie it with an elastic band so that it does not unravel.
- We comb the remaining released strands and, starting from the top ones, begin to weave
- Tie-ins (weaving the remaining strands) will be either on the right or on the left
- We tie the remaining 2 small ponytails into 1.
- We straighten the large side waves and the braid itself inside, starting from the bottom and moving to the base of the ponytail.
- By slightly stretching we will give it volume.
Heart hairstyle

- There are a lot of options for making a heart out of strands, but short hairs will not allow you to braid your hair; you need to use strands. This method is no worse than braids, it’s just that the heart will turn out different:
- Divide the baby's entire hair into two parts (from the forehead to the back of the head). Gather each part into a ponytail. Move the elastic band a couple of centimeters away from the ponytail, divide the curls from the roots to the elastic band into two parts. Pass the tail into the resulting connector from bottom to top.
- Do the same steps with the other tail. Divide each ponytail into two parts, make a rope, lay it out in the shape of a heart, secure with bobby pins, and secure the ends with an elastic band. For long-lasting hairstyle, do not spray big amount varnish Instead of plaits, you can braid small braids, the effect will be no worse.
- One heart is braided using the same principle. Various hairpins and flowers are added to the styling, and the look becomes festive. This option is great for babies with short hair.
Simple bun hairstyle

- Gather the hair at the back of your head into a ponytail and tie an elastic band with a satin ribbon of the desired color.
- Divide your hair into 3 parts, and the ribbon is considered the fourth strand.
- Place the ribbon at the edge and label it as the “first strand.”
- Place the second strand on top of the third, then take the ribbon and pass it under the third strand of hair.
- Then place the fourth strand on the ribbon, and then the same fourth strand goes under the second.
- The next step is to place the third strand under the fourth and on the second.
- Then place the ribbon on the third strand and pass it under the second strand.
- Repeat.
- The principle is that the ribbon remains in the center, and the strands of hair curl around it.
- It will be easier for you if you constantly say your action out loud, this way you won’t get confused and will remember the order faster.
Hairstyle with a bow

- Make a high ponytail and secure it with a tight elastic band. It is better that the hair is damp, so it can be collected comfortably, and the hairstyle will be more neat.
- Separate a small strand 3-4 cm wide and secure it with an elastic band. We won't need it for now.
- In order to make a volumetric bun, we use a special round roller.
- If you don’t have such a device, then you can make it yourself; to do this, take a thick sock and cut off its tip, twist the sock into a ring and you will get a similar roller.
- Distribute the hair evenly over the roller and put a thin elastic band on top.
- Starting from the back of the head, we separate a small strand and begin to twist it, gradually adding hair, in this way we must twist all the hair until it ends, you may end up with one or two turns around the bun.
- Secure the tip with a bobby pin or bobby pin.
- Now let's start creating the bow.
- To do this, take our strand and put an elastic band on the base.
- Pass the strand through the elastic several times, when it is already a little tight, thread the strand not all the way, leaving a small loop, this will be one part of the bow.
- Now twist the elastic band and thread the same strand of hair into the resulting loop to form the second part of the bow.
- The remaining tail will serve as the middle of the bow, place a strand between two loops and secure with a bobby pin, hide the remaining tip under the bun.
Hair bow

- A tight elastic band that matches the color of your hair;
- Hairpins, invisible pins (several pieces);
- Wax, gel or varnish for fixation;
- Accessories (flowers, hairpins, hairpins).
- Combs;
- Curling iron, curlers.
- We carefully comb the hair and collect it in a high tight ponytail.
- The end of the tail, about a third of the length, is not pushed through the elastic, but left hanging. This part of the hair will then be needed to finalize the hairstyle.
- We throw the falling part of the hair towards the forehead.
- We secure this strand with an invisible strand at the base of the elastic. Next, a jumper for the bow is formed from this strand.
- We divide the main part of the hair, twisted in the tail, in two. We make sure that the halves come out symmetrical and identical. Pull them slightly in opposite directions.
- The strand that is in front and fixed at the base with an invisible thread is thrown back through the middle of the tail. The actions are performed carefully so that the hair does not fall out of the strand, otherwise the finished styling will look careless.
- We securely fasten the jumper thrown back at the base of the tail with an invisible one. We hide the loose ends by pushing them under the elastic.
- We also secure each half of the bow on the crown with bobby pins.
- The next step depends on your imagination. We decorate the hairstyle according to our own wishes: we attach flowers, hairpins, elegant hairpins with beads or stones to the bridge.
- Final step: fix the styling with varnish, if necessary, highlight individual strands with wax or gel. If your hair is unruly or the weather is windy, use more hairspray.
Universal hairstyle

- We comb the curls so that later the hairstyle looks as neat as possible. Select a strand on the top of the head (if done slightly to the side, the bow will look playful) and also comb it.
- We collect the strand into a ponytail, fastening it with a thin elastic band, preferably to match the hair (so that it is invisible).
- Now we pull out the last loop of the elastic band and pull part of the hair out of the ponytail through it so that we get a “bun”. If you're counting on a bow big size, then pull out the “bun” larger, and vice versa, if you need a small bow, then the “bun” should be small.
- Now we pull the loop out of the elastic again and twist it.
- We make another loop in the tail (pull the loose curls through the loop). The resulting “bun” should be exactly the same size as the first one (for the symmetry of the bow), but located opposite it.
- This is the kind of preparation you should get. Note that the free ends of the tail should be in front.
- We straighten both “buns” to create volume. We give shape to the future bow.
- Now we proceed to the “knot” of the bow. We collect the tail and wrap it around our workpiece from front to back.
- We secure the ends at the back with bobby pins.
- We decorate the “middle” with a beautiful hairpin or hairpin with decoration.
- Curl the remaining curls with a round iron or curling iron with a large attachment.
Snake hairstyle

- Use a flat comb or your fingers to separate an even horizontal parting on the top of the head;
- Start weaving from one temple towards the other;
- Do the first weave of strands as usual, then add tufts of hair only from the side of the bangs, and from the side of the crown just the main curl. Thus, you will get a one-sided dragon, with a beautiful, embossed edging;
- Finish the braid, not reaching the ear 5 centimeters, make one weave without adding hair and turn the braid, now adding strands of hair under the parting, and on the other side just the main curl. Now the weaving occurs as if in the opposite direction relative to the first segment of the snake;
- Depending on the thickness of the hair and its length, you can repeat the bends of the snake several times, but it is better to make partings slightly diagonally, so the weaving will not be tight, and the snake will take about three turns;
- Finally, secure your hair with an elastic band. You can braid the rest of your hair with a regular braid or leave it in a ponytail.
French braid

- In fact, this braiding option is not easy enough for beginners.
- There is also a second name for the braid – “Dragon”.
- More simple method braiding is considered a simple braid.
- But to make a beautiful braid for your child in kindergarten, you have to really try.
- Basically, the “French braid” is braided on long and medium hair.
- If there is a holiday planned in kindergarten, then it is better to do everything clearly and correctly.
- First, you will have to separate a third of the hair from the main mass.
- That is, it is worth considering the fact that only three cycles of braiding are performed step by step.
- At the first stage, you need to braid a simple braid, and then, in subsequent stages, add hair on the side.
- It is practically necessary to weave one large braid.
- Then add strands step by step from both sides.
- If you really think about it, there is nothing complicated about it.
- Every parent can learn how to make braids for long hair.
- A girl with a loose braid always looks gentle and beautiful.
Braid hairstyle

- Separate small strands on the sides and braid each into a thin braid.
- Secure the base of the braids with a small hairpin, and do the same with the ends.
- Crabs of different colors look great.
- The remaining hair can be curled or left loose.
- The number of braids can be done differently, the main thing is that they are neat and your child likes them.
- Braiding from ponytails Divide the entire hair with an even parting, make a free number of ponytails on each side, secure with multi-colored elastic bands.
- Make flagella from each ponytail, begin to weave like lacing, alternating on the left and right sides of the hair.
- At the end, the hairstyle is secured with the same type of elastic bands or bows.
- The concept is very simple, accessible to everyone, and easy to implement.
- The main thing is to stock up on plenty of rubber bands.
- Some people make adjustments to their hairstyle - instead of braids, they braid it, which looks impressive and interesting.
Children's hairstyle

- Distribute your hair into two even parts using a vertical parting; make another parting on each side, starting from the occipital and ending with the frontal lobe;
- Start weaving from the back of the head;
- After you have braided the braid to the top of your head, turn and braid in the opposite direction;
- Combine the finished braids on one side and the other into one.
- This hairstyle is practical, it can be used not only for Everyday life, but also for holidays (matinees, September 1 and Birthday).
- Help to decorate a girl's hairstyle satin ribbons, bright elastic bands or hairpins.
Crisscross hairstyle for girls

- Divide your hair into two equal parts using a vertical parting;
- Afterwards, divide into 2 more (horizontal only): you should get 4 even parts for weaving; start weaving a French braid with one-sided grip from the upper left square;
- The braid should be loose, with a slight downward slope;
- Stop the braiding in the middle (when the 1st braiding zone is ready), grab it in a ponytail; braid your hair on the opposite side (2nd zone) in the same way and make a ponytail;
- Repeat the same with the left bottom(3rd side); Read more:
- After releasing your ponytail, hold the finished braid and at the same time braid the remaining square (4th zone).
Pigtail headband: a beautiful children's hairstyle

- Separate the hair from the frontal part of the head with a comb, and collect the rest in a ponytail;
- Throw your hair to one side and start braiding french braid, grabbing hair from both sides;
- Finish the braiding of children's hair with a Russian braid; hide the tip under your loose hair;
- Unravel your ponytail and comb it; If desired, roll the remaining hair using hot rollers.
- The girls' hairstyle is ready!
Video: beautiful and easy hairstyles for girls
Most mothers start every morning with thoughts about how to quickly get the little princess ready for kindergarten or school so that the girl remains neat all day. This is especially true for hairstyles, several simple options of which you need to have in stock in case of lack of time.
The hair of very young girls is fluffy and not obedient in their mother’s hands. In addition, it is rare that a child will sit quietly for a long time while his hairstyle is being created.
Important! In addition to beauty, the requirements for a child's hairstyle are resistance to any active games and not tight weaving so that the head does not hurt by the end of the day.
Depending on the length of your hair, you can choose a variety of everyday styling options.

Children's hairstyles for every day
For any hairstyle for every day, your home arsenal should have:
- Straight comb with fine teeth.
- Little ones silicone rubber bands.
- Hairpins or invisible ones.
- Beautiful elastic bands and hairpins if necessary.

Daily hairstyle sunshine
- For convenience, divide the curls into 2 parts with a straight parting.
- Separate thin strand to the right of it and gather it into a ponytail with a bright elastic band at a short distance from the hairline.
- Make identical ponytails in a circle.
- Collect all the ends in the center of the circle and secure with a hairpin.
This video shows how to do a little girl's hair very quickly and easily.
Easy hairstyle for girls with two braids
Most modern mothers probably had this hairstyle in childhood. Simple braids have not lost their relevance and in the images of modern little ladies.
- Make a straight or zigzag parting.
- Braid each part into a braid; for convenience, you can first secure the tails.
- Do interesting option hairstyles, crossing the braids at the back of the head and securing it again at the base with bobby pins to form a figure eight.

Beautiful wreath hairstyle for girls
Despite the apparent complexity, it will take about 15 minutes to weave a wreath, and the styling looks will be spectacular and beautiful all day.
- Separate from start side parting 2 strands and twist them into bundles.
- Intertwine each other twice.
- Take the grabbers and attach them, continuing to twist the tourniquet.
- Braid this way all hair in the direction around the head.
- Returning to the starting point, intertwine the loose strands in the form of a rope to the ends and secure it behind the first row with bobby pins.

This wreath option is suitable for every day, and if use beautiful hairpins or ribbons, it will be a worthy completion of the festive look.
With a fast pace of life, a spikelet will always help out thanks to the speed of execution and the variety of different variations.
Important! By showing your imagination, you can change your looks every day with just one weaving skill.
Even a classic French braid will remove all hair from your face and last until the evening.

- Separate a thin strand from the forehead line and divide it into 3 parts.
- Place the right side on the middle one, and then left to the right one in the middle.
- Separate a curl (tie) from the loose hair at the temple and attach it to the far right side, place it on the middle strand.
- Make a pick-up on the left side and braid it, continuing weaving to the ends.
This video shows how to very quickly weave a French braid - a spikelet.
You can change the direction of the spikelet, making a braid diagonally or around the head, braid inside out, laying curls under the middle strand.
Children's hairstyles with hair bows
A playful hairstyle with a bow is very suitable for little girls both in everyday life and in festive atmosphere.

- Do tail on top of head.
- Do not pull the last turn completely out of the elastic band, but leave it in the form of a loop.
- Divide the loop into 2 halves, placing the remaining tip between them and securing it with an invisible one.
This video shows how very easy and simple it is to make a hair bow.
Children's hairstyles with buns
Little girls always want to look like their mother, and the modern mother's hairstyle often looks like a simple bun.
Advice! You can have fun getting ready in the morning by doing the same hairstyles for yourself and your daughter in 5 minutes.
Side bun
- Comb the ponytail smoothly to the side.
- The last round do not pull it out completely, but leave it in the form of a loop.
- Secure the bun a little with bobby pins and wrap the tip around the base, securing it at the bottom with a bright hairpin.

Bunch with flagella
A bright and mischievous hairstyle with flagella will withstand any daytime tests of a little fidget.
- Collect 1 tail on the back of the head or 2 on the sides.
- Separate a small curl from loose hair and twist it in one direction until the strand curls into a ball at the base.
- Repeat twisting the strands throughout the entire tail, securing the result with invisible.

Classic bun for girls
For a classic bun, you will additionally need a soft hair donut and several hairpins.
- Collect on the top of the head there is a ponytail with an elastic band.
- Wind it onto the donut vertically from the tips to the base.
- Gently straighten the resulting bun, so that there are no gaps left.
- Secure with hairpins or bobby pins.

Classic bun with braid
Simple braids will help you diversify a classic bun quickly and easily.
- Separate with a horizontal parting a third of the hair from the growth line, temporarily remove it clamp.
- Collect the remaining part into a ponytail and twist it into a bun, secure with bobby pins or hairpins.
- Divide the first part into 2 halves and braid each one.
- Wrap the base of the bun pigtails, crossing them over him.

Easy children's hairstyle with a small bun
A hairstyle like a Disney princess will delight any little lady.
- Collect some hair on the top of the head and comb lightly.
- Twist the combed hair in your hands and lay it around like a shell, securing the strands with bobby pins.
- Pick up the remaining side curls and place them underneath.
- Decorate the bun with a tiara and curl the remaining loose ends.

Hairstyles for girls for long hair
Girls always have long hair are a source of pride for mom, but at the same time you need to be able to style them every day, doing easy hairstyles.
With a French purl braid
A simple purl braid is woven according to the principle, only the strands are laid under the middle curl. At the end, all the turns are slightly stretched to the sides for more volume.

For the bun you will need a donut, which needs to be secured at the base of the ponytail on the top of the head.
- Thread a thin strand from the tail under the donut, divide the rest into the upper and lower halves.
- Take a thin curl from the lower half from the side of a separate strand and divide it into 2 parts.
- Braid hair around the base, picking up identical strands from loose hair.
- Braid the remaining part into a braid and hide it under the bun.

Braiding a tourniquet
- Gather the tail with an elastic band.
- Divide the free part into 2 halves and take them in the palms of the same name.
- Twist 2 strands in one direction and intertwine them together.
This video shows several options for children's hairstyles for kindergarten and school.
Hairstyles for girls for every day for medium hair
Everyday styling for medium length hair, easy to perform and will not require much time.
Elfini
A simple hairstyle like a little elven princess: separate a small strand at the temples and braid them into braids, which are connected with a beautiful hairpin at the back of the head or behind the ears, if the length allows.

Ponytails with elastic bands
An interesting hairstyle that imitates French braiding, but much simpler in performance and will last all day.
- Divide the hair with a straight parting into 2 halves, temporarily remove one with an elastic band or clip.
- Horizontal parting separate a small strand from the forehead, make the tail with a silicone rubber band.
- Do second tail under the previous one.
- Divide the first into 2 halves and connect them under the second, attaching them to the strands of the third.
- Divide the tip of the second tail and connect it under the underlying one.
- Repeat all actions with the second half of hair.

An elegant variation of the Greek hairstyle
Greek style hairstyle is universal and charming at any age.
- Twist a small strand at the temple several times inward.
- Separate another curl nearby and attach to the first one, twist in the same direction together.
- Attach all the hair in a similar way to the back of the head, where it is secured with several hairpins and bobby pins.
- Repeat the same on the other side.
- Hide the remaining ponytail twisting it into a shell from tip to base and secured with a pin.
- Decorate your hairstyle with small hairpins or a headband with beads.
This video shows one of the options for a very beautiful holiday hairstyle with plaits.
Pull a loose, low ponytail at the back of your head and pass the free part above the elastic through the hair, tighten the ponytail a little.

Quick hairstyles for short hair
While the young princess is just beginning to grow thick hair, There are not many hairstyle options, but they exist.
Styling for very young ladies
The first simple hairstyles for girls are mainly cheerful palms with colorful elastic bands. All hair is divided into several sectors and collected in ponytails.

Hairstyle option for older curls:
- Separate horizontally part a third of your hair at the forehead and gather it into a ponytail.
- Take the same part in the middle and secure it together with the upper tip with an elastic band.
- Remaining gather the curls together at the back of the head.
This video shows three ways to braid hair for a little girl.
Using accessories on short hair
Short hair and tend to get into your eyes during active games, and to reliably collect them you need to try.

All sorts of accessories are used for this: soft colorful rubber bands, crabs, fastening hairpins, headbands.
Each of you can create children's hairstyles for girls with your own hands - in the presented master class we have collected only simple and very quick hairstyles.
Multi-layer basket
Do you like retro style? A granny style hairstyle looks very interesting! With some skill, it won’t be difficult for you to do it for your daughter!
- Distribute your hair over the entire circumference of your head.
- Start from the crown of your head in a circular weave using the French braid principle. Grab loose strands only with outside.
- Moving in a circle, braid all your hair. You need to finish the weaving with a regular three-row braid.
- Tie the end with an elastic band and hide it under the “basket”, securing it with a bobby pin.

Pigtail in the form of a headband
A hairstyle for every day in the form of a circular braid is very simple to do and allows you to neatly remove the strands from your face.
- Separate the hair near the forehead using a thin comb.
- Gather the rest of your hair with an elastic band so it doesn't get in the way.
- Throw the strands at your forehead to one side and begin to weave a French braid, grabbing loose strands on both sides.
- Tie the end of the braid with a very thin elastic band and hide it under your loose hair. If desired, curl them with a curling iron.


Beautiful hair flower
This very beautiful hairstyle is perfect for matinees and celebrations.
- Comb your hair smoothly and comb it to one side, making a side parting.
- Tie the ponytail with a thin elastic band.
- Separate the middle strand from it and braid the braid to the very tip. Tie it with another thin elastic band.
- Using bobby pins, place the braid around the main elastic to create a flower.
- Curl the ends of the tail with curlers.
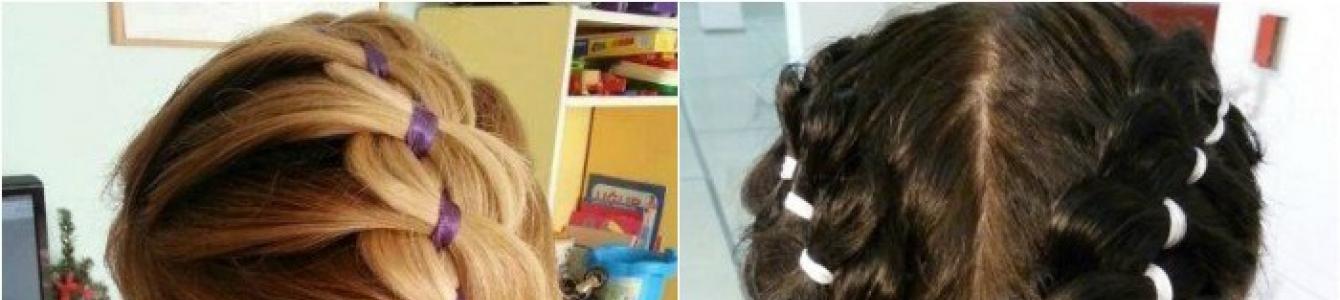
Heart hairstyle for medium length
Beautiful children's hairstyles will turn your little girl into a real princess. This elegant option captivates with its simplicity!
- Comb your braids with a comb to the center parting.
- Tie one part of your hair with an elastic band.
- From the second part, make a French braid, weaving in loose strands only from the outside. Then it will resemble the shape of a heart. Tie the end with an elastic band.
- On the other side, repeat the same weaving. Braids should be symmetrical.
- Tie the ends of the braids together.

For more details, see the video:
Elegant wreath made of rubber bands
Hairstyles using elastic bands are in particular demand, as they allow you to create real beauty in just 10 minutes! This option is suitable for medium length hair.
- Separate your hair with a longitudinal parting.
- Divide each of the two parts in half with a horizontal parting.
- Now do the same with each of the 4 sections. You will get 8 identical strands.
- Tie each strand with a thin colored or plain elastic band. As a result, you will have 16 small ponytails arranged in a circle.
- Gather them in the middle with one large rubber band to make a wreath.

Side bun braids
This elegant hairstyle for children will suit any outfit and will make your daughter a beautiful little princess.
- Tie the ponytail to the side.
- Braid three braids. If your hair is thick, it can be much larger.
- Wrap each braid around the base of the ponytail, securing with hairpins.
- Decorate the bun with decorative elements.

"Infinity Sign"
This wonderful hairstyle comes from the 80s. In the modern version, it is made simpler, but it also looks great.
- Make a central or zigzag parting and tie two ponytails almost at the back of the head.
- Braid two braids.
- Lift the right braid up and pull it under the elastic band that holds the ponytail. For reliability, you can use another rubber band.
- Pull the left braid into the resulting ring.
- Secure the tip as well.
- For decoration, use hairpins with bows or flowers.


Also, you will like these options:
Low braided bun
Girls 10 years old can braid such an amazing bun - feminine and elegant. Just like your beloved mother!
- Comb your hair to the side.
- Tie a low ponytail.
- Divide it into 5-6 equal parts.
- Braid each part into a braid.
- Tie the ends together with a very thin elastic band and fold them in half so that the tails point up.
- Secure the bun with an elastic band and add a hairpin or a fresh flower.

Hairstyle for loose hair
Cute hairstyles for loose hair can be done in kindergarten both on holidays and on weekdays.
- Comb your hair into a side parting and tie 4 small ponytails along it.
- Divide the second and third in half and connect adjacent strands with an elastic band.
- Divide the central tail in half again and attach the resulting strands to the outer tails.
- Braid the ends of your ponytails into pigtails.

Hair bow
Do-it-yourself festive children's hairstyle for a girl does not require any special knowledge. Anyone can do it!
- Tie a high ponytail. Do not pull your hair out to the end, but leave the tip hanging over your forehead.
- Divide the resulting loop in half.
- Throw the remaining ends back to completely cover the elastic. Secure it with a bobby pin.
- Spray the bow with varnish.

How do you like this bow?
Knot styling
This hairstyle is durable - it will last all day, giving your daughter a neat appearance.
- Make a side parting.
- Separate the strands on the left and right with a parting extending from the temple to the ear.
- Divide each part into three equal sections.
- Starting from the parting, twist a tight strand, gradually adding loose strands. Make three bundles on both sides.
- Divide the hair at the back of the head in half.
- We make a tail on the right side by attaching the corresponding strands to it.
- We make exactly the same tail on the left side.
- We twist two bundles, securing them with hairpins.
- We distribute the protruding ends and spray with varnish.

Two hearts
From long and thick hair you can make two hearts. Looks very nice!
- Divide your hair in half with a straight parting.
- Make two tails.
- Make a small indentation at the base of the elastic and pull the tail through it.
- Divide it into two parts and twist each into a rope.
- Form a heart and securely secure it with a bobby pin or hairpin.

How do you like these 2 options:
Lightweight fishtail
This fashionable hairstyle can be safely performed even on short strands.
- Comb your hair and separate two identical strands on the sides.
- Tie them together with a thin elastic band.
- Lower it a little and pull the tail inward.
- Below, separate two more of the same strands and repeat the process.
- In this way, you can braid all your hair, or you can make only 3-4 braids.

Hairstyles for kindergarten for every day will allow your beloved daughter to always look beautiful, fashionable, stylish and elegant. Try to repeat these master classes with photos - please both yourself and your little beauty.
Requirements for children's styling
Children's daily hairstyle must meet several important requirements:
- Speed of implementation – should be easy to create, without taking a lot of time and effort;
- Stability – the styling you create must withstand any manipulation (putting on a hat, active games, changing clothes for sleep, physical exercise) and maintain its appearance until the evening;
- Convenience - the hairstyle should not interfere, pull the strands very hard and cause discomfort;
- Approval by a child - even the youngest fashionista has her own concept of taste, which must be taken into account. Otherwise, your daughter may respond with disobedience, or even grow up with complexes.
Multi-colored spikelet
A multi-colored spikelet, flagellum or dragon is perfect choice For unruly hair. Your daughter's hair will be securely secured with many soft elastic bands and will not distract her from active games.
1. Comb everything back to avoid any knots.
2. Using the sharp tip of a comb, select part of the hair.
3. Tie it into a ponytail with a bright elastic band.
4. Now, in front of the ears, make another even and smooth parting. Separate this part, attach it to the first one and also tie it into a ponytail. Take colored elastic bands - the braid will be more fun.
5. Using the next parting, separate the strands below, form a new ponytail and comb thoroughly.

6. Repeat the process again to the base of the neck.

7. If there are strands of hair hanging out above your ears, pin them up with brightly colored hairpins.
8. Decorate the end of the braid with a bow.

Bun with braids
Children's hairstyles for medium and long hair can hardly do without beautiful buns. This is a great way to break away from the usual girly braids and try something new.
1. Comb it all back. At the top of the head, separate a wide section of hair (it should go behind the ears).
2. Secure it temporarily with clamps so that it does not interfere.

3. The rest of your hair should be tied with an elastic band.
4. Twist the ponytail into a bundle.

5. Place the bundle into a bun, wrapping it in a circle.
6. Secure with a pair of pins.

7. Separate the hair that has been set aside along the parting. Divide the right side into three.
8. Braid it into a braid, tying the end with an elastic band.

9. Do exactly the same braiding with the hair on the other side of the parting.
10. Wrap the bun in braids.

11. Secure your hair with a couple more pins.

"Eight" of hair
This cool hairstyle has been in fashion for many years. You probably did it yourself as a child. And now it’s time to make it for your daughter.
1. Make a straight or zigzag parting.
2. Tie two low, tight ponytails near your ears.
3. Braid them and tie the ends with thin silicone rubber bands.
4. Fold the braid in half so that the ends point towards the ears. It should be a bagel.
5. It needs to be secured with a second elastic band.

6. Thread the second braid into the finished ring.
7. Secure again with silicone rubber.

8. Decorate the figure eight with bows.

Braided hat
Does your fashionista love to wear her hair down? There is one great way to move your hair away from your face so that it doesn’t get in the way or get into your eyes. An unusual “hat” will be the best decoration!
1. Comb your hair with a brush. At the top of the head, separate a wide section of hair (approximately at the level of the ears).
2. Comb it to the side and braid it.

3. The tip must be tied with a silicone rubber band.
4. To give the braid volume, stretch it slightly.

5. Wrap the braid in a circle, forming a beautiful flower.
6. Secure it with pins.

In this video you are presented with three popular hairstyles for girls in kindergarten for every day:
Most little girls really want to be like their mothers. Feel free to make this super beautiful bun– make her dream come true!
- Comb your strands up.
- Tie a ponytail.
- After making the second turn, do not pull out the ends completely, but leave a fairly fluffy loop. It needs to be stretched and secured well.
- Wrap the remaining ends around our bun.
- Secure the end of the strand with a beautiful bright hairpin.

Braid loops on the sides
How to braid a girl in kindergarten? Braid her hair and put it in rings - fashionable, simple and beautiful!
1. Make a straight parting.
2. Comb your hair well.
3. Tie two ponytails.

4. Braid your ponytail.
5. Secure the tip with a thin silicone rubber band.

6. Curl the braid up, attaching the end to the base of the ponytail. Secure it again with silicone rubber.
7-8. Repeat the entire process on the other side.

9. Decorate your hair with bows or decorative elastic bands.

Elegant braid
This braid is ideal for girls from senior group. It looks very nice and doesn't take much time to complete. What else does a mother need who needs to quickly get her child ready for the garden?!
1. Comb your hair into a central parting.
2. Tie two ponytails.
3. Divide each ponytail in half.

4. Connect together the strands located closer to the parting - now it is one strand.
5. Now braid and secure the end.
6. Decorate your hair with bows.

Bun of five braids
The list of simple and chic hairstyles will continue in this master class. With its help you will create a neat and unusual bun.
1. Comb it all back and tie it into a ponytail.
2. Separate a not very wide curl from it and wrap it with an elastic band. Hide the tip in your hair and secure it securely.

3. Braid 5 braids.
4. Tie their ends together.

5 a. Pull your braids up.
5 B. Secure them with an elastic band.

Neat "malvina"
With this simple and beautiful styling Both the father and the girl’s older brother can handle it. A neat little curl will allow you to quickly style hair of any length.
1. Use a horizontal parting to separate a section of hair from one ear to the other.
2. Tie it into a ponytail.

3. Put elastic bands on it - plain or multi-colored.

4. When you reach the back of your head, pick up the remaining hair and tie a low ponytail. Decorate it with a lush bow.
Side bun of their braids
Everyday bun hairstyles for kids look great. Here is one of the options!
1. Comb it all back. Tie the ponytail to the side.
2. Braid three identical braids from it.

3. Tuck the ends of each braid into the middle and tie securely with a silicone elastic band.
4. Place the braids in a bun, twisting them in a circle.

5. Secure your hair with hairpins.
6. Don't forget about decoration.

How do you like this option?
Braids for loose hair
Weaving in the form of a cobweb will certainly attract the attention of others and will make your daughter the most fashionable and wonderful.
1. Part your hair to the side. Tie 4 thin tails along it.
2. Divide the two ponytails in half in the middle. Align the halves with adjacent strands and tie the ponytails. There should now be three of them.

3. Divide the ponytail in the center and attach its halves to the outer ponytails. Tie with rubber bands.
4. Braid the ends into two braids and secure again.

Ponytail without braiding
This type of braid does not need to be braided - this is its main advantage. As you can see in these photos, this is a very simple ponytail, tightened with many different elastic bands. It suits girls whose hair is cut into a ladder cut.
1. Using a massage brush, gather the strands together and tie them into a ponytail.
2. Decorate its base with a bow or a beautiful elastic band.

3. Now, one by one, string elastic bands onto the tail - multi-colored or plain. They should be the same distance from each other.
4. Also tie a bow or a bright elastic band (the same as the one on top) at the end of this “braid”.

Braid like a first-grader's
Will your daughter start school in a year? So you need to get used to the hairstyles of first-graders! A braid with a ribbon allows you to quickly tidy up long hair.
1. Comb it all back, make a high ponytail and start braiding.
2. Approximately halfway through the braid, add a ribbon to the hair.

3. Place it so that the two ends of the ribbon are intertwined with the hair.
4. Continue weaving with ribbons.

5. Carefully tie the end of the finished braid.
6. Wrap the braid inward, folding it in half. Tie the ends of the ribbon nicely.

Hair bow
Hairstyles for kindergarten for every day should be not only comfortable, but also beautiful. Here is a wonderful model that will turn your little daughter into a real princess.
- Comb it all back.
- Tie a ponytail.
- On the second turn of the elastic, do not pull the strands out completely, but leave a loop. The ends of the hair should fall onto the forehead.
- Divide the loop in half.
- Place the ends from the forehead in the middle of the resulting bow.
- Carefully secure it with a bobby pin.

All mothers want their little princess to be the most beautiful of all, have good qualities and wonderful taste. All this must be laid down for the child from childhood. And mother is the first hairdresser and stylist in the life of every little girl. But sometimes you have to choose something that is not what you would like, since little fashionistas have different hair and not all hairstyles are suitable for every face shape. That's why fashion trends Children's hairstyles are different from adults.
For adult women, when choosing a hairstyle, the fashion trends of the season and sense of style play a huge role. But for a little girl, the main criterion for choosing this look should be convenience and simplicity. It is for this reason that children's hairstyles for babies are rarely overloaded with various details; they are as simple as possible and most often collected.
The simplest haircuts and hairstyles for girls, photos
In the most early age Little princesses' hairstyles can be divided into 3 main categories:
- ponytails- low or high, in different quantities and sometimes interconnected;
- small delicate braids which often start from the temples;
- cute loose curls under a headband or hoop.
And all kinds of weaving have long remained the most popular among young mothers and their daughters:
- French braid- a simple weaving option that any mother should be able to do, since it is the main one for many others women's hairstyles. This braid starts with a base - a braid of three strands, which are carefully crossed with each other, and then side strands are gradually added to them.
- Braid made of plaits- an even simpler hairstyle option that will suit a baby of any age and with any hair length. The weaving system for this hairstyle is that two strands are separated from the head, each of which is then twisted into a not very tight strand. The bundles are then wrapped around each other in a different direction from the original one. It turns out very nice.
Simple and original hairstyles for girls with ponytails, photo


Simple and original hairstyles for girls with pigtails, photo


- If a girl’s hair is very soft and scatters, then the easiest way is to first collect it in a ponytail, and then carry out various manipulations with it.
- For curly-haired babies, cute ponytails on the very top of the head are perfect. For medium length hair this will be enough, but long curls later you can wrap it in buns.
- There are girls with unruly hair or areas where the hair sticks out in a completely different direction. Greek hairstyles or short haircuts are good for them.
- The owners are very fine hair A ponytail or braid will not work - they will look very “mousy”. But if you first curl your hair and then create a hairstyle out of it, it will turn out very cute.


Hairstyles for the holiday
The simplest version of a holiday hairstyle for a little girl is feminine and beautiful. Greek style. To get this hairstyle, you will need a special bandage or braid with an elastic band (artificial). A lace may also work, but not a silk one. The headband should be put on so that it is on top of the hair, and higher on the forehead than on the back of the head. All strands, being twisted, are wrapped in a bandage to close it. If time is short, you can simply curl your curls and style them with an ordinary lace on your head - it will be no less beautiful.
For prom The baby needs to look absolutely charming, so in this case, hairstyles with all sorts of complex weaves will be excellent options.


Hairstyles for girls for different hair types
Long
- The simplest hairstyle (if the hair is thick and beautiful enough) is loose curls. This option is not the most practical, especially for small and active little girls. But for the sake of fairness, it should be noted that sometimes the beauty of flowing hair is difficult to replace with anything. To lighten the look a little, loose hair can be tied up beautiful ribbon or dress your baby in an elegant headband with beads. Cute hairpins in the form of small bows that secure the side curls look good. The ends of loose curls can also be curled, but in a gentle way without over-drying.
- Braids and all kinds of weaving. It is this hair length that provides mom with enormous scope for imagination and turning it into reality.
- An ordinary tail, with the addition of a few interesting details, can sparkle in a completely new way. In addition, this hairstyle option is always very convenient.


Average
Medium-length hair for girls is ideal. There are styling options for them too great amount and it’s still easier to care for them: they get tangled less and dry out much faster.
- The ideal hairstyle for medium-length hair is a bob haircut. It is incredibly popular among mothers of all times, because it looks cute, and the baby does not have to braid her hair every morning. This haircut will be well complemented by a beautiful hairpin or side strands, selected with small bobby pins.
- Feminine wreaths with flowers. From the entire volume of hair you need to form a small bun, and then carefully secure it. You need to put a wreath on top so that the bunch is right in the center. Any headband with flowers will look chic with loose hair - the perfect addition to a summer look.


Short
Short hair has fewer hairstyle options, but nevertheless offers very interesting styling.
- Short flowing hair offers a wide range of options for playing with partings: oblique or straight, zigzag or ladder.
- Delicate hoops decorated with rich details, soft headbands in a feminine style or cheerful stilettos with berries or flowers will definitely complement the image of a little fashionista.
- Braids look amazing on short hair. This way you can braid a presentable French braid in a circle - from one temple to another.
- There is another interesting option: the entire mass of hair should be divided into two parts and carefully braid small braids from the parting to the temples - this will create a surprisingly openwork headband of hair. It would be great to decorate this hairstyle with live or high-quality artificial buds.


Hairstyles for little girls now offer wide scope for imagination - the main thing is that the mother is patient and ready to experiment with her little daughter. Stay beautiful and gentle!


