
A New Year's card is a wonderful New Year's gift that children can make for their family, loved ones and friends.
The main characters of our cards will be the Snowman and the Christmas Tree
DIY New Year's card with a Snowman. Master class with step-by-step photos
Necessary:
Paper for the base of the card;
Volumetric double-sided cattle;
Scissors;
Sequins, ribbon, pompoms and plastic eyes.
Manufacturing process
.jpg)
.jpg)
3. Using glue, glue eyes, sequin buttons and a carrot nose onto the Snowman figure.
.jpg)
4. Tie a ribbon-scarf around the Snowman’s neck.
.jpg)
5. Glue a Snowman figurine onto the postcard using double-sided tape.
.jpg)
6. Using double-sided tape, glue on the Snowman’s hat.
.jpg)
7. Using double-sided tape, glue on the hands of the Snowman.
.jpg)
8. Using glue, glue the pompom to the hat, legs and star to the scarf.
9. Our postcard is ready.
.jpg)
10. We draw up and sign inner part postcards of your choice.
DIY New Year card with Christmas tree. Master class with step-by-step photos
Necessary:
Paper for printing templates;
Paper for the base of the card;
Volumetric double-sided cattle;
Scissors;
Ribbons, pompoms and plastic eyes.
Manufacturing process
1. Print out the templates for making a postcard.
.jpg)
2. Cut out all the necessary parts.
.jpg)
3. Using glue, glue on the nose and eyes of the Christmas tree.
.jpg)
4. Using bulk tape, glue the large Christmas tree onto the small one.
.jpg)
.jpg)
5. Using double-sided tape, glue on the Christmas tree hat.
.jpg)
.jpg)
6. We fold two ribbons of different colors (in our case, gold and red) and thread them through the hole of the card.
.jpg)
.jpg)
8. Our postcard is ready.
.jpg)
9. We design and sign the inside of the postcard as desired.
Both cards together.
.jpg)
It is not at all necessary to buy expensive ones for the Christmas holidays; you can show your attention to an inexpensive one made by yourself. Cute New Year cards will delight loved ones and people you just know. In addition, this is a great idea for family creativity with children. Today, in a review of the editorial site, we will show the basic techniques for making postcards; in just 1-2 evenings you can create excellent gifts for friends and colleagues.
New Year cards can be done in different techniques Oh. They will perfectly complement any gift and will for a long time keep the warmth of your hands and pleasant memories. To make such a present you will need, colored paper, figured hole punch and decor. And then everything depends on the imagination of the craftswoman; you can come up with a simple, but at the same time beautiful postcard, or use more complex techniques for making it.


Unusual New Year and Christmas cards using scrapbooking technique
New Year's cards made using the technique are distinguished by a special warmth; to make them it is not enough to use ready-made ones; here it is important to show imagination, which makes each craft unique.
Today we will show you how to make a New Year’s double card with your own hands, for this we will need:
- base paper 18.4x24.8 cm. It must be folded in half;
- scrap paper 18×12 cm – 2 pcs.;
- cuttings and New Year's pictures;
- curb punch;
- glue "Moment" and PVA.
Let's get to work.
| Illustration | Description of action |
 | Make a layout of pictures on a sheet of scrap paper. |
 | Move the sketch to the side and glue all the blanks onto the base one element at a time. |
 | The front side is ready. |
 | Make a decor layout on the second piece of scrap paper and glue all the details. |
 | Glue the finished crafts onto the base; it should protrude 2 mm from each edge. Fold in half. |
To decorate cards using the scrapbooking technique, lace, satin ribbons, as well as glitter, beads and artificial flowers are used. Often used to secure two sheets of paper, which gives crafts originality and individuality.


Related article:
: master classes, what tools and materials are needed, basic techniques how to do christmas balls, Christmas tree, scrapbooking chocolate maker, photo album - in our publication.
New Year cards using origami technique
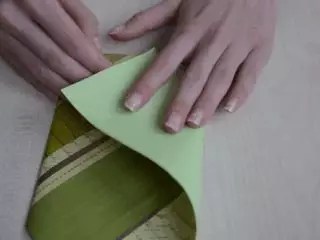
Translated from Japanese technique means folded paper. These crafts look very beautiful. Today we will make a miracle card with, in which you can put a note or congratulation. To work, you need to prepare green A4 paper, on the back of which there should be a pattern.
Step-by-step instruction.
| Illustration | Description of action |
 | Place the paper horizontally with the same color side up. Move the bottom left corner up. Bend the resulting triangle in half. |
 | Bend the long side of the triangle back, the width of its parts should be equal. |
 | Open the pocket and fold it up bottom part, smooth out all edges well. |
 | Fold the bottom corner back and fold the sides of the triangle together. |
 | Make cuts along the side of the triangle, the first one on the left side at a distance of 2 cm from the edge. The rest decrease in proportion to the inner line. |
 | Open the Christmas tree and fold the cuts down on both sides. |
 | Fold all the corners back along the marked lines. |
 | Unfold the workpiece and bend the bottom triangle upward. Apply glue and glue to the opposite side. |
 | Turn the workpiece over, bend the free corner to the opposite side, and secure the edges with glue. |
 | Decorate the card with colored circles. |
You can watch the entire process in more detail in the video:
We invite you to look at a few more original ideas with additional decoration.


Related article:
: ideas, step by step examples crafts with a New Year theme, options for different manufacturing techniques, figurines of New Year symbols and animals - in our publication.
Magic quilling lace
If you are invited to visit quite suddenly and there is nothing as a gift, you can make an amazing postcard in just half an hour. To work, we will need a special ruler with holes of different diameters, as well as cut strips of green, light green and brown colors.
Master class on making New Year's crafts using the quilling technique.
| Illustration | Description of action |
 | Screw the strip onto an awl, then put it into a small diameter hole, then take it out, form a droplet and glue the edge. |
 | Make another roll in the same way and glue both parts onto the paper. |
 | From stripes bigger size form the second branches in the same way. For openwork branches, the strip is simply wound onto an awl and straightened. One edge remains wavy. |
 | Form the entire Christmas tree in the same way. |
 | For the trunk, fold a triangle out of a brown strip in several layers, glue the edges and glue it to the workpiece. Roll 2 rolls and glue them inside the trunk. |
 | Decorate the Christmas tree with miniature buttons and glue burgundy stripes around the perimeter of the card. |
You can watch the whole process in more detail in the video:
You shouldn’t stop at just one technique; crafts designed using different techniques turn out much more elegant.


Handprints, fingerprints and footprints are the cutest decoration for New Year's cards.
New Year's cards can be made with children, for example, colorful handprints, fingers and feet. Carved and unusually decorated blanks look interesting.

For inspiration, we invite you to look at wonderful ideas for decorating postcards using prints of children's hands, fingers and feet. They can be additionally decorated with paints and New Year’s decor.
1 of 6


Related article:
: step-by-step master classes with photos of making using origami, quilling, quilling and others techniques original ideas- see our publication.
Beautiful New Year cards made from unusual materials
New Year's cards look very beautiful, for which completely unexpected materials are used.
Opening Grandma's Chest: Jewelry Made from Buttons, Ribbons and Threads
Buttons, satin ribbons and threads are a universal material for New Year's decorations. To work, you only need a sheet of cardboard, glue and scissors.
From buttons


From tapes


From threads


Related article:
: what will be needed in the work, procedure, step-by-step master class on manufacturing, how to fasten and wind a thread to obtain an openwork or dense coating, how to remove a blank from cardboard, ideas for decorating a Christmas tree - in our publication.
Fluffy beauty made of corrugated paper
Even a schoolchild can make a craft from it; it will be an addition to a New Year’s gift or an independent surprise for loved ones.
To work you will need:
- thick colored cardboard;
- corrugated paper;
- scissors and glue;
- additional decorations.
Let's get to work.
- Fold the cardboard in half.
- Draw or use white paper to mark the outlines of the branches.
- Cut several strips of different sizes from corrugated paper.
- Glue the strips to the cardboard according to the markings, having first assembled them a little with an accordion.

Plenty of imagination with colored tape
Little children will find it interesting to make their own New Year's craft made from colored tape, today the retail chain offers a huge variety of plain or patterned material. Additionally, you can use colorful magazine clippings, stickers and other suitable decor.

For inspiration, we suggest looking at unusual ideas for decorating postcards with colored tape.


DIY magic: postcard “Christmas ball” with sequins and sparkles
Postcards decorated with sparkles, sequins and rhinestones look magical. We invite you to make a unique one with us, and the master class will help in this process.
For work we will need:
- colored paper for scrapbooking in A5 format;
- thick white paper;
- thick plastic bag;
- double-sided tape and glue.
| Illustration | Description of action |
 | Fold the paper in half, cut a rectangle from the white paper 5 mm smaller than the folded colored paper. Mark the center in it, draw a circle with a compass and cut it out. |
 | Take a plastic bag the size of the postcard and fill it different decor. Seal the edge of the bag with an iron, after wrapping it with a strip of paper. |
 | Glue decorative stickers onto scrap paper. |
 | Glue the bag to the inside of white paper with double-sided tape. |
 | Glue the blank to the scrap paper with double-sided tape, decorate with ribbons and decor. The inside of the spread can also be decorated with sequins. |
Felt applications
Soft is associated with homely warmth and comfort, which matches the Christmas theme. To work with it you don’t even have to take it out sewing machine– all parts can be perfectly glued or sewn by hand.


Any material can be used: ideas for free New Year cards
You can make postcards completely free of charge from any available materials found in every home. For example, it can be knitted crafts from leftover threads, decorative beads, paint, glitter, and even simple ones will become an unusual decoration for a gift.


An entertaining hobby for preschoolers: DIY New Year cards
We all remember our childhood, how our mothers and grandmothers helped us make beautiful cards for the New Year as gifts for teachers. Now it’s our time to create a magical miracle with our child.
"Snowman"
For a simple postcard we will need:
- thin cardboard white and blue color;
- multi-colored paper;
- curly and regular scissors;
- glue, simple pencil and felt-tip pens;
- pad with stamp ink;
- figured hole punch.
Let's get to work.


"New Year's ball"
Younger children will also find ideas for pre-holiday creativity; they can paint New Year's ball on a postcard. To do this, you will need thick white cardboard, folded in half, and plain paper, in which an adult must first cut a round hole of a suitable diameter. The template is placed on the front side of the cardboard and painted with felt-tip pens. That's it - the postcard is ready.

"Christmas balls"
For a postcard with Christmas trees, but using a more complex technique, you need to prepare:
- blue cardboard;
- blue paper with snowflakes;
- glue and scissors;
- pen for a congratulatory inscription.
Operating procedure.
- Cut circles from blue paper.
- Fold each circle in half and glue the halves to each other. The more elements glued together, the more magnificent the ball will be.
- Glue the blanks onto cardboard, draw the strings upward with a pen, and parents can write warm words.

"Mitten"
Children aged 6-7 years like to work with scissors, so we suggest making the next craft not in the classic rectangular shape, but in the form of one or two mittens. They can be cut from New Year's paper and stick it on cardboard. The place of the elastic band is often decorated with a piece of fur or a knitted element.

We invite you to look at some interesting design ideas.


DIY ideas for making New Year's cards for schoolchildren
Older children can be offered more complex jobs that will require parental help.
Postcard “Fluffy Christmas tree in a snowdrift”
At first glance, schoolchildren will not be able to make such a craft, but once they understand the process, everything will turn out to be quite simple. For work we will need:
- colored cardboard;
- sliced strips of two shades of green;
- glue;
- toothpick or awl;
- white corrugated paper;
- bead and flagellum.
Operating procedure.
- Cut the fringe into strips along the entire length.
- Wrap the strips around a toothpick, glue the edges and fluff the cut side.
- Glue the blanks onto paper in the form, decorate with beads.
- Glue a toothpick to the trunk of the Christmas tree, glue a bow instead of a star, assemble corrugated paper and glue it in the form of a snowdrift.

Volumetric card with gifts
Three-dimensional postcards always look unusual; you can come up with a theme for any holiday. Today we will make a DIY craft with New Year's gifts.
For work we will need:
- pink paper 18×13 cm;
- cardboard white;
- colored paper;
- decorative ribbon, beads;
- ruler, pencil, scissors and glue;
| Illustration | Description of action |
 | Fold the paper in half, measure 1 cm, 4 cm, 3.5 cm and 2.5 cm from the bottom at the fold. Draw lines from the points to the center of the paper. You should get 3 squares with a side of 4, 3.5, 2.5 cm, respectively. From the fold line, make cuts along the markings. Open the card and fold the shapes in the opposite direction. |
 | Cut strips of colored paper to the size of the squares, decorate them with decorative tape and stick them on the blanks. |
 | Fold a sheet of cardboard in half, glue a blank with decor into it, decorate the edges with decorative ribbon with beads, glue a bow over the boxes and decorate them with beads and rhinestones. |
 | Glue a pink stripe to the front side, and ribbons with beads on it and next to it. |
You can watch the master class in more detail in the video:
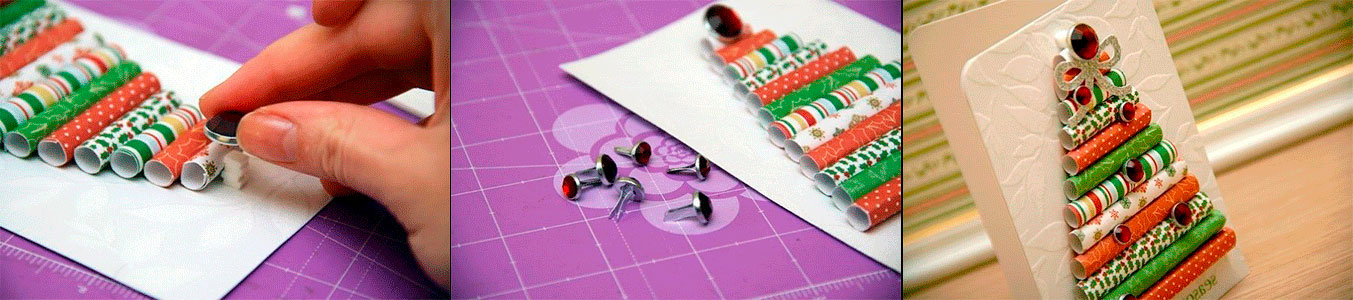
“Christmas tree made of tubes”
To make an unusual New Year's card you will need multi-colored scrapbooking paper, double-sided tape, glue and a nail bead.
Step-by-step instruction.
- Cut 12 rectangles from colored paper 10 cm long. The width of the smallest is 9 cm, each subsequent one is 6 mm wider than the previous one.
- Wrap the rectangles around a pencil in the form of a tube.
- Glue the pieces together
- Glue the Christmas tree onto a sheet of thick paper.
- Attach a bead to the top.

Conclusion
So you met various ideas design of New Year's cards. We hope that our master classes will help you arrange your holiday greetings.
And finally, we suggest looking at a selection of ideas with descriptions of how to design unusual New Year’s cards with your own hands together with your children.
No matter what good gift– it is considered incomplete without a postcard. Range greeting cards today it is very big. However, if you want a unique postcard, then it is better to make it yourself. This is exactly what we will do now: consider ideas for DIY New Year greeting cards.
You will need: thick colored cardboard in A4 format, scissors, corrugated paper, PVA glue or double-sided tape, a simple pencil, decorative elements (sequins, beads, ribbons...).
Master Class

New Year card in scrapbooking style
Scrapbooking is a whole art that teaches you how to create and decorate photo albums (in our case, a postcard) with your own hands. Scrapbooking has a whole history of how a notebook turned into an album. At the end of the 17th century, notebooks with additional blank pages appeared. Their owners pasted in images, creating entire collections. This is how scrapbooking began to develop.
You will need: thick colored cardboard in A4 format, PVA glue or double-sided tape, scissors, scrap paper, pencil, decorative elements (sequins, beads, rain, buttons, sequins...).
Master Class
- Make 12 rectangles from scrap paper. The size of each rectangle should be different, starting from the smallest to the largest. (Width from 1 to 12 cm, length 5 cm for all rectangles).

- Roll each rectangle into a cylinder in the width direction using a simple pencil securing each cylinder with glue.
- Glue all the tubes together, starting with the largest and ending with the smallest, creating a Christmas tree shape.

- Let the Christmas tree dry well, then glue it to the right half of the card.
- Decorate the card to your taste with sparkles, sequins, buttons, rhinestones...
You will need: A4 colored cardboard, wrapping paper or candy wrapper, thin black marker, scissors, PVA glue or hot melt glue, stapler, decorative elements (sequins, beads, rain, buttons, sequins, bows...).
Master Class

New Year card in minimalist style
Minimalism(from Latin - smallest) is a style that is distinguished by its simplicity and laconic composition.
You will need: A4 colored cardboard, a shaped hole punch or a stationery knife, thread, needle, sequins, a simple pencil, a ruler and scissors.
Master Class
- Make the base of the card by folding a piece of cardboard in half.
- On the right half of the card, sketch out a Christmas tree and a star top. Use a ruler and pencil.
- Cut through the star with a shaped hole punch or a stationery knife.
- Use a needle to make holes in the shape of a Christmas tree - a triangle.
- Take a thread and a needle and make stitches. After each stitch, string sequins.
- Carefully fasten the thread on the reverse side.
New Year card in origami style
Origami- This is a type of decorative and applied art, literally translated from Japanese as “folded paper” into various figures.
You will need: multi-colored A4 cardboard, PVA glue, scrapbooking paper or thick paper, decorative elements (sequins, beads, rain, buttons, sequins, bows...).
Master Class
- Make the base of the card by folding a piece of cardboard in half.
- Take 3 squares of thick paper whose sides are 20cm long.
- Fold the square diagonally, unfold it and fold it crosswise again diagonally (conditionally marking 4 triangles).

- Fold 2 opposite triangles inside.
- Press the resulting triangle to the surface and mark the conditional center.
- Fold the bottom corner parallel to the middle. Repeat this procedure with the second corner. The module is ready!

- Make 2 more of these modules, maybe in different colors.
- Assemble the Christmas tree in this way: glue the origami module to the right side of the postcard, form the Christmas tree from top to bottom, insert the next module into the previous one.

- Decorate the Christmas tree to your taste with sparkles, sequins, buttons, rhinestones...
You will need: A4 colored cardboard, scissors, a simple pencil, ribbons, PVA glue, decorative elements (sequins, beads, rain, buttons, sequins, bows...).
Master Class
- Make the base of the card by folding a piece of cardboard in half.
- Glue the tree trunk to the center right side of the card. The barrel must be made of tape Brown shaped like a trapezoid.
- Cut 6 strips of ribbons 2 cm wide, 2, 4,6,8,10,12 cm long.
- Cut the corners of the ribbons on both sides.
- Glue the tapes from bottom to top, in the shape of a triangle.
- Decorate the Christmas tree to your taste with sparkles, sequins, buttons, rhinestones, stars, bows...
You will need: A4 colored cardboard, scissors, double-sided napkin round shape, ruler, simple pencil, double-sided tape, decorative elements (sequins, beads, stars, rain, buttons, sequins, bows...).
Master Class

You will need: A4 colored cardboard, A4 colored paper, scissors, a ruler, a simple pencil, a stationery knife, flat paper decorations (snowflakes, stars...), decorative elements (sequins, beads, stars, rain, buttons, sequins, bows...).
Master Class

You will need: colored cardboard and A4 paper, scissors, stationery knife, compass, thick thread.
Master Class

For a long time in New Year's Eve people exchanged greeting cards or mailed them to loved ones. Unfortunately, with the development of digital technologies, people have almost stopped giving each other postcards; as a last resort, they send a digital version by e-mail. But it’s so great to receive a real postcard, hold it in your hands and fill your heart with the warmth of attention. It’s especially nice if children give a New Year’s card, creating it almost independently with their own hands. A postcard made by yourself can create Christmas mood and bring joy to the author and recipient.
There are many options for creating New Year cards, let's look at a few step-by-step descriptions making a variety of postcards.
For the youngest children, we suggest creating a postcard with a bright (possibly multi-colored) garland of clear fingerprints. Or use a small handprint to create a funny Santa Claus.
Step 1. On any flat object that does not absorb paint, make a rectangular frame from insulating tape or tape to the size of the future card. You can use a baking sheet for these purposes.
Step 2. Apply an even layer of paint to your palm and use a cotton swab to create Santa Claus or any New Year's design.

Step 3. Reprint the design onto the card by applying the card to the paint.
See video: DIY Christmas tree card using a child’s footprint or handprint.
New Year card with a snowman in 3D format

Take white construction paper and cut out three different circles. Shade the edges of the circles with a pencil lead, so the snowman will take on an advantageous shape. Glue the circles one on one, so that the smallest is on top and the largest is on the bottom, then glue them onto the card. From colored cardboard, cut out a triangle for a nose, handles, circles for eyes and buttons, and a rectangle for a scarf.
New Year card with snowdrifts
Creating this card will turn into an amazing fairy-tale ritual for your child. Any child will be happy to help you and will be able to show their talents to the maximum.

Necessary materials:
- Thin double-sided cardboard, various shades of green;
- Thick cardboard for postcards;
- Sequins, beads, sparkles and other decorations;
- Scissors;
- Plain white sheet;
- Glue.
Step 1. Cut out different Christmas trees from colored green cardboard.
Step 2. Fold thick cardboard in half.
Step 3. Cut the white sheet to the depth of the postcard you are creating. Fold it into an accordion shape.
Step 4. Glue the ends of the white accordion to the bottom, inner part of the card, and glue the Christmas trees onto the snowdrifts.
Step 5. Decorate the card.
New Year card with balls

As a gift, you can make a card not only with a picture of a Christmas tree, but also with bright multi-colored balls. To create balls, you can use bright colored paper or even glossy sheets of old magazines. Cut such sheets into thin strips of different widths and glue them onto a white sheet. From the resulting striped sheet, cut out different balls and glue them onto the card.

Decorate Christmas balls on the card with bright ribbons tied in a bow.
You can also use flat buttons to create balls.
New Year's card with voluminous balls

Necessary materials:
- Multi-colored cardboard for balls;
- One sheet of cardboard for a postcard;
- Pencil;
- Scissors;
- Glue;
- Stapler (thin wire).
Step 1. Cut out identical circles from multi-colored cardboard so that they come out identical, use a compass or any flat round object, which you trace along the outline with a pencil.
Step 2. Fasten the cut out circles with a stapler (wire) together in the center.

Step 3. Glue the resulting flat ball to the base of the card and bend the circles in half.
Step 4. Decorate the balloon with a bow and sign the card.
The greeting card can also be decorated with multi-colored flags made of fabric or paper and attached or sewn to the card.
Postcard with applique

This card is easy to make and will bring joy to any recipient. Take rice grains as the material. Use long grains to lay out a Christmas tree, snowflakes or a star. Round grains are great for simulating snow.

Take dark cardboard and glue cut-out white snowflakes to it. You can place one large snowflake in the center of the card or use several snowflakes of different sizes. This picture looks very elegant and festive.
The Christmas tree is an invariable attribute New Year's celebration, and a postcard with a Christmas tree is a great gift. It’s very easy to create such a card, so feel free to start creating with your kids.
The postcard in the Scandinavian style will depict a Christmas tree created from strips of paper.

Necessary materials:
- A4 cardboard or thick paper;
- Glue;
- Colored paper (preferably bright), you can also use braid or scrapbooking paper, and colored tape will also work;
- Scissors.
Step 1. Take paper or cardboard, fold it in half and place the Christmas tree on the “front” of the card, and you can write your wish inside. You don’t have to fold the sheet, then the postcard will be single (for this version, you can also use A5 cardboard).
Step 2. Using colored paper scissors, cut thin strips, from shortest to longest, in ascending order. You also need to cut a rectangle for the future trunk.

Step 3: Glue the strips onto the cardboard in a herringbone shape.

Step 4. If desired, decorate your Christmas tree; for this you can cut out balls and a star on the top of the head.
See video: Scrapbooking. New Year card in Scandinavian style.
One more thing:

Required materials for production:
- Cardboard (thick paper);
- Pen or pencil;
- Scrapbooking paper;
- Glue;
- Decorative details (beads, buttons).

Step 1. We cut the scrapbooking paper into different rectangles, and the width of the rectangles should be the same for all, and the length of each next one should be slightly larger than the previous one (about 1 cm).

Step 2. Tightly twist the tubes from the cut out rectangles, wrapping them around a pencil or pen. Fix the tubes with glue.


Step 3. Glue the formed tubes together in a Christmas tree shape, from longer to shorter tube. Glue the resulting Christmas tree to paper (preferably embossed) or prepared cardboard.

Step 4. Decorate the Christmas tree with bright beads or buttons.
Even people can create a Christmas tree from bright store-bought stickers Small child Multi-colored bright flat buttons can be used as decoration.
Older children can embroider a Christmas tree on thick cardboard; it is better to pierce the holes with an awl in advance.
It is very easy to create such a postcard if you embroider a triangle with a star on the top of the head and a small rectangle - the trunk.
A more complicated option is if you make holes opposite each other along the perimeter of the triangle, and then sew them with threads; use sequins for decoration.
You can embroider with threads whatever you want - a modest Christmas tree, a small deer and a sock with gifts.

Young children can also create an applique from a regular cypress or fern leaf and decorate it with beads, seed beads or sequins. The main thing is that an easy-to-make card will bring great joy to the baby and grandparent.
Creating a three-dimensional New Year's card
Volumetric cards look very beautiful and solid. It’s always a pleasure to receive and give such a card. Volume postcard You can also give it to your favorite teacher or teacher.
Postcard 1

For production you will need:
- Thick paper or sheet of cardboard;
- Glue;
- Christmas tree blanks (can be printed);
- Stapler (you can use thin wire).
Step 1. Download, print and cut out the blanks for your future Christmas tree. (You can also cut out the triangles yourself from colored construction paper).

Step 2. Connect the parts together with a stapler (or wire).
Step 3. Glue the resulting Christmas tree onto cardboard or paper. Fold all the triangles of the Christmas tree in half, except for the bottom one. Sign it; if you wish, you can add decorations, for example, in the form of sequins or beads.
Postcard 2
The card is very easy to make, even a first grader can do it.

Necessary materials:
- Scissors;
- Glue;
- Thick paper (cardboard);
- Colored paper.
Step 1. Take colored, preferably green, paper and cut out rectangular strips. We cut out the rectangles in descending order, with the longest strip being wider than the others, and the short one narrower.

Step 2. Fold the cut strips like an accordion. We fold the smallest strip more often and the larger the strip, the more fold we make.
Step 3. Glue the Christmas tree onto a sheet of cardboard folded in half. Glue the Christmas tree inside the card, on the formed fold.

An easier option for creating a postcard is to fold a cut out green triangle into an accordion shape. Glue it onto cardboard and make a trunk and a star on the top of the head.
Postcard 3
This one is very easy to make, bright and beautiful card all children will like it.

For production you will need:
- Two sheets of thick paper (cardboard);
- Scissors;
- Various small decorations;
- Pencil.
Step 1. Take one sheet of cardboard, bend it in half, then straighten it and draw a regular Christmas tree on the fold line.
Step 2. Bend the cardboard with the painted Christmas tree so that the drawing is on top and carefully cut out the drawn tiers of the Christmas tree.
Step 3. Bend the resulting Christmas tree in the opposite direction.
Step 4. Take the second cardboard and glue the cardboard with a herringbone pattern to it. Decorate the resulting Christmas tree and sign the card.
Postcard 4

An original postcard for lovers of origami technique, very simple to make.
For production you will need: cardboard, scrapbooking paper, scissors, compass and glue.

Draw a circle on paper, draw a diameter and cut out both semicircles. Fold the Christmas tree as in the photo and glue it. Decorate and sign the card.
Postcard created using the rainbow folding technique
The iris folding style or rainbow folding can reflect your original ideas for creating a New Year's gift. The end result is a very beautiful postcard with a twisting spiral effect.
Necessary materials:
- Cardboard (thick paper);
- Colored paper, three colors will be needed;
- Glue;
- Iris template (you can download and print it or build it yourself).
To create this postcard, you will need to build an iris template; it will be built on the basis of an isosceles triangle with a base 14 cm long and a height drawn to the base equal to 16 cm. Take a rotation step of 1 cm. The dimensions can be changed as desired.

Step 1. Cut strips from colored paper. We make the width of the strip twice as large as the pitch and add an allowance of up to 4 mm. Thus, for this postcard, we cut out strips with a width of 22-24 mm. Make the first strips a little wider, as they will have to cover the contours of the tree. You will need a lot of prepared strips, so cut them as you create the card.
Step 2. Fold the cut strips in half.

Step 3. Take brown paper and cut out 5 strips (preferably different shades brown) measuring 35 by 20 mm. We also fold these strips in half.

Step 4. Draw the silhouette of the Christmas tree on thick cardboard and cut it out very carefully (you can use a stationery knife). We make an iris template or print a ready-made one.

Step 5. Attach the prepared template to the wrong side of the cardboard using paper clips. It's okay if the silhouette of the tree is larger than the template. Next we will work from the wrong side.
Step 6. Fill the barrel. We begin to glue the prepared brown strips. To do this, apply glue to a strip of right side slots and glue so that the fold of the cut strip falls on the line of the template. Next, grease the top and bottom of the cardboard as well as the first strip and glue the second strip.

Step 8. Glue the largest strip of the first color at the beginning of the template, try to ensure that the fold coincides with the line on the template.

Step 9: Glue a second large strip of a second color on the opposite side of the template.
Step 10: Glue the next large strip of the third color along the bottom edge of the template.
Step 11: Very carefully glue the next strip of the first color next to the first strip of the same color. Use glue very carefully, only placing small dots.
Step 12. Glue a strip of the second color along the template line, carefully aligning it so that the fold coincides with the line.


Step 14. Turn the card over and, if desired, decorate the resulting Christmas tree. Sign and you can give a great New Year's gift created with your own hands.
For greater clarity, also watch the video; although it is in English, the essence can be understood without words: iris folding tutorial papermart.
Hello everyone, hello! Do you remember that I recently promised you that I would make a detailed article on the topic of creating New Year’s cards with your own hands?! I keep my promise and share my work.
So today I will show you how to make original postcards for the New Year 2020, which you can make together with your children. These will include voluminous congratulations, and simple applique, as well as origami and drawing.
Remember that such homemade ones will be a pleasure not only to give, but also to receive. A joint creativity will bring a lot of pleasure to both children and their parents.
The main elements of holiday souvenirs will be Snowmen, Santa Claus and little animals. All winter landscapes and all subjects associated with this magical event will also be appropriate. Whatever your imagination is enough for, then depict it!
And if you're ready, then let me begin.
The most unpretentious and affordable material for making this kind of crafts is colored paper and cardboard. You can build anything you want with these tools! And most importantly, the products are made quickly and simply.
Here, for example, is an applique in the form of a Snowman. Look how bright this congratulation looks. I suggest you definitely make such a card with the kids.
"Snowman with snowflakes"

You will need:
- thin colored cardboard (2 sheets: white and blue);
- colored paper;
- stamp ink: blue or gray;
- scissors (curly and regular);
- glue;
- pencil, markers, ruler;
- figured hole punch with snowflakes;
- compass.

Manufacturing process:
1. Take white cardboard and draw 3 circles of different diameters on it using a compass or round objects. These are the parts for the Snowman. Cut them out.

2. Now use stamp ink to draw circles to outline the outline a little.


4. Take the largest cardboard circle and coat it with glue in the center. Glue to the blue base. And glue a circle of smaller diameter on top.


5. Cut two strips from construction paper of any color and glue them on top of the second circle. This is a scarf. Glue the smallest white circle on top.

6. Use a black marker or felt-tip pen to draw eyes and hands. Cut out a carrot nose from orange paper and glue it on.

6. Take white cardboard and cut out snowflakes from it using a shaped hole punch.

7. Glue them anywhere and in any order near the Snowman. Turn the base over and write or glue a greeting. That's all!

"Christmas tree with gifts"

You will need:
- blue, yellow, purple, gold, red and white cardboard;
- blue and green paper;
- multi-colored braid;
- snowflakes;
- toothpaste and brush;
- comb with teeth;
- PVA glue;
- transparent glue;
- regular and curly scissors.
Manufacturing process:
1. Take a piece of blue cardstock and cut it in half. Or you can fold the cardboard in half if you want to create an opening option. Using curly scissors, cut out a rectangle 110 by 150 mm from white cardboard. Glue it to the blue cardboard using PVA glue. Next, cut out a 120 by 20 mm rectangle from blue paper with curly scissors. Make an inscription on it: “Happy New Year!” and glue the rectangle to the white cardboard.

Now cut out a square with sides of 25 mm from purple cardboard, 30 mm from yellow cardboard, 40 mm from gold cardboard, and a 20 by 50 mm rectangle from red cardboard. Tie these parts with braid, and glue the ends on the back side with transparent glue.
2. From green double-sided paper, cut out 3 squares with sides of 70 mm, 100 mm, 130 mm. Fold the squares like this: diagonally in half, unfold along the other diagonal as well. By unfolding the square, you will get lines along the diagonals. Fold the blanks as shown in the photo to form a triangle. Fold the top edges inward.


3. When you have folded all three squares, start gluing them with the smallest amount of PVA glue to the base. The next square needs to be glued inside the top one, and the third one - inside the second one.

4. Cut out snowflakes or make them using a shaped hole punch. Glue it onto the workpiece. Next apply toothpaste on the brush and using the “spray” method, running the brush over the comb, apply toothpaste to the Christmas tree and the entire product as shown in the picture. Additionally, the Christmas tree can be coated with transparent nail polish with glitter. Your craft is ready.
Now try to make a product not only from paper and cardboard, but also from beads.
"Christmas tree made of beads"

You will need:
- Scrapbooking paper;
- Beads of different sizes, but the same color;
- Glue gun;
- Cardboard;
- Double-sided tape;
- Scissors;
- Glue gun;
- Satin or organza ribbon;
- Pencil.
Manufacturing process:
Take cardboard and cut a rectangle out of it the right size- this is the basis of the product. Then cut out a rectangle of scrap paper slightly smaller than the cardboard base. Glue this rectangle to the base using double-sided tape. Cut out several different sized squares and rectangles from colored paper. Glue them on top of the workpiece. Now, on the base, mark with a pencil a schematic image of the Christmas tree. And cover the picture with beads, ranging from large to small in size. Next, decorate the craft with a ribbon or organza bow.

By the way, in addition to beads, you can also use buttons. Here, for example, is the “Wreath” applique. This work is great for children 2-3 years old.

And here’s what kind of volumetric beauty you can create.


Or try making a hugging Snowman with your child. Here's an idea and a template for implementation.


Also use a regular hole punch to create small colorful circles. You can then easily and simply make an applique out of them. For example, depict Christmas balls.

Or the easiest and quick option for babies.

Don't forget about 3D postcards.
"Volume Christmas trees"

You will need:
- colored cardboard;
- scissors, simple and curly;
- pencil and ruler;
- decorations.
Manufacturing process:
1. From white cardboard you need to cut out triangles of different sizes for Christmas trees. Trim the edges of the triangles with curly scissors.
2. Take blue cardboard and fold it in half. You need to make two such blanks.

3. Make markings in one of the blanks and cut out the steps on which the Christmas trees will stand.
4. Glue the cut piece inside the whole piece. No need to glue the steps! Then glue the Christmas trees onto the steps and decorate them to your liking.
Take a look at the next option. It turns out to be real magic. There are no difficulties at all. But how the kids will love to perform such a trick.
Or here’s another idea with a voluminous congratulation. The accordion bending technology is familiar to everyone, and with this approach, a real masterpiece is obtained.
"Star with balls"

You will need: cardboard, scissors, pencil, ruler, self-adhesive tape, colored paper, glue, gift paper, ribbon.
Manufacturing process:
1. Take cardboard and fold it in half.

2. Draw half a star and cut it out along the outline.

3. Then mark 7.5cm from the left edge of the base using a ruler and pencil. Do the same by turning the product over. Bend the cardboard along these marks, as shown in the photo below.


4. Now take the braid and use it to decorate the star. Cut out balls from colored paper and glue them.


5. Take another A4 sheet of cardboard of the same color and fold it in half.

6. Glue a square piece to the inside gift paper with a New Year theme.

7. Glue two parts of cardboard blanks together as follows.

8. Close the product and decorate the front part with squares. Tie a ribbon.


Well, now the most interesting ideas for children's creativity from paper and cardboard.
Simple application New Year's heroes according to templates.

Option for making another volumetric Christmas tree + diagram.


But what a beautiful Snowman you can make on the front side of a postcard. Decorate with ribbon and real eyes. 
Or make bells out of cardboard. It looks very impressive and festive.

Don't forget to use the corrugated paper. All products from it immediately turn out to be voluminous.

And here is a combination of appliqué and palm painting. Well, just lovely!

And what cute mittens you can cut out and glue on festive background. In this way, bright congratulations are obtained.

The next idea is for older children, for seniors and preparatory groups in kindergarten or for students primary school. Here you have to cut and glue the parts yourself.

Or choose templates of New Year’s characters for the kids, and let them decorate the products too.

The main thing in this matter is imagination and accuracy, and your help in creation).
Templates and diagrams for making New Year cards
But for those who have little imagination, it’s best to use ready-made ideas and templates. Then you, too, will make cool products and give them to your closest people.
For example, you can easily and simply make Christmas trees from adhesive tape. Here are the samples.


Or, according to the following scheme, make a three-dimensional postcard.

According to the instructions below, cut out and create a congratulatory tree. 
Or use this template as a basis.

And everyone's favorite Snowmen.

Or mittens for creativity.

Here is a paper bunny for applique.

Or a template for a finished postcard. Print, cut out and color.

Another 3D option with a Christmas tree and snowmen.


A simple spruce in the form of an applique or regular coloring. Just right for children's creativity.

I also found a scheme for creating a three-dimensional product as a gift. I hope you find it useful.

AND beautiful description on creating winter candles. It looks very original.

How to make a DIY New Year's card with snowflakes flying out of it
Now I want to talk about how you can beautifully combine winter beauties - snowflakes - in such crafts. Everything is very simple. Let's take the basics and start the process.
"Carved Snowflake"

You will need:
- Snowflake stencil;
- Shiny cardboard;
- Scissors;
- PVA glue;
- Glue crystal (moment);
- Stationery knife;
- Rhinestones;
- Eraser;
- Ruler;
- Pencil;
- White ribbon.

Manufacturing process:
1. Download and print the snowflake stencil.

2. Select a dark blue cardstock and fold it in half (recommended size is 12 by 15).

3. Now cut the gray snowflake stencil with scissors.

4. Attach the cut out snowflake to the middle of the card on the left inner side and trace it with a pencil.

5. This is how the snowflake should appear.


7. Trace the small snowflake around the center of the larger one.

8. Take a sharp utility knife and slowly, carefully cut out the design as shown in the photo.

9. As a result, you should have 2 snowflakes: cut out and on cardboard.

10. Grease the cut out snowflake with glue.

11. Fold the base and glue a small snowflake (smeared with glue) in the center of the cut out snowflake.


12. Decorate the product with rhinestones.


Here is the finished sample. 

"Snowflake Kirigami"

You will need: white and blue paper, template, sharp stationery knife.
Manufacturing process:
1. Save and print the template on white A4 paper.

2. Place the blank on the cardboard and begin to carefully cut out a snowflake along the contour with a sharp knife.

4. Additionally decorate the front side, glue wishes or sign the card.
"A simple option for preschoolers"
You will need: snowflake diagram, cardboard, knife.
Manufacturing process:
1. Print out the snowflake template.

2. Choose a base for the product. Transfer the snowflake according to the stencil to the inside of the base. Carefully cut out the design. Fold the cardboard in half. Decorate the front as you wish.

These are such simple, but simply awesome ideas for creating greeting souvenirs with snowflakes.
Master class on making a postcard in the form of a mitten. The most interesting and easy ideas
"New Year's mittens"
You will need: background paper, card base, lace, ribbon with an inscription, lace, figured cardboard frame, double-sided tape, cardboard gloves, stamps, paint, fancy braid, glue.

Manufacturing process:


Well, now the selection of ideas is a little simpler, there are already options for preschoolers. Look and choose!


And of course, templates for making such products.


Postcards for the New Year 2020 with the symbol of the year Rat (Mouse) for children
As you know, this year will be held under the symbol of the Metal Iron Rat (Mouse). Therefore, a great idea would be to depict this animal on the product itself.
I propose a very simple technology).
You will need: yellow and white colored paper, scissors, glue, decorations.
Manufacturing process:
Take a sheet of yellow paper. Fold it in half. This is the basis. Cut circles on it to imitate cheese. Draw on white paper or print the finished mouse. Glue it onto the base as shown in the photo. Complete the products with festive decor - snowflakes, stars, sequins. Sign the card.
![]()
And here is another idea with the image of the main character of this New Year. Watch it quickly and make it with the guys.
This option is for celebrating the Year of the Pig.
"Piggy"

You will need:
- colored paper in pink shades (dark, light);
- base - a rectangle of cardboard;
- felt-tip pen or gel pen;
- pencil;
- scissors;
- glue.
Manufacturing process:
1. Save and print the pig template. Cut out the stencils.

2. Transfer the details onto paper using stencils and cut them out. At the same time, use darker pink paper for the legs and muzzle, and cut out the heels and ears from light paper. Also, do not forget to draw the fold lines, that is, all the dotted lines. Make a cut on the muzzle.


3. Take the base and fold it in half. Draw nostrils on the heel and eyes on the muzzle.

4. Fold the legs along the dotted lines. Lubricate the bent parts with glue and glue them to the base as shown in the picture.


5. Now make folds on the head. Lubricate the bent corners with glue and glue the muzzle.

6. Fold the heels and ears. Glue them too. Sign the front side.
New Year card using scrapbooking technique. Step-by-step instructions:
Next, I prepared a product for you using the scrapbooking technique. Moreover, I chose the simplest option so that the kids could easily create their plans. Of course, if you have big kids, then choose more complex options.
“Christmas tree in scrapbooking style”
You will need:
- thick colored paper or colored cardboard;
- scrap paper;
- PVA glue;
- pen, felt-tip pen (or other similar item);
- decorations.
Manufacturing process:
1. Decide on the size of the Christmas tree that will appear on the craft. Based on this, cut several rectangles of different widths from scrap paper.

2. Using a pen, roll each rectangle into a tube. Secure each tube with glue so that they do not unwind.

3. Glue the tubes together.
4. Make a base and glue our glued Christmas tree onto it.

5. Decorate the spruce and the base itself as you wish.


And here are just more complicated ideas for creating New Year’s cards using this technique.


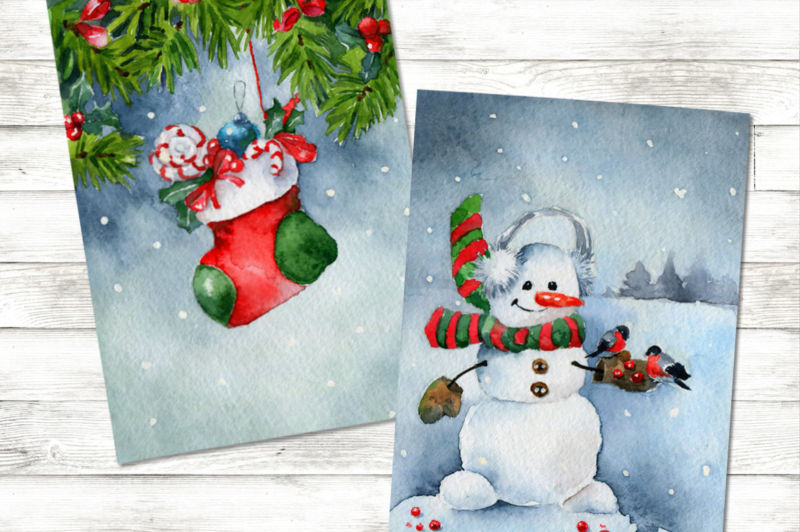
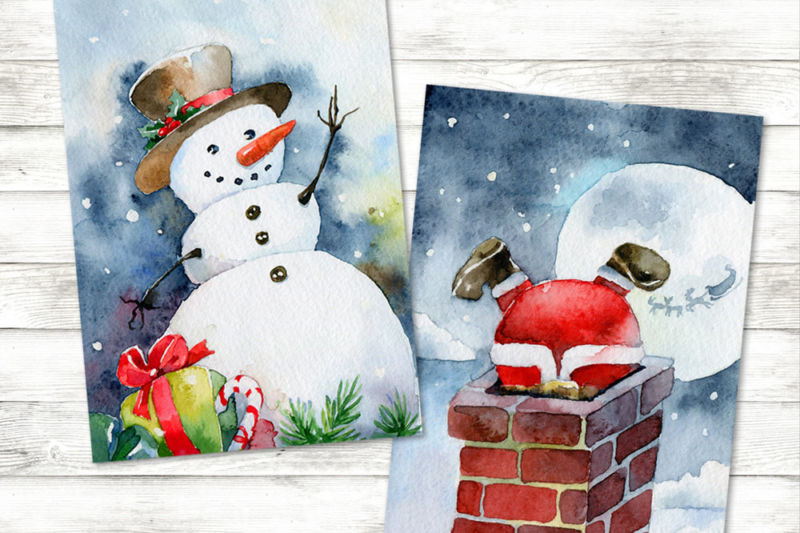
We draw New Year cards in watercolors
In addition to appliqué and paper folding, such works can also be created by simply drawing or painting certain subjects.
"Multi-colored garland"

You will need:
- scrap paper (or regular thick paper);
- scissors;
- paints;
- brush;
- simple pencil.
Manufacturing process:
1. First prepare the base for the craft. To do this, fold a thick sheet of paper or scrap paper in half.


3. Color the lanterns with paints and write the inscription “Happy New Year”.

Finger painting is a great option for kids. It turns out very beautiful.
"Finger Christmas tree"

You will need:
- thick sheet of paper;
- marker;
- ruler;
- paints.
Manufacturing process:
1. Fold a white sheet of paper in half. Now, using a ruler and marker, draw the “skeleton” of the spruce.


And instead of one finger and its print, you can use the entire palm at once. Just help your child color in the right way color scheme palm and leave its imprint.

Or draw the characters from the resulting trace.
You can also add various decorations to the drawn elements, such as buttons.

Basically, of course, you first need to come up with or choose a plot, draw it in pencil, and then color it. You can also use ready-made templates.

I would be incredibly happy to receive such a work created with my own hands.
Interesting ideas for cards made from cotton pads and felt with wishes
And I want to show you how you can use ordinary cotton pads and felt in crafts.
Again, everything is easy and simple here. Choose a plot, cut into in the required form and quantity of felt or disks, glue them to the base and sign your wish. Voila, everything is ready!
I offer a variety of compositions for your choice.
- "Snow City";
- "Snowman";
- "Herringbone";
- "Father Frost";
- "Christmas decorations";
- "Bunny";

- "Christmas tree and bell."

Here comes the felt art.
- “Spruce from stripes”;
- "Cut-out silhouette";

- "Bear in the north";
- "Gorgeous";
- "Winter composition";

- "Round dance";
- "Forest Dweller"

And now I offer you ready-made options for congratulations and inscriptions. Print them out, cut them out, and let the kids put stickers on their crafts.


DIY New Year cards for kindergarten - video selection
And in conclusion, I have prepared for you a selection of greeting cards from different materials for creating with your own hands in children's institutions. Be sure to check it out, great ideas!
That's all! As always, I wish you creative inspiration, good mood and a winter miracle! Happy New Year, friends! Bye bye.


