
Any knitted decorative elements look cozy and stylish in the interior. Be it napkins or decorative pillows, blankets, rugs. In this article we will look at crocheted floor mats with diagrams and photos. IN Lately they are becoming increasingly popular among craftswomen and those who create comfort.
In order to crochet a rug today, yarn manufacturers can offer craftswomen a huge selection of special thick yarn. This could be knitted yarn. It resembles strips of knitted fabric. Or a special thread resembling a rope in thickness. It will be a synthetic fiber or a mixture of acrylic and cotton. This thread is sold in bobbins or skeins. You can buy it in craft stores or on specialized websites.

What type of rug can be knitted by hand?
In addition, for crocheting floor mats, diagrams and photos of which are given later in the article, you can use other material:
- Plastic bags of different colors.
- Clothesline.
- Old knitted T-shirts, turning them into yarn.
From old knitted T-shirts we make yarn for rugs as follows:
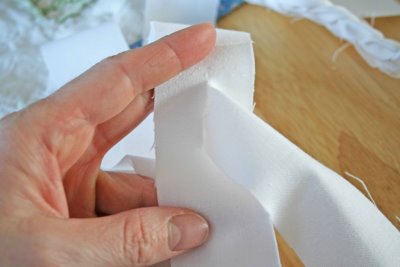
- Fold the T-shirt in half, cut off the fabric below the armhole, and remove the top part.
- Cut off the finished bottom of the T-shirt.
- Fold the rest of the T-shirt in half, but unevenly, leaving one side seam to another 5-6 centimeters.
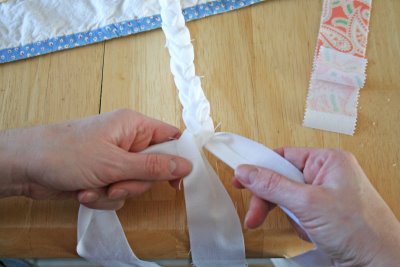
- We cut from the middle to the side seams to cut the T-shirt into strips of 1.5-2.5 centimeters. We cut through to the first side seam, cutting it, but we do not cut the part that protrudes.
- Lay out the T-shirt in one layer. The middle is not cut, the first cut strip is cut off at the middle. This will be the beginning of the rope. Next, we cut through the middle from one cut edge to the other, unraveling the rope to the end.
- We take the remaining part of the T-shirt above the armhole, which we set aside, cut off the folds along the edges of the sleeve, cut the seams of the sleeve, lay it out in 1 layer, round the corners of the resulting rectangle and cut out a strip in a circle, in a spiral, 1.5-2.5 centimeters wide. When we reach the neck, we go around it, cut it out,
- After the strip is cut, you need to look through its entire length and remove any unevenness that may exist by cutting off what is unnecessary.

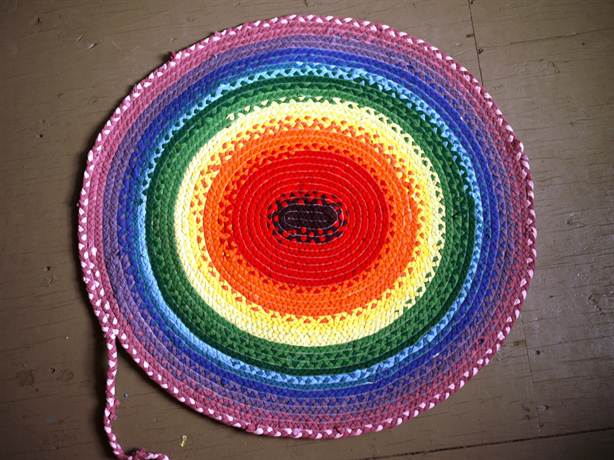
A knitted rug can be multi-colored
This is how quickly and easily we will get knitting yarn. One T-shirt will not be enough for a floor mat. You can take 4-5 T-shirts of different colors and weave them into a very good product. Next, let's look at the patterns and options for rugs.

Knitted rug made from old T-shirts
Simple rectangular or round rugs

How to knit a rectangular rug
A rectangular rug is very convenient; it can be laid in the hallway, in the bathroom, in any room or near the front door. By alternating the color of the yarn, it can be made beautiful and suitable in color to the interior of the room. It is simply knitted according to the pattern given below.
We start knitting by casting on 21 air loops. Then in the 6th loop from the hook we make 3 double crochets (dc). Next we knit according to the pattern. We finish the first row with 1 dc and knit 3 chain stitches to move to the next row.
We alternate the color of the yarn in each row or in every second row, to your taste. This rug can be knitted from knitted yarn, clothesline, or plastic bags. A thick synthetic thread in the form of a rope will also work.
Round rug
DIY knitted round rug
The simplest round rug is knitted using a simple circle pattern. For a cute knitted rug, we need yarn from old T-shirts or purchased knitted yarn in two shades.
For the next row, we perform 3 lifting loops in a new color and knit 2 DCs in each column of the previous row.
Change the color of the thread again, perform 3 lifting loops and knit in a circle, evenly adding another 12 dcs.
Thus, we knit 12 rows according to the circle pattern, alternating the color of the yarn. For the thirteenth row, change the pattern and knit *1DC, 2 chain stitches*, skipping 1 stitch of the previous row, repeat from * to *. We knit in a circle with simple single crochets, changing the color of the yarn. That's it, the mat is ready. It can be placed in a nursery or in a bathroom.
Openwork rugs based on napkin patterns
Openwork floor mats can be knitted according to patterns of beautiful napkins. Due to the thickness of the threads and the hook, they will turn out to be of large diameter. Such rugs can be round or oval. Let's look at the scheme and process of working on an oval, very beautiful rug that can take its rightful place in the living room.

Knitted openwork rug
To make this rug you will need quite a lot of yarn. The volume is determined individually. Homemade t-shirt yarn won't work here, as you're unlikely to have 10 or 20 t-shirts in the same color. You will have to buy knitting yarn and a large number of hooks. It should be at least 6 numbers, so that it is convenient for you to work. You need to select it individually.

Openwork rug pattern
Work begins with a set of medium air loops that will be located in the center of the rug. Next we knit according to the given pattern.
To create an amazingly beautiful rug self made You can use any napkin pattern. It should not be too airy, with big amount holes to make the mat denser.
Rugs with cones

Knitted rug with cones
Rugs with cones look very interesting. To create such a masterpiece, you can use the given diagrams or any diagram of a napkin with cones. You need to work according to the scheme from the center. We knit the cones like this:
- From one stitch or loop of the previous row we knit three or more double crochets with a common top.
- The number of double crochets in a cone is usually indicated on the pattern element. The cone itself will have as many stripes as you need to knit double crochets.
- In the next row, the bump is counted as 1 column.

Rugs with cones can be openwork or quite dense. You can choose a scheme to suit your taste and, after just a little time, you will have a stylish new accessory for your room. The rugs knit quickly. But you will have to make an effort, since the thing turns out to be voluminous.
Motif rugs

Unusual DIY rug
Rugs knitted from round motifs will look very stylish and modern. To do this, you need to use a pattern of a regular crochet circle or a circle with bumps or a pattern. For a rug, you can knit several circles of the same or different diameters, and sew them together in a certain sequence, according to the idea.

You can connect elements together in two ways:
- In the process of knitting the last row of each circle, attach the edges of adjacent circles to the loops. For this method, you need to think through the composition in advance and draw a diagram of circles in the rug.
- When all the elements are connected, connect the circles with each other using a needle and thread.
Rugs made from elements in the form of a circle will complement the interior and will be bright and stylish accent in the room.
Crocheted rugs with knitting patterns, photos and videos

Rugs or rugs have been an integral part of any interior for centuries. Modern textile artists have significantly expanded the range of materials and ideas, thanks to which this handicraft has come back into fashion and become popular. A skillful combination of shades and textures can turn even the simplest rug into a noticeable interior detail. You can create such different ways, but the most popular is crocheting
How to crochet a rug correctly
Selection of yarn and knitting patterns

Reusing things is in fashion these days, so don't throw away your knitted sweaters—they'll come in handy for crafting.
Crocheted rugs from old things with diagrams and descriptions of actions
Our grandmothers often knitted rugs from old things, scraps of fabric and anything that came to hand. This was considered a “poor man’s activity”, for people who could not afford to buy a ready-made carpet. But today craftswomen from countries with the most developed economies vying to compete in ways reuse materials.
Thin knitwear is perfect for knitting a rug. Take several T-shirts and cut them into yarn as shown in the diagram. A special technique will help you get a single thread without knots from one T-shirt.


Prepare balls of different colors, buy a thick hook and get to work. Crochet lessons for beginners will help you master the most simple circuits for circular knitting.

The rug can be knitted in one round, as shown in the diagram. Alternating air chains and columns will benefit from bright combinations yarn.


Simple crochet patterns will help you knit the perfect circle - the basis for the rug. If you do not adhere to special color rules, you can create a motley rug.


But if you show your design skills and conjure with shades, you can weave a beautiful circle with a contrasting color transition.

If, in addition to old T-shirts, you also have a supply of threads that you don’t really need, you can knit a rug using a different technique. A knitted ring needs to be tied with threads, as shown in the diagram.


For beginner knitters, it is difficult to master knitting a large rug. That is why you should adopt the idea of crocheting blankets and rugs from motifs.


Tie several circles of different diameters and arrange them into one product. If you wish, you can choose shades that harmonize with the decoration of the apartment, or you can simply play with the contrast and make the rug a bright spot in the interior.

Crocheted cord rugs with patterns and step-by-step photos

To work, you will need a polyester cord with a core, which is very popular among craftswomen. The palette of shades is so rich that yarn manufacturers can envy such variety. One hundred percent synthetic, these cords are nevertheless pleasant to the touch, they are used to knit practical and beautiful rugs for bedrooms, kitchens and children's rooms. From the name it is clear that this is a kind of “cord in a cord”, due to which products made from this material are embossed and emphasize a pattern of any complexity.

Polyester material is used to knit not only rugs, but also bags and even weave jewelry. - Crochet Flowers can also be woven from cord if you become familiar with the basic techniques.


Operating procedure:
- start knitting from the middle;
- for the first loop, wind several layers of cord around your finger and begin tying the resulting amigurumi ring (that’s what it’s called) with a simple single crochet;
- move along the template, completely adhering to one of the presented schemes.


The amigurumi ring is the basic element from which beginners begin to master crocheting dolls and other toys.
Crochet bedside floor mats
Today, ribbon yarn is popular among craftswomen who love to create not only things with their own hands, but also interior items. Bulky yarn in Tunisian crochet allows you to create beautiful things according to original technology weaving.

Ribbon yarn is easy to work with and has a varied range of shades in both pastel and classic palettes. The thread itself is beautiful and expensive, so knitting too large carpets from it will take a significant toll on your wallet. But, thanks to its beautiful color, it does not require special weaving techniques, and a small bedside rug made from ribbon yarn will delight you for a long time.


Operating procedure:
- start knitting from the middle - wrap a ring of yarn around your finger and tie it with stitches;
- Continue knitting according to the pattern, making all the necessary stitch increases.
This material makes excellent crocheted chair rugs. You don’t even need to change the operating scheme. Enough measure the diameter of a chair or stool and after the circle the right size will be connected, just continue working without adding loops. Then your cape will have sides with which you can fix it on the chair.

Using high-quality yarn, you can learn to crochet a shawl with openwork motifs.
Crocheted bath mat with patterns

Silicone mesh can be purchased at a hardware store. It is almost transparent, so you can safely attach a finished rug to it. To wash the product in a machine, the mesh will need to be removed.

But there is another very simple way to make a rug from leftover yarn.
You will need:
- remnants of any thread (preferably different colors);
- hook;
- mesh of the required size.
The cells on the mesh make it easy to thread and secure threads on them. This way you can quickly knit a rug, as shown in the diagram.


Video with lessons on crocheting rugs
- Rugs crocheted from cord can be found on the popular channel “Knitting Together”. Many options indicating the yardage and yarn consumption, as well as step-by-step instructions for making the pattern according to the diagram.
- The author of the video tells how knitted Japanese rugs are created and introduces basic circuit simple pattern crochet main idea Such handicraft is the correct selection and arrangement of bright colors.
- Useful video about careful attitude to nature demonstrates how to crochet rugs from bags. Bright crocheted rugs for the hallway will lift your spirits from the first minutes of your stay in the house.
Simple and beautiful. Crochet rugs for beginners

Good afternoon And again about the rugs.
You can crochet a rug for beginner needlewomen using patterns from Japanese craftswomen, which are particularly beautiful and at the same time very simple to implement.
There are, of course, more complex versions of knitted rugs, although they seem so only at first glance.
Today we will show you how to crochet rugs for beginners, the simplest ones: round, oval, square, rectangular and even multi-faceted.
How to crochet a rug for beginners
Before crocheting a rug for beginners, you need to choose your yarn.
Most main secret The beauty of Japanese rugs, it seems to me, lies in the choice of color.
There can be many options for combining different yarns, it all depends on your taste and creativity. I really like products made in the same color scheme with a smooth transition from light to dark.
Classic contrasting colors are good, and you can also knit a beautiful bright rug from seven colors of the rainbow.
In addition to choosing a color, of course, you need to decide on the texture of the yarn from which we will knit the rug.
For knitting small rugs, thick wool blend yarn, acrylic, and cotton are suitable, and large floor rugs for the bathroom and other purposes can be knitted from rope, cord, old knitted T-shirts, plastic bags and other similar materials.
We choose the largest hook that matches the thickness of the yarn.
Simple crocheted rugs are crocheted using single crochets and double crochets.
Often knitting is used only on the back or front wall of the loop, this produces a beautiful ribbed effect.
How to crochet a rectangular rug

A rectangular rug can be knitted as follows:
- 1st row: double crochets on a chain of the required length for the rug; turn the product wrong side out;
- 2nd row: single crochet under the front wall of the loop; turn the product;
- 3rd row: single crochet under both sides of the loop;
- 4th row: same as 2nd;
- 5th row: double crochet under the back wall of the loop.
- And then repeat the pattern from the 2nd to the 5th rows.
How to crochet a round rug

A round rug will also look good from rows of posts under the back wall of the loop.
A pattern for knitting a circle is attached.
I think everyone knows the principle of knitting a circle.
In the second row we knit two stitches from each loop of the previous row. In the third row we make increases in every second column (i.e. through a loop), in the fourth - in every third column, in the fifth - in every fourth and so on.
 You can also watch a detailed video tutorial from Olga Papsueva on how to crochet a round rug.
How to crochet an oval rug

Crocheting an oval rug is also not difficult. Choice beautiful color yarn - already half the battle! And you no longer need to come up with anything complicated.
Let's look at the crocheting pattern for an oval rug.
First, we assemble a chain of air loops of the length we need. We determine the length of the chain as follows: minus its width from the length of the future rug.
For example, if the length of the rug is 80 cm and the width is -50, then 80-50 = 30 - approximately this length (and even a little less, since this size will increase when knitting) you need to make a chain.
And then we knit double crochets along the entire length of the chain (or single crochet), at the end of the chain we knit several stitches from one loop to form a semicircle and continue tying the chain on the other side.
So we knit an oval rug in a circle.

How to crochet a square rug
Square rugs can also be knitted using the rectangular principle in reverse rows. But square rugs knitted from the center in a circle look more interesting. They can be done  single crochet under the front wall of the loop or double crochet - as you prefer.
Knitting pattern here>>.
To obtain a square in each row, you need to make increases in the four corners as follows: two stitches, two chain loops, two stitches.
In each next row in the corners, the hook should be inserted under the air loops.
In the same way you can connect pentagon and hexagon: Divide the stitches into the required equal number and knit, making increases in the corners.
Octagonal crochet rug
I offer a diagram as an example octagonal rug, knitted according to the “granny square” principle.


Crocheting a rug for beginners is not at all difficult, isn’t it?
If you have any questions, write. I'll be happy to help in any way I can.
Want to learn about new original ideas for knitted rugs? What about Japanese napkins and blankets? Then this is the place for you.
Here are some more interesting rugs:
And in this video I collected photos of almost all the rugs, stories about which are on our blog.
Interesting crochet projects: rugs and rugs made from scrap materials
The new is the well-forgotten old. Crocheting rugs fits exactly this expression, because new and interesting models these products will complement and modern interior.
 Rug "floral fantasy"
They look great in rustic, Scandinavian or eco-style, adding to the room home comfort and warmth. This type of creativity can be practiced by anyone, regardless of gender.
 Wave pattern is suitable for the bathroom
Crocheting develops your hands, teaches you patience and gives you the opportunity to create an exclusive item for your room. To make such a rug will require skill, patience and strict adherence to instructions.
 Standard pattern for knitting in the round
  Set of flowers for interior decoration
  Asymmetrical rug made of multi-colored circles
Rugs in the interior of the apartment
For those who know how to knit napkins, it will not be difficult to take a larger hook and knit a rug of the desired size: small for the hallway or large for the living room or bedroom.
 Colored covering for a children's room
In this case, the main importance is attached to the shape and material from which the product is made.
- Knitted rugs made from old things cut into ribbons look great in the hallway. This is a great way to save money family budget, since there is no need to buy new flooring.
 A rug made from old things cut into threads with a geometric 3D pattern
- Crocheted rugs look interesting in a children's room. This is a place where you can give freedom to your imagination and create non-standard models, not just the classic circle. Knitting patterns and ideas are freely available on the Internet.
 Knitting pattern for a tiger rug
- But in the bedroom it is better to take the classics as a basis. A rug knitted in a circle is suitable for home comfort according to Feng Shui. Both simple and patterned knitting are suitable for it. The patterns are suitable for those used for knitting napkins, only the threads and hook are thicker.
 Openwork rug for a bedroom or living room
- Beautiful and original crocheted rugs can be made to decorate your living room. In this room are appropriate knitted models any shape: circle, oval, rectangle and even products made in the form of animal skin. There are many ideas for this, the main thing is to do everything according to the plan. Those mistakes that are not visible on small napkins will be noticeable on large models of rugs.
 The principle of weaving rugs from old clothes
  Geometric figures as a pattern for a rug
Basics of knitting rugs
All this can be done with your own hands if you have experience in crocheting. But what about those who only know how to knit? Or he has never done this at all, but wants to master crocheting rugs, seeing in the pictures interesting ideas interiors with these products?
 Nothing is impossible, even a peacock on your floor is real
You should try crocheting a small rug from scrap materials. To do this, you don’t need to take a complex diagram.
 Scheme for knitting the mesh base of the rug for knitting three-dimensional patterns
Flooring knitted in the round will find its place in the interior of a kitchen or bathroom.
 Knitted jewelry in a set
  Traditional oval rug made from old clothes
  Multicolored bathroom rug
To work you will need:
- crochet hook No. 8-10;
 Hooks are selected according to the thickness of the yarn
- long cut strips of fabric with one texture or thin clothesline.
 Pre-cut threads from clothing
  Clothesline for knitting a rug
Knitting any rugs begins with making a chain of air loops.
 Getting started - air loops and their closure in a circle
- After 4-5 loops are completed, they are combined with a fastening loop.
 To connect 5 loops in a circle, the hook is inserted into the first one, after which both (first and last) are knitted together
- Next, make a lifting loop. To do this, the thread is threaded through the center of the circle, grabbed by the hook and pulled back (example in the previous figure).
 Knitting in the round
- Then, in order, inserting a hook into each loop, continue to knit the circle according to the pattern.
 Some patterns involve knitting 2 or 3 loops into one
- To make the circle even, make two new ones from each knitted loop.
 Depending on the chosen method, the finished product takes the form of an even circle or polygon
Having knitted a rug of the required size, to finish knitting, you need to pass the thread through the loop and tighten it.
 When making a rug, the main thing is to “turn on” your imagination, then the product will definitely turn out
  Rug "Labyrinth"
  To make a rug, it is better to take synthetic yarn or clothing, since synthetics are more resistant to rubbing and wear.
This is a schematic description of how to knit rugs with your own hands.
 Spiral knitting
However, in order to master the technique of work and learn how to easily knit any patterns and make carpets different forms and sizes, experience is needed.
 Combined knitting
  An example of bright products for children's rooms
Unfortunately, it is not possible to make complex products intuitively, since even experienced needlewomen use special diagrams or write down their own during the process so as not to get confused in the future.
We offer you a visual video instruction on how to knit unusual rugs from unusual materials.
Women who wear skirts regularly need to buy new nylon tights. What should you do with old items of clothing? It’s a pity to throw away expensive tights, but you won’t be able to wear them anymore. But it’s easy to make practical rugs from them.
Well, you can watch the simplest method described above in the video, which describes in detail each stage of knitting a round rug from old or unnecessary things.
Crochet rug made from old things: execution diagram and step-by-step master class with photos
Many housewives love to decorate their home with various products. Made with your own hands, they create an atmosphere of warmth, coziness and comfort on winter evenings. A good option diversify the interior of the apartment, introduce elements of antiquity into it - make a crocheted rug from old things, the execution of which is simple and accessible.
You will need to prepare source materials. Go through old things. T-shirts, dresses, tights, skirts and others made from knitted and synthetic materials will be useful. Cut them into strips in a spiral and wind them into balls.
The width of the strips depends on the density of the material. The thinner it is, the wider the cut strips.
Prepare a hook size 8.5-10. It will be great if the balls turn out to be multi-colored.

How to knit a round rug: diagram
The basic rule is to adhere to the principle of circular knitting.
Dial 3 v. etc., connect them into a ring. Knit the first row 6 single crochets. In each subsequent row, 6 columns must be added evenly. When finished, the product will be smooth, without bulges or distortions. Knit the rug to the required size.
For a better understanding of the knitting pattern:
To get a more impressive rug with a convex relief, follow the steps according to the diagram. Only knit stitches by picking up the back wall of the loop

We knit a pentagonal rug according to the pattern
When knitting such a rug, it is better to use soft knitted items.. You need to start by knitting a circle of 5 loops. In the 1st row - 3 air loops, 2 double crochets in the first loop of the bottom row, 2 in. n., *3 double crochets, 2 in. p.* Perform the pattern between the stars 5 times. In the 2nd row - the same as in the first row. But after 3 double crochets, knit 1 chain stitch and then follow the pattern below.

The rug is knitted in the round to the required size. Each corner of the star is knitted separately.
How to make knitting threads from unnecessary things
To create long strips, cut the T-shirt from the bottom up in a spiral. Immediately wrap it in a ball so that the “threads” do not get tangled.
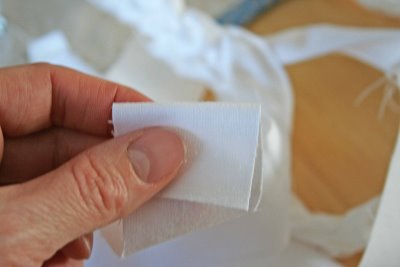
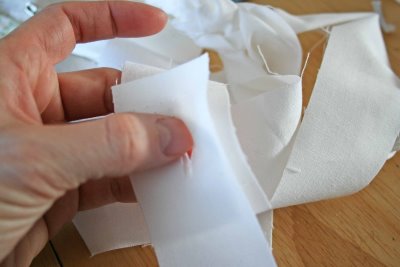
The short strips are easy to connect. Step back 1.5 centimeters from the edge and cut each strip.

Align the two strips so that their slots line up.

Pass the other end of the top strip from below through the aligned slots and pull out. As a result, you will get a knot.
In this way, you can fasten all the strips when knitting the product.
Rug in the form of a path for the corridor
After watching a master class on knitting a rug, you can make a beautiful one from old things. carpet, which is convenient and practical for the corridor.
Cut old T-shirts, T-shirts, and skirts into strips. Roll them into balls. It is better if they are of different colors.
Make a chain of air loops equal to the width of the future rug. Next, knit with single crochet stitches


When one ball ends, connect another. Sew the ends together with thread.
The track is knitted in a rectangular shape, so the fabric will need to be turned over when knitting.

If there are not enough threads, cut more strips of the required width.

The result of creativity will be a beautiful path for a balcony, cottage or corridor.

Use of weaving
Prepare a frame according to the size of the future carpet product, fill the nails on two opposite sides. Set the distance to 2.5-3 centimeters from each other.
The following instructions will help you learn how to weave a rug from old things with your own hands.
Pull the strips of material taut. It is advisable to take it in colorless shades. This will be the basis.
Pull the working strips first above the thread, then under it.

At the end of the row, pull the strip under the warp thread and work in the opposite direction.

When weaving a rug, sometimes move the finished rows towards the starting row. At the end of the work, hide all the knots on the wrong side. Now the finished product can be removed from the frame.
Working with knots
Place the carpet mesh on the table and place a strip of material underneath. Using a thick hook, pull out both ends of the strip and tie them tightly with a knot pull to one side. Now tie the next strip. It is advisable to start from the center of the grid, gradually moving in a circle to its edges.

Knotted rugs can be made in different shapes and colors.
Round rug made from unnecessary things
To better understand how to knit a rug from old things, study the following instructions.
Pre-cut unnecessary knitted items into strips 3 centimeters wide.
To make the rug smooth and beautiful, try to make the strips the same width.
Use different colors of material.

Make a loop and insert your hook into it.


Knit several loops to create a small braid.


The loops are connected into a circle.

Knit a chain stitch.

Thread the hook into the loop of the circle, pick up the thread and pull it through the two loops.


Knit a rug of the required size using this pattern. Make a fringe along the contour of the finished rug.

Tip: while the knitted circle is small, make air loops before each loop.
Master Class


Photo gallery of rugs knitted by craftswomen from old things


An interesting crocheted rug can be crocheted from old unnecessary things. The diagram is attached. We make the yarn exactly the same as in the first master class.
2 129 841
Making a rug from old things - Easy!
Do you think colorful, soft, original, practically free rugs are a myth? Look around! Do you have threads, cord, rope at home, unnecessary knitwear or old T-shirts? Then let's make the house even more comfortable with our own hands, and at the same time protect our planet from excess garbage!
This article contains original ideas for needlewomen for home comfort. Do-it-yourself carpets will be the envy and admiration of your neighbors and friends.
Rectangular pompom rug

Would you like to have a home soft mat, where it’s nice to lie in front of the TV or play with your child? Then look for leftover threads at home. If a housewife is fond of knitting, then usually there are always small skeins left that are a pity to throw away, and they are stored in some box for years.
In addition, you need to find scissors, cardboard and a mesh base (plastic can be purchased at a hardware store). Now we’ll tell you how to create a shaggy bedside rug step by step at home.

The video shows the whole process in more detail:
HEALTHY! If suddenly you don’t find cardboard at home, then you can wind the yarn directly on four fingers of your hand (we don’t take thumb), and the central thread will be tied between the middle and ring fingers.
If you decide to decorate the rug with small pom-poms, then you will definitely find a table fork for winding the material. All four cloves are wrapped, and a long thread is tied between 2 and 3 cloves.
Oval carpet made from braids woven from T-shirts

A nice, homemade rug from old things for feet in the bathroom or bedroom can be made from old T-shirts (an old T-shirt will do). Cotton is an environmentally friendly and soft material. Just three steps and the masterpiece is ready! You will need to select about 13 T-shirts. Choose plain or colored T-shirts - it depends on your taste and interior.
First step. Manufacturing of knitted threads
Making knitted stripes with illustrations and detailed description we posted it in the photo.Here's how to cut a T-shirt to make one whole strip:
Second step. Braiding
From the resulting balls, take three and begin to weave a braid. When the strip ends, weave in the next strip and so on until the fabric runs out. If the colors are different, then try to alternate them when weaving.When working, it is convenient to weave a braid, holding it between your knees, and to keep the braid tight and not unravel, use a clothespin when moving to the next piece of braiding.

As a result, you will get a long multi-colored braid. Fold the ends and sew with strong thread.

Third step. Machine stitching
Take sewing machine and a knitting needle, place a zigzag stitch on it. Next, select the shape of the product: oval or rectangle (you will get a track).In an oval rug, you need to decide on the length of the center; the longer the center, the longer the rug. The smaller it is, the wider the oval will be.
We take the end, measure the length, make the twist correctly - clockwise. Next we apply the second row of braids.

Start stitching where the first turn is.

We pass between two braids in a zigzag. We reach the beginning of the braid and carefully bend it under the next layer and make a turn again.


And so on in a circle (if oval shape) or along a snake (if the shape is rectangular) until the knit braid ends.

HEALTHY! The product may slip, so you can sew or glue it to a non-slip backing for safety, which can be found at IKEA called STOPP FILT.
Round rug made of twine and waste fabric

Where can you use scraps of fabric? Do not throw it away under any circumstances, because if you have a lot of free time, using this method you can make a small cup holder or a large interesting carpet for the floor with your own hands.
For this work you will need a lot of unnecessary scraps of rags, twine (jute rope or twine), a hook, a needle and thread.
Step-by-step operating instructions: 
When the first skein of fabric ends, use a thread and needle to sew on the end from the next skein. Or we twist the end and beginning together, then you don’t have to use a needle.


HEALTHY! It is better to make a rug on a flat surface. If you see that it begins to bend, then you can make two columns from one loop. In some places, you can remove fabric strips to level the product.
The craft will last a long time if used nylon tights, not fabric.
Instead of fabric scraps, you can also use a clothesline, and strong threads instead of twine. As a result, the rug will be harder and more rigid. See the photo for more details:
Rope or jute rug

To create this masterpiece from scrap materials to decorate a room in a nautical or Scandinavian style, choose rope. You will also need a sharp knife, silicone glue And thick fabric for the base. Making this craft yourself is quite simple, here is the description:

Everything ingenious - simple and fast!
The second option for handicraft made from these materials is a rectangular door mat for the hallway. Let's describe its creation step by step.
To make it, you will have to buy the cheapest rug in the store, or look around the house to see if there is an old one lying around in the pantry. The main thing is that it fits in size.

Rug made from shreds and clothesline
Sometimes thin scraps of needlework remain and housewives throw them away, believing that they are useless. But if you add a clothesline and thread with a needle, you get a nice handmade floor rug. What do I need to do:- Take a clothesline and a piece of fabric. We begin to wrap the rope tightly in a spiral.
- When the length of the wrapped rope is enough to form two rows, we roll the rope into a bagel and on one side (the wrong side) we begin to sew the rows of the rug together. One stitch in the first row, a second stitch in the second row and tighten them by pulling the thread.
- We make the next circle and stitch again. When one piece ends, we put the next one on top of the end of one piece and then wrap it around the rope. If the pieces do not hold well, you can grab them with a needle and thread.

This is how you can give thin scraps of unwanted rags a second life.
Rug made from old towels
Old terry towels in the household they are often used as rags, but needlewomen can also use them to create a chic carpet for the bathroom, without having to sew anything.
Follow following instructions for a soft and fluffy result:
- Finding the terry towels you are going to get rid of.
- Cut them into strips approximately 2 cm thick and 12 cm long.
- We buy the desired size of plastic mesh at a hardware store.
- We tie the cut rags to the mesh, securing them with a double knot.
- When the cells are large, you can tie two strips to one partition.
- By alternating colors, you can get a pattern on the rug.
An original design version of a rug made from various materials
The advantage of the following product is that you can use any materials to make it: threads of different colors, ropes, pompoms, braid, strips from old clothes (denim stripes look good), grass yarn, etc.Making the base:

ATTENTION! All warp threads should be on one (front) side of the cardboard, on the back side there will only be loops between the cuts along the edges.
Weaving:
Waterproof polyethylene mat
A good country option for the street. Such crafts can be made from plastic bags accumulated at home. A real housewife always has a bag of bags at home. Products made from garbage bags are softer, especially since now you can find almost all colors in stores: purple, yellow, black, red, blue, green, etc. You can make rainbow versions or with a gradient. You open the door, and there is a rainbow at your feet.You can watch the manufacturing tutorial in the video:
Stages of work:
- Fold the bag four to six times so that you get a thin strip: the bottom of the strip is at the bottom, the handles of the bag are at the top. Cut off the bottom and handles, cut the remaining strip into pieces of 3-4 cm.
- We straighten the resulting pieces to form rings.
- We tie the rings together using a loop. Take two rings. We thread the first one inside the second ring, then straighten the ends of the first ring and pull one end into the other and we get a loop, fix the loop on the second ring.
- We make a ball from the resulting several meters of tape of polyethylene rings and begin crocheting.
- To knit a circular product, start with a ring of 6 loops, then rows are knitted in single crochet columns, from each loop two columns are knitted in the next row (or at your discretion, the main thing is that the work does not bend).
While visiting your grandmother, you probably saw small handmade rugs in her house. Our ancestors did not throw away old things, they gave them a second life. Once you learn how to weave a rug from scraps without a hook, you can create it yourself. It will not only decorate your home, but also a very practical thing to use.
There are quite large crochet hooks on sale, but such a rug can be made without tools.
Round rug
The simplest version of a rug made from scraps of fabric is round. To make it you will need:
- Old fabric items;
- Scissors;
- Needle;
- Threads.
If you just want to recycle old items by creating a shoe mat, feel free to use any fabric. If you have ideas to fit this product into the interior, carefully select the color and texture of the fabric.
Start by cutting the fabric into long strips.
If the fabric is fraying a lot, it is better to sew each strip and turn it inside out, leaving the seam inside. This is quite a labor-intensive task, but a product made from treated fabric looks neater and will last longer.
From the resulting pieces of fabric you need to weave a braid. The tighter it is, the stiffer the resulting rug will be; therefore, if you want a soft rug, then do not twist the braid too much.
Secure the ends of the scraps with a pin.

And start weaving.
Having reached the end of the ropes, you need to lengthen them. If you tie a knot, it will turn out rough and ugly. There are two options - carefully sew on a new end or make cuts at the ends of the flaps and stretch an additional rope through the working end and insert its tail into the cut. Pull gently and you have a long rope without any knots or stitching. The whole process is clearly visible in the photo:


You need to make a long enough braid.

Do not process its ends yet, but simply grab them with a pin so that they do not unravel. If during the process of making the rug you want it to be larger, simply attach new pieces of fabric and braid it until you get the desired diameter of the finished rug.


You can braid the braid with ribbon instead of thread. To do this, weave it with zigzag stitches either into the side of the carpet or into the working braid thread. Pull the tape and it will connect the parts together.
For greater strength, it is better to completely weave or stitch the edge row of the rug, then the product will definitely not fall apart.

The round rug is ready!

Bathroom decoration
You can make a comfortable and practical bathroom rug yourself. For this you will need:
- Old towels;
- Ruler and tailor's chalk;
- Sewing machine;
- Tailor's scissors.
The process of making such a rug differs little from that described above. To begin, cut the towels into long strips 4-5 cm wide.

Connect the first three pieces using sewing machine. You also need to increase the “working thread” using this sewing tool.

When braiding a braid, the raw edges need to be folded inward.
During the assembly process, you need to stitch the rows on the machine.

The bath mat is ready! It is very soft and pleasant to the touch, absorbs moisture well and can be washed.
Woven models
Rugs from shreds can be woven using a base. It looks like a small loom. Make a frame out of wood that will fit the size of your rug. It can be rectangular or square, it all depends on your idea. You need to put nails on the frame at a distance of 2-2.5 cm from each other.
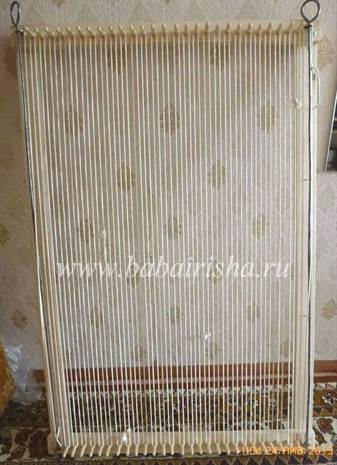
For these purposes, you can use a furniture panel or an old table. Making the machine is not difficult, and it will serve you for a long time.

Strengthen warp threads made from pieces of fabric onto them. On the leftmost warp thread, reinforce the working thread. It's best to sew it on. Weave the rug by passing the rope over one warp thread and under the other. You can use more complex techniques and weave with two working threads at once. During the weaving process, the fabric must be constantly pushed up to make it denser.
Every housewife wants her home to radiate warmth and for her family to want to return to their home as soon as possible after a hard day of work. In many ways, the “weather in the house” depends on the overall interior of your home. It happens that you have bought something expensive and beautiful, and there are fashionable chic curtains hanging on the windows, and the floor is covered with a thick fluffy carpet, but you don’t feel an atmosphere of comfort and warmth in the house. Every housewife can correct this situation.
The topic of today's article is crocheting rugs with a description of the work. Everyone knows that things made with love and care with your own hands always radiate positive energy. Add items made specifically by you to your home, and you will immediately notice how positive side the aura of your home will change. Crocheted rugs are exactly the items that will fill your home with warmth and comfort. In addition, they will harmoniously fit into the overall modern apartment or a country house.


Master knitters have learned to knit rugs for the home not only from yarn, but also from such unusual materials as scraps, plastic bags, and old clothes cut into strips. And believe me, rugs made from these materials look very original and interesting, and are practical and durable in everyday use. The master classes offered in this article will tell you how to crochet a rug from different materials. You will definitely put something in your “favorites”, or maybe you will be inspired and immediately take up crocheting rugs for your home.
BEST OPTION FOR BEGINNERS
Even the most inexperienced knitters will be able to cope with the master class for beginners without any problems. It is recommended to start mastering the technology of knitting rugs from a square rug onto the floor. In the photo you see an example of such a square rug.

To knit this type of rectangular rug you will need thick cotton yarn, which knitters call “spaghetti.” Choose yarn colors to suit your taste.
Step-by-step master class with description
Cast on a chain of v.p. the length you need.
1 row. Knit all stitches st. s/n. Turn the knitting to the wrong side.
2nd row. Knit all stitches st. b/n. under the front wall of the loop. Turn the knitting over to the right side.
3rd row. Knit st. b/n. under both walls of the loop.
4 row. Knit the same as 2nd. 5 row. Columns s/n. knit under the back wall of the loop.
Row 6 and all subsequent rows are knitted in a pattern repeated from the 2nd to the 5th row.
See the video for an example of such work.
GRANDMOTHER'S RUGS
As a child, most of you probably had so-called “grandmother’s rugs” in your room. These are multi-colored round floor mats crocheted from strips of fabric.

In order to crochet a “grandmother’s” rug from scraps, you will need a No. 10 hook and scraps of fabric. The flaps need to be cut into strips and sewn (or tied) together, rolled into a ball.
We knit in a circle with single crochets. To do this, you need to know the “rule of the circle” developed by knitters: cast on 3 ch. and connect them into a ring. Next, into a ring of 3 vp. knit 6 tbsp. b/n. Now divide the circle into 6 wedges and evenly add 6 tbsp in each row. b/n. on a circular row. In other words, it should turn out like this: 1 row - 6 tbsp. b/n., 2nd row - 12 tbsp. b/n., 3rd row - 24 tbsp. b/n. etc. If you knit a round rug according to this pattern, but only knit single crochets behind the back wall of the loop, then the rug will turn out to be more embossed. The photo below shows how to knit st. b/n. behind the back wall of the loop.
The crochet pattern for a round rug looks like this:


It is fashionable to lay such a rug on the floor or cover a chair or armchair with it. For more details on the work process, watch the video tutorial.
RAG CROCHET FROM RAGS
This is an interesting rug that you can make if you knit it from strips of fabric that are cut from old clothes. Using this type of crocheting a rug from rags, you kill “two birds with one stone”: you get rid of unnecessary things and create a practical, necessary thing for the home.

To make a crocheted rag rug, first of all, prepare the material for knitting. To do this, go through yours, separate the selected unnecessary items along the seams and cut in a spiral into strips 1.5-2 cm wide. We sew the strips together and wind them into balls. You will need a thick hook for knitting from stripes - No. 10 or more.
Start knitting with 8 chain stitches, which need to be closed into a ring. Next we knit st. b/n. according to the “rule of the circle”, the knitting technique of which is described in this article above. Uniform additions are needed to ensure that the circle is flat and not convex like a hat. If during knitting the circle turns out to be wavy, then this problem can be corrected by subsequent steaming and ironing of the rug. Everything is simple and clear. In a couple of evenings you can easily knit a warm home rug.
Video tutorial: how to make a rug from old things.
RUG STAR CROCHET
This pentagonal knitted rug looks original and interesting in the interior of your home. Job description below.

You can knit such a star-shaped rug from any desired material: yarn, bags, scraps.
Knitting starts from the center. You need to dial 5 ch. and close them in a ring.
1 row. 3 v.p. lifting, 2 tbsp. s/n. above the 1st ch. previous row, 2 ch, * 3 tbsp. s/n., 2 v.p. Knit from * to * 5 times to form a pentagon.
2nd row. 3 v.p. lifting, 2 tbsp. s/n. above the 1st ch. previous row, 2 v.p., 3 treble s/n., 1 v.p. and then continue knitting according to the pattern shown in the photo below.
The pentagon is knitted in circular rows to the size you need, and then each “ray” is knitted separately.
Crochet rug Star: knitting pattern

If you knit this rug from soft thick yarn, it can be used as a bedspread or blanket.
HOW TO CROCHET A Rug FROM BAGS
An excellent discovery of our housewives was the use of plastic bags for knitting home rugs. Crocheted rugs made from bags are good because they can be easily washed and dried, and they are pleasant to the touch. For the bathroom, toilet and kitchen - this is simply an irreplaceable thing. A rug made from bags is not afraid of water; it will be enough to just shake and dry it.

To knit a home rug from bags, you need to prepare the bags themselves. To do this, any plastic bags are cut into strips 2-3 cm wide, sewn with thread or glued with a warm iron through the fabric and rolled into a ball. Knit with crochet number 4. The photo above shows a rug made from multi-colored garbage bags. One such mat takes about 40 bags.
To knit a rug from plastic bags, two types of loops are used: air loops, double crochets. This rug model is oval in shape.
Cast on the required number of loops. In this sample of a home rug, 12 ch are cast on. + 3 v.p. rise = 15 v.p.
1 row. Insert the hook into the 4th loop of the chain from the edge and knit 5 tbsp. s/n. Further in each century. p. knit 1 tbsp. s/n. 10 times. In the last v.p. knit chains 6 tbsp. s/n. Turn knitting. We knit the other side in the same way, forming an oval. Close the row with a connecting column.


Row 2 and all subsequent rows are knitted according to the pattern. Thus, the middle of the canvas will remain straight, and the edges will expand and round, thanks to the increases in semicircles. The result is an oval canvas. Crochet pattern for an oval rug made from bags:


To decorate a rug from bags, you can knit decorative elements: flowers, leaves, bows.

The rug turns out shiny and bright. And the main advantage of this product is its cheapness and practicality. See the video for examples of work:
RUG ON LOINT NET WITH HOOK
Knitting rugs on fillet mesh is another innovation invented by needlewomen. Such products look rich and lush. At first glance, it seems that knitting a rug using this technique is very difficult. In fact, the work is done easily and quite quickly. Even a novice craftswoman can cope with this task if she already knows how to knit chain stitches and double crochets.

You can use any yarn you want and the corresponding hook number. The knitting process begins with the execution loin mesh the size you need. The photo below shows the knitting pattern.

Once the mesh is knitted, start knitting the outer part of the rug. It is recommended to start knitting from the middle of the fabric, then the pattern will be even and the “waves” will go in one direction. Each side of the cage should be tied with a st. s/n. There can be from 1 to 3 on each side. The thinner your thread, the more stitches you need to knit. Thus, focusing on the drawing diagram, you tie all the “cells” of the fillet mesh.
This is what the reverse side of the work should look like.

Scheme for tying the base of the rug with ruffles:

Knitting pattern for a rug on a loin mesh:

Such rugs have an attractive appearance, and thanks to their structure they look very elegant and rich.
JAPANESE CROCHET RUGS. Master Class
Japanese crocheted floor mats are a special knitting technique. Rugs knitted using this method are unique and inimitable. The interweaving of rings, stripes, interesting combinations of colors captivate at first sight. Look at the next photo. Agree that this is simply a masterpiece!

The base of the rug is a circle. To begin, make a chain of 6 chain stitches and close it into a ring.
1 row. Tie 3 ch into a ring. lifting, 7 tbsp. s/2n.
2nd row. 5 fluffy tbsp. s/2n., 3 vp between them.
3-4 row. 2 tbsp. from 4 lush tbsp. s/2n., knitted together, under v.p. previous row.
5 row. Knit a chain of vp, attaching it to the previous row with half-columns.
Rings. Cast on a chain of vp and connect it into a ring. The length of the chain depends on the diameter of the ring you want. Tie the ring st. s/2n.
The second ring is knitted like this: pick up a chain of chain stitches, pull it through the first ring and connect the first and last loops using a half-stitch. This is how the two rings are connected to each other. Tie the second ring st. s/2n.
Knit and connect all the rings in this way. Connect the first and last rings to each other.
Then sew the rings to the round base of the rug. Or you can immediately, in the process of knitting each ring, attach it to the base.
Japanese crochet rug: knitting pattern


Knitting a rug using Japanese technology is a fascinating activity. Here the emphasis should be placed on the correct selection of yarn colors. And then stylish and colorful handmade rugs in Japanese style will update and complement your room.
CROCHET KNITTED RUGS FOR CHAIRS
All of the rug models presented above can serve as a cover for chairs or stools. But I would like to show you another very pretty model- a crocheted chair rug that your children will especially like. Look at the photo below. Beauty is something you can't take your eyes off, right?


We will need light yarn (wool or wool mixture) and the remains of red, black and pink threads.
The base of the rug is a circle knitted from light-colored yarn. In knitting a circle, air loops and single crochet are used. Knit a circle according to the “rule of the circle”, which is described in this article above and according to the pattern. To make the rug warm, it is recommended to knit two circles and sew them together. For children who are very cold, you can also insert a layer of padding polyester between the circles. Then, focusing on the diagrams presented in the next photo, make eyes, mouth and ears, sew them to the base and that’s it - the children’s crocheted rug for a chair is ready. Patterns for crocheting a rug for chairs:

Your baby will love this knitted cover for a stool. He will be happy to sit on it, play, and maybe even sleep.
A continuation of this idea of toy rugs can be coverings for chairs in the shape of the faces of other animals. And bright, and beautiful, and fun!
All models of home rugs presented in this selection are distinguished by their simplicity in design (suitable for beginners) and attractive appearance. Don't be afraid that your homemade rug won't fit into your modern interior. Approach with creativity and inspiration the selection of the model and color scheme of the future rug and the result will pleasantly surprise you. Experiment and everything will work out. Enjoy your time with your hook and ball!
We crochet a rug from old things, knitted yarn, bags and much more.
How to create comfort in your home is probably the most popular topic among women of all ages! And no matter whether a young housewife or an experienced one, everyone wants to update and add a cozy zest to their home. Handicrafts are especially good at this, because you can create unique masterpieces with your own hands for very affordable money.
In this article we will tell you (and hopefully inspire you) how to knit a floor rug using a wide variety of techniques. We hope that after reading this article, you will add at least one exclusive rug to your home!
Round crocheted rug for the floor for beginners: diagram, description, master class, photo
There was a time when we actively threw away textile rugs knitted by grandmothers from old yarn and scraps, even from dachas and summer houses. But a few years ago, just such rugs became trendy, but with some modifications. So - we knit fashionable grandma's rugs.
For knitting, we need bright knitted yarn of one or more colors. If it’s too expensive for your budget, you can make this yarn yourself from old knitted T-shirts. Details on how to do this in the video below.
Video: Yarn from a T-shirt. Knitted Improvisation
The yarn is ready, let's start knitting! We take the thickest hook that is in the house and start knitting. Remember, the ease of work and density of the mat depends on the size of the hook. We knit an air loop and carefully hem it with thread No. 40 to match the knitted yarn for convenience. And we start knitting:
Row 1: 2 chain stitches and 11 double crochets.
2nd row: 2 chain loops and 2 double crochets from each loop (according to the diagram).


3rd row: 2 double crochets and 2 double crochets from one loop (according to the diagram).


Row 4 and subsequent ones: according to the pattern, each time adding one double crochet in each section.


We knit the last row to the end and tighten the last loop tightly. As at the beginning of knitting, we hem the edge with thread No. 40 for strength.


Please note that such a rug can be knitted with either plain or multi-colored threads. But it is important that the colors come in sections, and not ripple like our grandmothers. It is this trick that distinguishes fashion models from grandma's rugs.
Crocheted square rug for the floor from old tights: diagram with description and photo
For those who have already cut up all the T-shirts, but really want to create, don’t be discouraged and take out the tights! In this section we will teach you how to knit an interesting and very original rug from tights! So, we will need everything, we will notice everything! Unnecessary tights and granular filler of your choice, it can be holofiber, silicone, etc.


We cut the tights into different pieces from 10 to 20 cm; different colors of tights will give the rug texture. We sew each piece on one side, fill it and sew it tightly into a “pebble”. If the tights are thin, we wrap one stone in several layers of tights so that the filler is not visible. We sew the “pebbles” together and sew them to the base. The rug of “soft stones” is ready!
Well, that's not the only way to turn the ordinary into the wonderful. We complement our master class with several inspiring videos.
Video: Rug FROM TIGHTS
Video: How to knit a rug from old tights?
Crocheted oval rug for the floor from old T-shirts: diagram with description and photo
And in this section we will tell you how to create a beautiful oval rug from old T-shirts or knitted yarn. We talked about exactly how to cut and fasten T-shirts in the first section and won’t dwell on that.
We collect from 6 or more air loops. Limitations - the size of the place where the rug will lie. The calculation is simple - the width of the desired product is divided in half and subtracted from the length of the product. Do not forget that when knitting the chain stretches by 30-40%.


After finishing knitting, you can sew/glue the rug to the base so that it is rigid and does not bunch up at the edges.
Crocheted rectangular rug for the floor from old jeans: diagram with description and photo
Another simple and original rug, now made from old jeans. We will need a large mesh from a hardware store and jeans cut into 5*15 cm pieces.


At each crossing of the mesh, use a hook to thread a piece denim and tie it in a knot so that the ends diverge in different directions. If desired, the ends can be slightly tousled, then the rug will look even more delicate. Just? Yes! Beautiful - of course! Ideal for youth housing.
The same option looks great with knitted pieces.


Video: Rugs made from old things
For those who want to knit an openwork rug, you can take both cord and knitted yarn. The essence of knitting will not change because of this, but the size and, naturally, thickness of the carpet directly depends on the thickness of the yarn. Please note that openwork rugs, unlike dense products, cannot be glued to a dense lining.


Knitting is quite simple. One air loop hemmed for strengthening and further according to the diagrams below.


Don’t forget to also thread and reinforce the last loop at the end.
Video: Knitting together an oval rug from the “Lacy” cord
Video: Crochet floor mat star made of knitted yarn
Crochet rug for the bathroom floor made from plastic bags
A bathroom rug made from plastic bags looks very impressive. But its production will require a lot of effort and time. This is worth remembering before you start working.


Preparation: cut from garbage bags(or any other dense) strips of the same thickness (3 cm for those that are thinner and 1.5 cm for dense ones). We cut lengthwise and then tie it with neat sea knots.
Since the knitting technique from a row is easier to see once than to read a hundred times, we have included three step by step videos which you will probably quickly knit your first and perhaps not the last rug from the packages.
Video: Crochet rug from bags, part 1
Video: Crochet rug from bags, part 2
Video: Crochet rug from bags, part 3
Video: Making a mat from plastic bags
Crochet rug for the toilet floor
And these rugs can be knitted from a wide variety of materials, everything is limited only by your imagination! Below we present a pattern according to which we knit one motif, and then repeat the same six copies.


Now we need to connect the elements according to the following diagram, after which all that remains is to wash and starch the openwork rug.
Video: Crochet rug from sheets
Now it's time for the delightful rugs for the stools. To work, we will need all kinds of leftover yarn, or purchase a lot of multi-colored threads.


We knit 12 air loops and connect them into a single ring, after that we knit 5 air loops and knit the core - 24 columns with 5 crochets. The element is ready. Next, we knit exactly as much as required and use threads and a gypsy needle to sew the elements into a single rug.


Video: Crochet rug made from motifs with twisted columns (rug crochet)
Sometimes you need a simple, yet durable rug, most often for the veranda, hallway or dacha. In order for dust and fine dirt to pass through it well, and for minimal maintenance, a mat without a lining is required. Rope and thin thread are great for this.


So, we take the rope, fold it as in the photo and stitch it with thread No. 40. And then we knit layer by layer in single crochet columns so that the cord is always inside. These can be both small and very impressive carpets.

If you want the carpet to be oval, then instead of a circle, tie a cord of the required length around the first row and then just like in a knitted rug, only with a cord inside.
Video: Rug knitted from cord
Video: Crochet rug made from twine


