
Often, children, in their free time from school, try to build something interesting on their own out of paper. But as a rule, nothing comes to mind other than standard airplanes and frogs. And here, naturally, parents - caring fathers and mothers - should come to the rescue. They know for sure that with cool boats, made in a matter of minutes from available material, you can captivate your child so much that he simply, simply, forgets about everything in the world. Imagine, Dear friends, all of you together as a friendly family fantasize and design ships, boats, boats, sailboats, and then put them into the water to see the enchanting sailing of paper masterpieces. If you also want to have fun with your children, but are not entirely aware of this technique, then we suggest you read our article. She will provide 6 ideas on how to easily and simply make a paper boat with your own hands. The crafts will turn out beautiful and clear, let's look at them now.
A simple boat made from a sheet of A4 paper
This is the simplest, fastest and most common version of a paper boat. Both small children and adults can do it. To create simple craft from sheet A4 with your own hands, you should read the step-by-step instructions, as well as photo and video descriptions.
You will need:
- A4 sheet of paper.
Progress:
- Fold the sheet in half 2 times.
- Next, unfold the sheet once.
- Now fold the upper halves of the sides towards the central fold so that you form an angle.
- Bend the lower parts of the workpiece upward on both sides, and when you fold it, there will be extra corners left. These corners must be bent beyond the triangular part of the workpiece. Let's do the same on the second side.
- Now open the triangle and fold along the other folds. Carefully work out the folds of the sides.
- We bend the lower corner of the diamond upward, but not reaching the upper corner by about 2 cm. We do the same on the other side, turning the workpiece over.
- Now we open our workpiece and fold it along other folds.
- Holding the side corners, open them by pulling them in different directions. You will have a beautiful boat formed. To better approach our idea, we have prepared a video for you that will help you cope with the task quite quickly.
Ship with sail
If you don't know how to make a paper boat with a sail yourself, then take into account our provided idea. It takes longer to make such a masterpiece, but it turns out more interesting and beautiful. In terms of complexity, it is not too different from the first one, so it is quite accessible for a child to complete. Let's look at the step-by-step instructions to gain the necessary knowledge and skills to create it. 
You will need:
- A4 sheet of paper;
- Blank from sheet 12×5 cm and 3×3 cm;
- Thin wire;
- Scissors;
- Large needle;
- PVA glue.
Progress:
- We do the craft itself in the same way as in the first version.
- Use a needle to make a hole at the top of the boat triangle.
- We need to thread the wire into the hole and bend it from below so that it holds.
- We need to make a sail from a 12×5 sheet. Use a needle to pierce two holes for fastening and put the sail on the wire.
- Now we make a flag from a small blank. Bend the sheet in half and attach it to the wire, bending it down. We need to glue the two parts of the flag together.
- Using scissors, cut a triangle on the flag to create two cloves.
- Straighten out all the details of your beautiful paper boat and you can set it sailing. As a prime example, we recommend that you watch our video. It will tell you how you can more easily and easily cope with this creative work at home.
DIY paper boat
Another option is a simple paper boat that you can make with your own hands. Both you and your child will like such a beautiful boat, and most importantly, it will sail perfectly. Let's see how to build such a boat using our step by step description provided idea.

You will need:
- A4 sheet of paper.
Progress:
- Place the sheet vertically on the table.
- Pull the upper right corner to the middle of the left side so that the top edge of the sheet lies parallel to the left edge of the sheet. And we make a bend.
- Next, straighten the sheet and fold it in the same way, only from left to right.
- Now bottom part fold a sheet of paper in half to the fold line of the top part.
- At the bottom curved part on both sides we bend the triangles upward.
- Unbend the upper part and make another fold, pulling the top line to the bottom. This way you will have a horizontal fold.
- Now, along the horizontal folds, we fold the upper part of the sheet into a triangle, bending these folds inward and the rest outward.
- Fold the resulting workpiece in half lengthwise. Turn back.
- Now turn the back side of the sheet towards you and fold it into a triangle, pulling the sides towards the center.
- Fold the lower small triangles along the folds upward. You will end up with a diamond-like shape.
- Pull the side corners to the central fold.
- Fold our workpiece in half lengthwise.
- Now straighten the beautiful paper boat, opening the central fold outward and gradually form a boat. For a more detailed and visual examination of the master class, we recommend that you familiarize yourself with the following interesting video made using the origami technique.
Flat bottom boat
Another option a simple boat made of paper - this is a model with a flat bottom. It will swim perfectly through puddles or along the river. To make such a creation with your own hands, you can read our step-by-step instructions, as well as photo and video descriptions of the idea provided.

You will need:
- A4 sheet of paper.
Progress:
- Fold a sheet of paper like an accordion into 3 parts so that the folds are along the sheet. Work all the folds thoroughly.
- Straighten one fold and fold the other in half, leaving the middle part untouched.
- Then straighten it back out.
- Now at the top, bend two corners inward, focusing on the center of this part.
- Fold the remaining part in the same way, folding the sides towards the middle.
- On the other side, fold only one corner along the side where the sheet is folded in half.
- We bend the previously bent side to the common side.
- Bend half of this part outward and bend it back.
- Now, from the side where 4 corners were bent, we fold 4 more in a similar way, only on the free side.
- On the other side we bend one corner.
- Divide the resulting workpiece into 2 equal parts and begin to form a beautiful boat.
- Fold the part where only one corner was bent along the line where the sides of these triangles end.
- Bend it back and open the workpiece in the middle. You will have the bow of the boat on one side.
- On the other side, straighten the walls and corners to create the back of the boat.
- Now you can do it good craft. To make your creative work easier, we suggest watching a video that will tell and show you how to make a paper boat using the origami technique quite simply and quickly.
The simplest paper boat
If you want to surprise your friends or child with the fastest way to assemble a paper boat, then you should like this option. Such a masterpiece will not float, at least not for long, but it will have original way assemblies. Let's see how to make such a miracle with your own hands.

You will need:
- Sheet of paper (square).
Progress:
- To execute this idea correctly, you first need to fold the square sheet diagonally.
- Now fold the bottom of the triangle (about 1/3 of it) up. Work the folds well.
- Unbend the structure and turn out the lower curved parts so that you get the sides of a beautiful and neat boat made by yourself.
- Our quick assembly product is ready! If you find it difficult to create a craft, then we offer you a video. You'll get through it much faster.
Yacht made of paper using origami technique
In order for you to be able to quickly create such an original paper boat at home, it will not require much effort and time. All you have to do is look carefully at our step by step wizard class and success will be in your capable hands.

To work you will need:
- colored paper (square);
- brush;
- office glue.
Manufacturing process:
- In order for this idea to please you, you need to be patient and show desire. Making a yacht is not at all difficult; on the contrary, it is very exciting. Take a bright sheet of any color and fold it in half diagonally so that you get one large triangle. We bend its edges with our finger, and then unfold it and fold it in half again, but on the other side, trying to form the same geometric figure.
- On an unfolded sheet of paper, we received two longitudinal cross fold lines, which marked the center of our sheet. Now we place the material with an acute angle upward - like a rhombus. We bend its right edge, highlighting the clearly bent side with a finger, and pull it towards the center.
- After this, we need to fold our rhombus with three corners in half, but so that its central part looks outward. That is, the previously bent right corner should look upward, not inward. We will eventually learn something like a triangle, but its right side will not have a sharp shape.
- Now we have to bend the top of the right side of the triangle inward so that we get a small rhombus. We press its upper sides with a finger, creating clear lines.
- Now the top left side We need to bend the diamond we just received from the bottom up, making an acute triangle in this way. We do the same with the right side of our figure.
- We should connect the sharp upper base of our rhombus together, place it on its side in the form of a kind of flag, highlight the fold lines on both sides with a finger, and then turn it back.
- We should slightly bend the acute corner of the unfolded rhombus, then connect the opposite sides of the figure together, pressing them tightly.
- We also have to bend the upper left side of the rhombus outward, pulling it to the very center of the small rhombus. Don't forget to run your finger along the folded lines.
- Now we also need to bend the left side corner of the diamond slightly, pressing it, and unfold it.
- We will need to do the same with the right side of the rhombus.
- After this, we place the right side of the rhombus on the left, and sort of pull the middle of the figure up so that the pipe of the ship looks out.
- We hide the ends of the two sides folded in half inside. We have a five-pointed figure with a pipe at the top.
- Now we bend the lower side upward and pull it almost to the base of the yacht. We fix the folds with our fingers, and then unfold our bottom of the yacht and lift up the edges of the ship so that they are on all sides of the product.
- We have to fasten the back of the craft with office glue so that it does not open.
- Gently straighten the bottom of the product with your fingers and place it on the table to admire. Such a beautiful creative work will appeal to every parent and child as well. The idea may seem difficult at first glance, but with the help of our prepared video, all difficulties will disappear by themselves. If you don’t believe me, it’s worth making such a creation out of paper with your own hands.
Useful tips
Many of us have loved making paper boats since childhood and let them flow in streams. This fun is still popular among those who love to craft.
You can make a boat using plain paper or cardboard. But you can also try materials like tree branches, polystyrene foam, walnut shells and plastic bottles.
You can build several boats and launch them race. Whose boat floats the longest will win.
Let's look at several ship options, starting with two types paper boats.
How to make a boat (diagram)

You can prepare both a sheet for printing, and a landscape or notebook sheet.
Here's how to make a regular paper boat.

This is how you can make a sailboat/frigate

And this is another type of paper boat

How to make a paper boat
The diagram below shows how to make origami boat.
How to make a boat (photo)
Prepare a sheet of A4 paper.
1. Fold the sheet in half lengthwise.
2. Bend and straighten the sheet again to mark the fold locations in advance.
3. Fold the top corners towards the line.

4. Fold the bottom edges up halfway (this must be done on both the front and back sides).

5. Now bend the bottom corners 90 degrees to the top. Do this on both sides.

6. Also, on both sides you need to bend the bottom edges to the end.

7. Taking the folded piece by the center, begin to stretch it.

8. The bottom edge of the square needs to be folded up.

9. Again, take the workpiece by the center and begin to stretch it.

10. The bottom edge needs to be folded.

11. Holding the workpiece by the tips of the corners, begin to stretch it.

That's all!
This is another type of boat, or rather a steamship with two pipes. This steamer is very easy to make - follow the photo instructions.

Prepare a sheet of A4 paper (or a simple landscape sheet) and scissors.
1. First you need to make a square from a rectangular sheet.

Fold the top corner of the sheet so that the top side is on the left side.
Fold and cut off the excess bottom of the sheet and unfold it.
Since one fold line is already there, it remains to make a second one. To do this, fold the sheet as shown in the image, i.e. connect opposite corners diagonally. Next, unfold the sheet.

2. Fold the corners towards the middle.


3. Turn the workpiece over and repeat the same thing, i.e. bend the corners again towards the center.

4. Turn the workpiece over again and repeat the same action a third time.

5. Turn the workpiece over one last time and straighten the two opposite corners as shown in the picture. These corners should turn into rectangles, which will act as the pipes of your steamer.

6. All that remains is to take the product by the tips of the opposite corners and simply unfold it. The steamer's pipes must close together.
How to make a boat with your own hands

As was already said at the beginning of the article, boats can be made not only from paper. Here's what you can do if you use, for example, bottle caps.
Such a craft is not at all difficult to make. Simply glue three or more bottle caps together using superglue, add a toothpick mast and a sail.

If you wish, you can tie a string with a reel to your boat so that you do not lose it and can return it.
But what a cute boat you can make using walnut shells.

To make such a boat, you first need to carefully split the walnut into two even halves and clean it of the insides.
Light a candle and then drip paraffin into the shell.

While the paraffin is in the shell liquid form, insert a toothpick, which will serve as the mast of the ship.
Once the paraffin has hardened, you can decorate the ship. For example, add a paper flag or sail.
Here's how to make a boat from tree branches.


DIY paper boat made from candies
1. First you need to trim off the excess from a piece of foam to give the shape of the future ship.

2. For a good poop, glue on a few flat pieces.

3. So far the ship is not very level, which means we will correct the situation with the help of papier-mâché.
Parents have been making paper boats for their children since the invention of paper. After all, this simple toy gives children a lot of joy when they play it in the bathroom, pond, stream, puddle or even river. In the photos below you can see a vivid example of this magnificence.
The lonely sail is white. In the blue sea fog!..)))

Here they are, beauties. Amazing, isn't it?

By the way, do you remember how to make this beauty? 🙂 It doesn’t matter, because today’s article is intended to help you with this!
What paper is best to make a boat from? Tissue paper is perfect for making a paper “vessel,” but you can fold it from newspaper or regular notebook paper.
Let's see how to make a paper boat in the most common way.
By following the description and visual illustrations below, you can easily and simply make a paper boat. So…
All we need to make a paper boat is an ordinary rectangular piece of paper. Well, straight arms, of course :) Well, let’s get started.

Fold a rectangular piece of paper in half and make a vertical fold

Fold one top corner toward the center line

Fold the second corner to the midline

Fold the flap up on one side, as shown in the picture.

Fold the second flap up


Grab the center points and pull, turning the triangle into a square


Bend the corner on one side as shown in the picture, unfold it, and do the same on the other side.

Fold the second corner

Stretch the center points


Grab the edges and stretch the shape

The paper boat is ready
For clarity, in addition to the diagrams presented above, I recommend watching a video on making paper boats. 🙂
How to make a paper boat (video)
How to make a paper boat (video)
Well, we watched the video, made a boat, filled a bath with water... We can play! 🙂
Hi all! It’s almost spring, and then summer is here. The most beautiful and warm season will begin, the streams will run and we will all go hiking and have a picnic. The children will launch boats into the sky, and we will fry
By the way, a paper boat is excellent, and it’s the same for May 9th. Therefore, if you are still in doubt, you can use this particular toy and you will be happy original idea for a small souvenir.
As a child, I really loved such games in nature, and when I grew up I began to sit and fold different figures out of paper, I really liked this activity. Now my favorite naughty girls and I often make such creations.
Do you really know the answer to this question? After all, putting together such a figure is not difficult in principle; the main thing is to then decorate and design it in some special way.

The simplest technique is origami, so I’ll start with that.
1. Take a rectangular sheet such as A4. Place it horizontally in front of you.

2. Then fold in half as shown here.


4. And then open it to its original position, but the line will be visible.

5. Draw a line with a pencil.

6. Now you need to make a triangle on top.

7. This is what happened. Do everything carefully and so that it turns out symmetrically.

8. Now, bend those ends that have formed.

9. After this, iron it with your hands.

10. You need to bend the resulting corners on both sides.

11. Then begin to reveal the intended stencil.

12. You will get a square like this.

13. Bend the bottom corner.

17. And close as shown here in this picture.

18. Bend the other side as well.

19. Start opening the craft.

20. Pull the two ends.

21. So it turned out to be a handsome white man.

Simple paper boat folding patterns
Now you can use another guide to make a bunch of other and brand new models.
1. Take a sheet square shape and roll like this.

2. Fold each corner diagonally to form a triangle.

3. You will get a figure like this.

4. Take the next action.

5. And then fold and iron the corners on both sides to the center line.

6. Almost everything is ready, only a small matter remains. Namely, expand the figure.

7. Use your fingers to open and gently press everything against the walls of the boat.

8. This is such an interesting and funny toy, the kids will be delighted. Place your favorite cartoon characters in it and have fun playing with your child.

If, in short, or in general, you have already learned how to make such a boat, but at some stage you forgot, I am ready to offer you such a small scheme that you will definitely remember, copy it to your desktop so as not to forget))).

You can also make such a boat, it also resembles a closed boat. The diagram should be read from left to right. She swims perfectly in the stream and does not drown.

I think that even if there is a storm, such a toy will cope with it.

Step-by-step instructions for a DIY boat
Do you like the fairy tale Scarlet Sails? There such a beautiful and graceful ship sailed with such luxurious sails. If you are looking for just such an option, you can watch this video:
And if you prefer to do something simpler, then this instruction will come to your aid and will come in handy.
1. Make a square out of a regular sheet of paper and fold it in half to form a triangle.

2. Then unfold it to its original position and bend the sheet in half.

3. These are the lines you will get, one diagonal and the second horizontal.

4. Fold the leaf in half again.

5. And where there is a diagonal, bend the ends to this line to make triangles with equal sides.

6. Now fold the sheet of paper in half in the opposite direction.

7. Unbend again to the starting position and follow further instructions.

8. Take the corner on the left and apply it to the center.

9. And then fold it in half, and the left corner will have to be bent inward.

10. Do the same with the right corner.

11. After this, you will have to bend the very bottom corner of the paper, you will get a base, which you will hide inside.

12. This is such a funny toy that will certainly delight your mischievous baby or toddler.

Making a boat that doesn't sink in water
I offer you quite interesting models which are made of cardboard. Moreover, you can come up with such a miracle yourself. The main thing is that you need to find high-quality cardboard and have it be glossy on the other side. This type is usually not sold in stores; all kinds of souvenirs are packed in it.

Then ask your child to make decorations or decorate for him. In general, make it irresistibly beautiful.

Can be made from ordinary plastic cups or plates.

And, you can, hee hee, of course it’s a joke, and sail on such a creation on the lake yourself).

Also good idea take a milk or yogurt bag, i.e. a tetra pack, and use it to make a craft like this. Don't forget the checkbox.

Great option to use in action plastic bottle, it will never sink and such a boat will serve you for a very long time.

By the way, they also make structures from foam plastic and other available materials.

Step-by-step paper boat master class for beginners
Well, I would like to touch on the topic and show the youngest children another option that can be used for kindergarten.
1. Take a square sheet of paper, you can take regular white or colored.

2. Fold it in half to form a triangle.

3. Bend the bottom end to the top, as shown in this picture.

4. Now, where you have a fold line, drag the bottom corner up, as if turning it inside out.

5. Here, the fold line is marked, in case you didn’t understand.

6. And this is what happens.

7. You can trim the tip or hide it. This is such a wonderful and cool creation.

Origami boat from A4 sheet
Now let's look at some more diagrams, for example, how to make a real paper steamship yourself easily and quickly.
There is such a diagram, I think it will be a bit complicated for beginners, but I’ll show you anyway.

I tried to fold it myself, and this is what came out, it’s great and, in my opinion, not difficult.

The kids decorated it.

Here’s another look at the steamer we made before, only its design is a little different. We got two pipes, tu-tu.
By the way, even an ordinary boat can be decorated in an interesting way, take a look, this is like the first option.


You can build a boat with two seats. How? And here's how, look step by step instructions and repeat. Isn't it brilliant?

The first was with a sailboat, and the second without it.

Another option caught my eye.

Well, here are all my good and beloved friends! Make a bunch of these creations, play with your children and smile more often. Good luck to everyone and see you again! Bye bye!
Sincerely, Ekaterina Mantsurova
Origami technique is an ancient and fascinating art that is accessible to everyone. It perfectly develops attentiveness, logic and fine motor skills hands Thanks to our simple step-by-step instructions, you and your child will learn how to create amazing and at the same time simple paper boats with your own hands.
For our master class we took white paper. This is no coincidence, because the boats can be decorated at your discretion. In addition, not everyone has specialized origami paper on hand. So, how to make a paper boat?
DIY classic paper boat
The first model is a classic boat made from A4 sheet. To fold such a paper boat, follow this algorithm:
Take an A4 sheet and fold it in half across the paper. Then start bending the resulting workpiece again. But not completely, but only pinched the corner a little, as shown in the photo.

Focusing on the intended line, fold the upper left corner towards the center.

Fold the second corner in the same way as the first. Run your finger firmly along the fold lines to make them as thin and smooth as possible.

Fold the bottom free edge up, up to the line of the previously folded corners.

Do the same with the second free edge.

Then you will need to secure these edges to the model, making them into kind of corners.

Do this for both edges.

A triangular pocket has formed inside the workpiece. Open it up.

Fold the product along opposite fold lines.

You get a pocket again, this time square. Bend one free edge of the workpiece diagonally.

Do the same with the second edge.

Take the resulting model by the edges and gently stretch it.

Great! You made your own paper boat according to the classic design.

If you have any difficulties making this craft, this video will help you:
How to make a motor ship out of paper?
The second model is a two-pipe motor ship. This wonderful boat floats great on the water and has such a bizarre shape that few people can resist the desire to create a copy of it themselves.
To make a motor ship you will need A4 sheet and scissors.

Fold the sheet as shown in the picture and cut off the excess edge. You have received a square from which you can make a motor ship.

Take the resulting square sheet and bend it diagonally to make a cross like this.

Bend one of the corners across to the center. Do this operation with all remaining corners.


Turn the workpiece over. Similar to the previous point, bend all corners to the center.


Turn the workpiece over again. Fold all the resulting corners into the center again.


Turn the workpiece over again. No, you don't need to fold the corners anymore. Open one pocket as shown in the picture.

Open the opposite pocket.

Unbend the workpiece.

Fabulous! You have made a paper boat.
Watch also the video on how to make such a craft with your own hands:
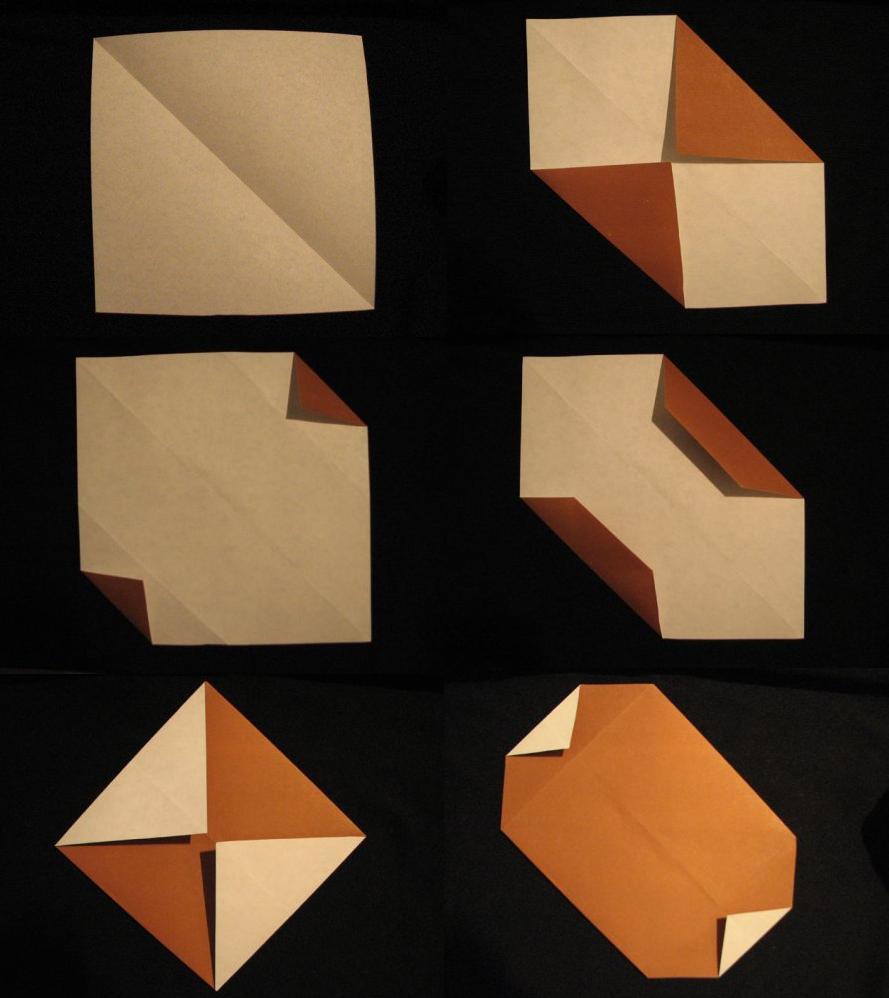
DIY paper boat in the shape of a sailboat
This scheme is easier to implement than the previous two. This type of paper boat is not intended for sailing. When he falls into the water, he falls on his side. But it looks great as a land toy. In addition, if you make many sailboats of different sizes, you can decorate your interior with them.
Like a motor ship, you will need to make a square from A4 sheet.

Take a square piece of paper.

Bend it diagonally.

Fold the sheet along the second diagonal and open it. In front of you is a blank with outlined lines.

Bend one of the corners across, with the sharp edge toward the center.

Bend two more corners in the same way. You will get an envelope.

Fold the bottom part of the envelope in the opposite direction, moving away from the edge by about 1 cm.

Fold the workpiece in half to break the central diagonal in the other direction.

Attention! The most crucial moment! You need to fold the workpiece, pointing the center inward.

Fold the bottom edge of the workpiece, this way you will get a support for the sailboat.

Perfect! Your luxury sailboat is ready!

How to make such a sailboat is also shown in this video:
These three simple schemes will keep you and your child busy for several hours, and the result is a variety of DIY paper boats. All that remains is to paint or decorate them at your discretion and put them on the water!
Tamara Green taught us how to make paper boats
Photo by the author. Copying prohibited


